Microsoft Hyper-V
ZenPacks.zenoss.Microsoft.HyperV
This ZenPack provides support for monitoring the Hyper-V role running on Windows 8, Windows 8.1, Server 2008, Server 2012, or Server 2016. Monitoring for the following Hyper-V entities is provided using txwinrm Async Python WinRM Client or the .NET based zendotnet service. See the Prerequisites section for details.
Please restart zenoss after installing this ZenPack. Note that the commercial zenoss version requires ZenPacks.zenoss.Impact, otherwise the DynamicServices panel will be missing.
Applications Monitored: Microsoft Hyper-V (2008, 2008R2, 2012, 2012R2, 2016), Microsoft Client Hyper-V (Windows 8)
Commercial
This ZenPack is developed and supported by Zenoss Inc. Commercial ZenPacks are available to Zenoss commercial customers only. Contact Zenoss to request more information regarding this or any other ZenPacks. Click here to view all available Zenoss Commercial ZenPacks.
Releases
Version 2.1.1 - Download
- Released: 2024/05/08
- Compatible with Zenoss Resource Manager 6.7 and Zenoss Cloud
- Requires PythonCollector ZenPack, ZenPackLib ZenPack, Microsoft Core ZenPack
Version 2.1.0 - Download
- Released: 2020/09/09
- Compatible with Zenoss Resource Manager 6.7 and Zenoss Cloud
- Requires PythonCollector ZenPack, ZenPackLib ZenPack, Microsoft Core ZenPack
Features
The features added by this ZenPack can be summarized as follows. They are each detailed further below.
- Discovery of Hyper-V entities.
- Monitoring of Hyper-V Server and its components.
- Custom commands for monitoring using WinRM.
- Event management and monitoring for certain Hyper-V states.
- Optional auto-discovery of virtual machine guest operating systems.
- Optional service impact with addition of Zenoss Service Dynamics product.
Discovery
The following entities will be discovered through an IP address, user name and password you provide. The attributes, tags and collections will be updated on Zenoss' normal remodeling interval which defaults to every 12 hours.
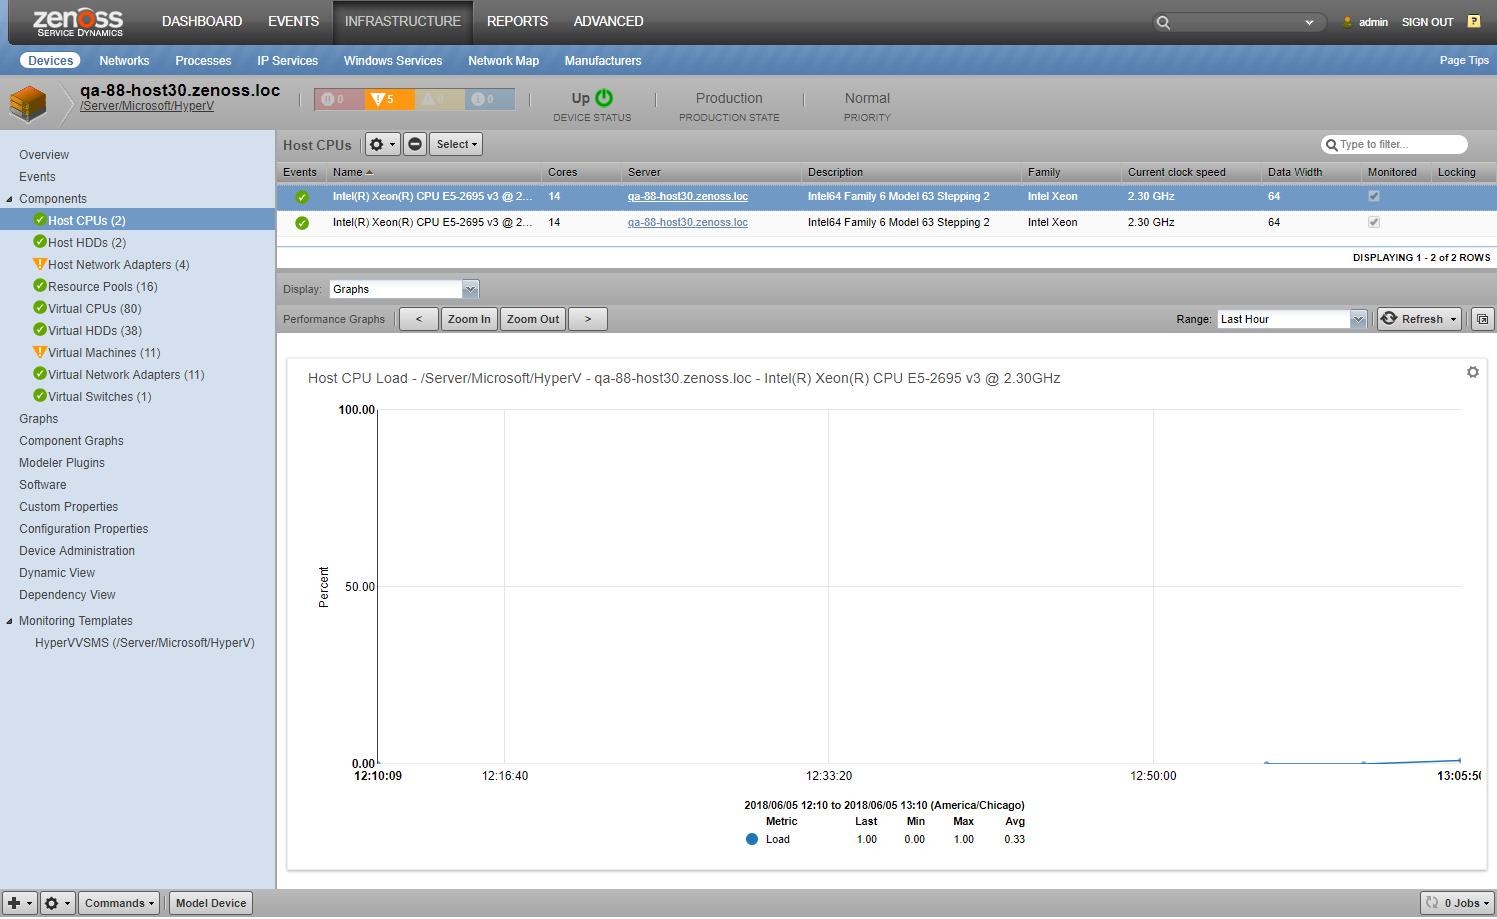
Host CPUs
- Attributes
- Description
- Data width
- Family
- Current clock speed
- Max clock speed
Host CPUs
- Attributes
- Description
- Data width
- Family
- Current clock speed
- Max clock speed
Host HDDs
- Attributes
- Size
Cluster Shared Volumes (CSV)
- Attributes
- Backup state
Host Network Adapters
- Attributes
- IP Addresses
- MAC Address
- Availability
- Default IP gateway
- DHCP server
- Adapter type
- Is physical
- Net connection status
- Speed
- IP subnet
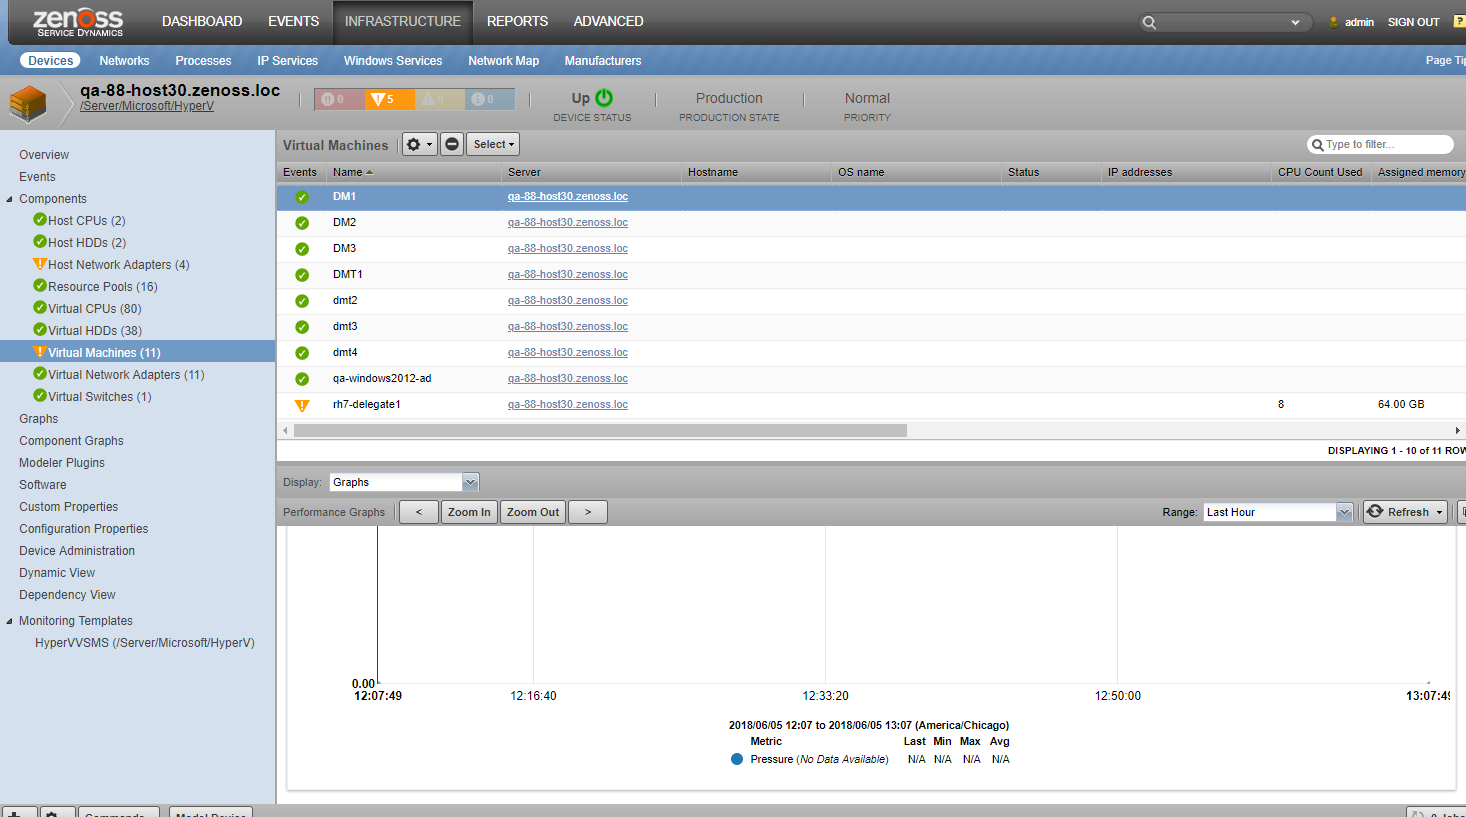
Virtual Machines
- Attributes
- Hostname
- OS Name
- IP Addresses
- CPU count used
- Assigned memory
- Enabled State
- Description
- Install date
- Operational status
- Status descriptions
- Time of last state change
- Time of last configuration change
- OS version
- Collections
- Virtual CPUs
- Virtual HDDs
- Virtual Network Adapters
- Other
- Guest Device (if monitored by Zenoss)
Virtual CPUs
- Attributes
- Description
- Data width
- Family
- Current clock speed
- Max clock speed
- Install date
Virtual HDDs
- Attributes
- Max media size
Virtual Network Adapters
- Attributes
- IP Adresses
- MAC Address
Resource Pools
- Attributes
- Reserved
- Capacity
- Allocation units
- Description
- Operational status
- Health state
Virtual Switches
- Attributes
- Description
- Operational status
- Health state
Note that all the discovered values for the attributes above are shown as of the last modeling time.
Monitoring
The following metrics will be collected every 5 minutes by default. The Average statistic is collected, and the graphed value is per second for anything that resembles a rate.
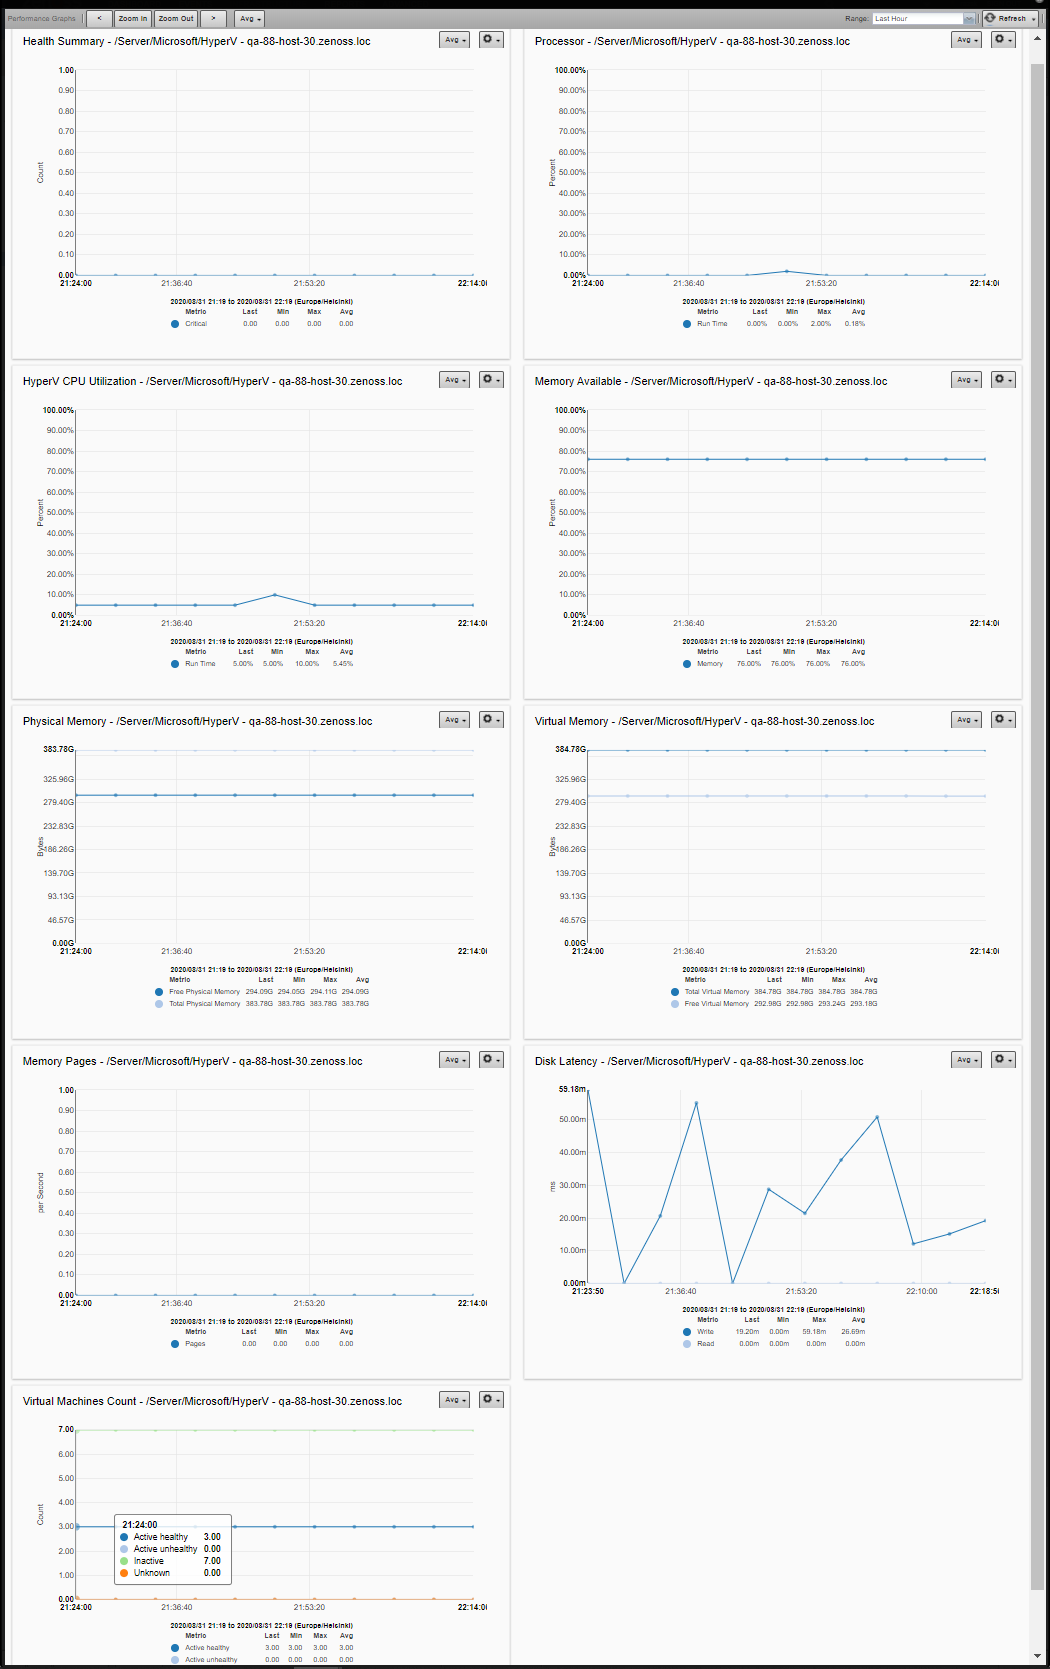
Hyper-V Server
- Health metrics
- Health Critical
- Processor metrics
- Total Run Time
- CPU Utilization
- Total Run Time
- Memory metrics
- Pages (per Second)
- Available Memory
- Physical memory metrics
- Total Physical Memory
- Free Physical Memory
- Virtual memory metrics
- Total Virtual Memory
- Free Virtual Memory
- Disk metrics
- Average Read
- Average Write
- Virtual Machines count metrics by state
- Active healthy
- Active unhealthy
- Inactive
- Unknown
Host CPU
- Metrics
- Load
Host HDD
- Metrics
- Memory Utilization
- Performance (bytes per sec)
- Disk Queue Length
Host Network Adapter
- Metrics
- Network Utilization
- Output Queue Length
- Inbound Errors
- Outbound Errors
Resource Pool:
- Metrics
- Reserved
Virtual CPU:
- Metrics
- Load
Virtual machine
- Metrics
- Total Run Time
- Average Pressure
Virtual network adapter:
- Metrics
- Total Bytes
- Total Packets
Virtual Switches:
- Metrics
- Total Packets
- Total Bytes
Note
Powered off virtual machines report 0% Virtual CPU load starting from Windows Server 2016.
Custom commands for monitoring using WinRM
You can use the custom command datasource in the HyperV ZenPack to create custom data points, graphs and thresholds.
- Use either DOS shell commands or Powershell script
- Use any valid Windows executable or Powershell cmdlet.
- Powershell commands separated by
;. Always end script with;. - For TALES eval, surround by single quotes. e.g.
'${here/id}'. - For Powershell variables, use 2
$. e.g.$$myvar = 10. - There is a character limit of 8192 imposed by Microsoft. Zenoss header is ~450 characters so you have about 7500 characters for your script.
- Use standard parser to parse the
output or create your own
- Nagios have the form
key=value. - JSON - script must put data into JSON format with special requirements.
- ZenPacks.zenoss.Microsoft.Core.parsers.JSONParser - script must put data into JSON format.
- Auto will save a returned value into a data point.
- Create custom parser in
$ZENOSS_HOME/Products/ZenRRD/parsers/.
- Nagios have the form
- Viewing script output
- Create datapoint(s) to collect the data for graphing.
- Create custom parser to send event or transform data.
Note
Platforms' JSON parser requires placing result under "values" and "<component id> or
<device id>" keys. This could lead to additional complexity in writing
commands/scripts. To simplify this, Microsoft Core ZenPack provides its
own JSON parser - ZenPacks.zenoss.Microsoft.Core.parsers.JSONParser.
It expects keys as datapoint names and maps them to relevant
datapoints.
Note
For multiple Powershell commands with pipe ("|") surround them in double quotes.
Note
Avoid using double quotes in Write-Host argument strings. Coupled with Nagios parser it may lead to 'Custom Command Error' Critical events and 'No output from COMMAND plugin' messages in zenpython logs.
Example usage
Script with TALES expression
- Select a HyperV target device.
- Navigate to HyperVVSMS (/Server/Microsoft/HyperV) Monitoring Template.
- On the right side panel, click '+' to add a HyperV Shell datasource.
- Provide name (eg. custom) and type (HyperV Shell) for the datasource.
- Click View Edit and Details.
- Set parser to Nagios.
- Uncheck Use Powershell.
- Set script to echo
OK^|value1=${here/zWinPerfmonInterval}. - Add data point to datasource called
value1which can be graphed.
Using a custom parser
Logon to the Zenoss server and create a python file called test1.py in
/opt/zenoss/Products/ZenRRD/parsers and restart Zenoss
The content of test1.py
from Products.ZenRRD.CommandParser import CommandParser
class test1(CommandParser):
    def processResults(self, cmd, result):
        result.events.append({'summary': 'test1 parser event', 'severity': 5, 'test1.detail': cmd.deviceConfig.name})
- Select a HyperV target device.
- Navigate to the HyperVVSMS (/Server/Microsoft/HyperV) Monitoring Template.
- On the Data Sources panel, click '+' to add a 'HyperV Shell' datasource.
- Provide name (eg. custom) and type (HyperV Shell) for the datasource.
- From the gear button, choose View Edit and Details.
-
Set Parser to test1.
Average Read, Average Write -
Add a Windows command or Powershell script.
-
Run zenpython to collect the data.
zenpython run -v10 -d <devicename> -
Check events after 5 minutes for the test1 event.
Using the Auto parser
- Select a HyperV target device.
- Navigate to HyperVVSMS (/Server/Microsoft/HyperV) Monitoring Template.
- On the right side panel, click '+' to add a 'HyperV Shell' datasource.
- Provide name (eg. custom) and type (HyperV Shell) for the datasource.
- View Edit and Details: parser is Auto, and tick the Use Powershell box.
- Enter script. Be sure to use a double dollar sign,
$$, in order to distinguish any powershell specific variables from a TALES expression. - Add a datapoint to collect the return value from the script which you can then graph.
Event monitoring
According to the following Hyper-V states this ZenPack will trigger events with an appropriate summary message.
Hyper-V Server
Warning events
- Less than 10% of free memory available,
- Disk read or write latency is higher than 15,
- Memory pages per second value is higher than 500,
- Processor total run time is higher that 60%,
- Virtual machine is deleted.
Critical events
- Less than 5% of free memory available,
- Disk read or write latency is higher than 25,
- Health Critical is not equal to 0,
- Memory pages per second value is higher than 1000,
- Processor total run time is higher that 90%.
Host HDD
Error events
- Config manager error code is not 0 (Device is working properly)
- Status is not OK.
Cluster Shared Volume (CSV)
Error event
- Fault state is not 0 (NoFaults).
Host Network Adapter
Warning events
- Network utilization percentage in higher than 40
- Output Queue Length value is not equal to 0
Error events
- Net connection status is not 2 (Connected)
- Availability is not 3 (Running or Full Power)
- The number of Inbound/Outbound errors is more than 0.
Critical events
- Network utilization percentage in higher than 65
- Output Queue Length value is greater than 2
Virtual Machines
Warning events
- Processor total run time is higher that 60%
- Average Pressure is higher that 80
Error events
- Enabled state is not 2 (Enabled)
- Operational status is not 2 (OK)
- Health state is not 5 (OK)
Critical events
- Processor total run time is higher that 90%
- Average Pressure is higher that 100.
Info event - Virtual machine is created.
Guest Device Discovery
You can optionally configure each monitored Hyper-V server to attempt to discover and monitor the guest operating systems running within each Hyper-V virtual machine. This requires that your Zenoss system has the network and server access it needs to monitor the guest operating system.
Service Impact
When combined with the Zenoss Service Dynamics product, this ZenPack adds built-in service impact capability for services running on Microsoft Hyper-V. The following service impact relationships are automatically added. These will be included in any services that contain one or more of the explicitly mentioned entities.
Service Impact Relationships
- The discovered guest virtual machine is impacted by the Hyper-V Host which is impacted by the Host CPU, Host HDD, Cluster Shared Volumes (CSV), Host Network Adapters and Virtual Switch failure.
Usage
Adding Hyper-V Device
Add Hyper-V Device using Basic Authentication
Use the following steps to start monitoring Hyper-V with Basic Authentication using the Zenoss web interface. Please check the Prerequisites section before adding device to ensure the Hyper-V target server has the correct WinRM setting.
- Navigate to the Infrastructure page.
- Choose Add Hyper-V Server from the add device button.
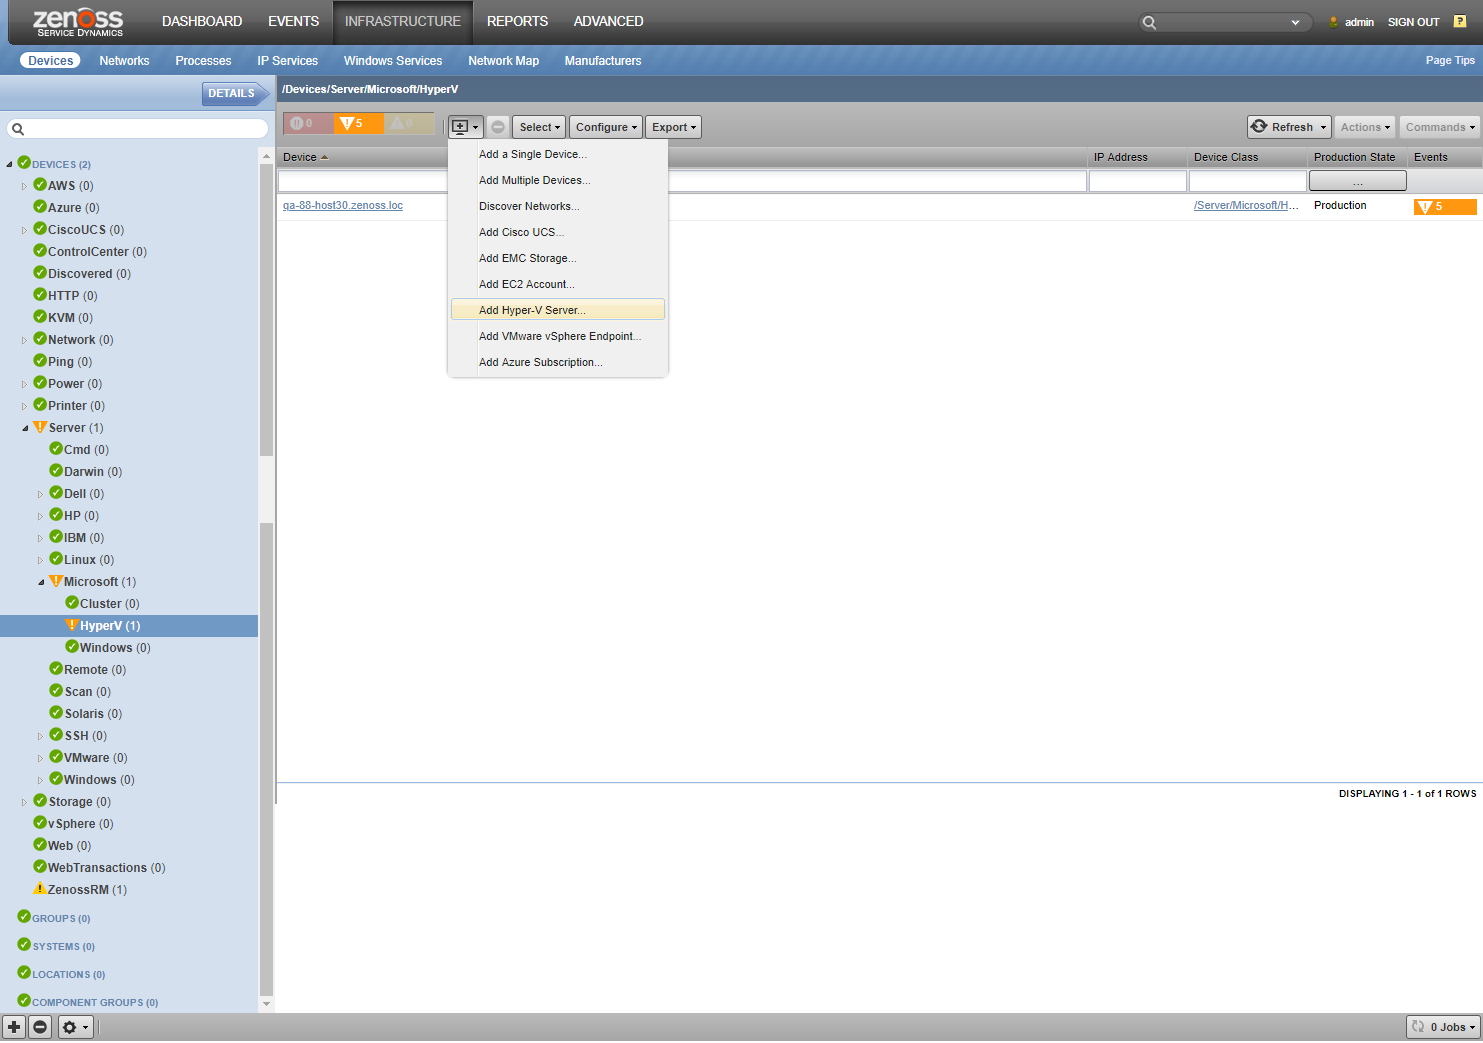
- Enter the Device Name, your Hyper-V server's IP address, user name
and password.
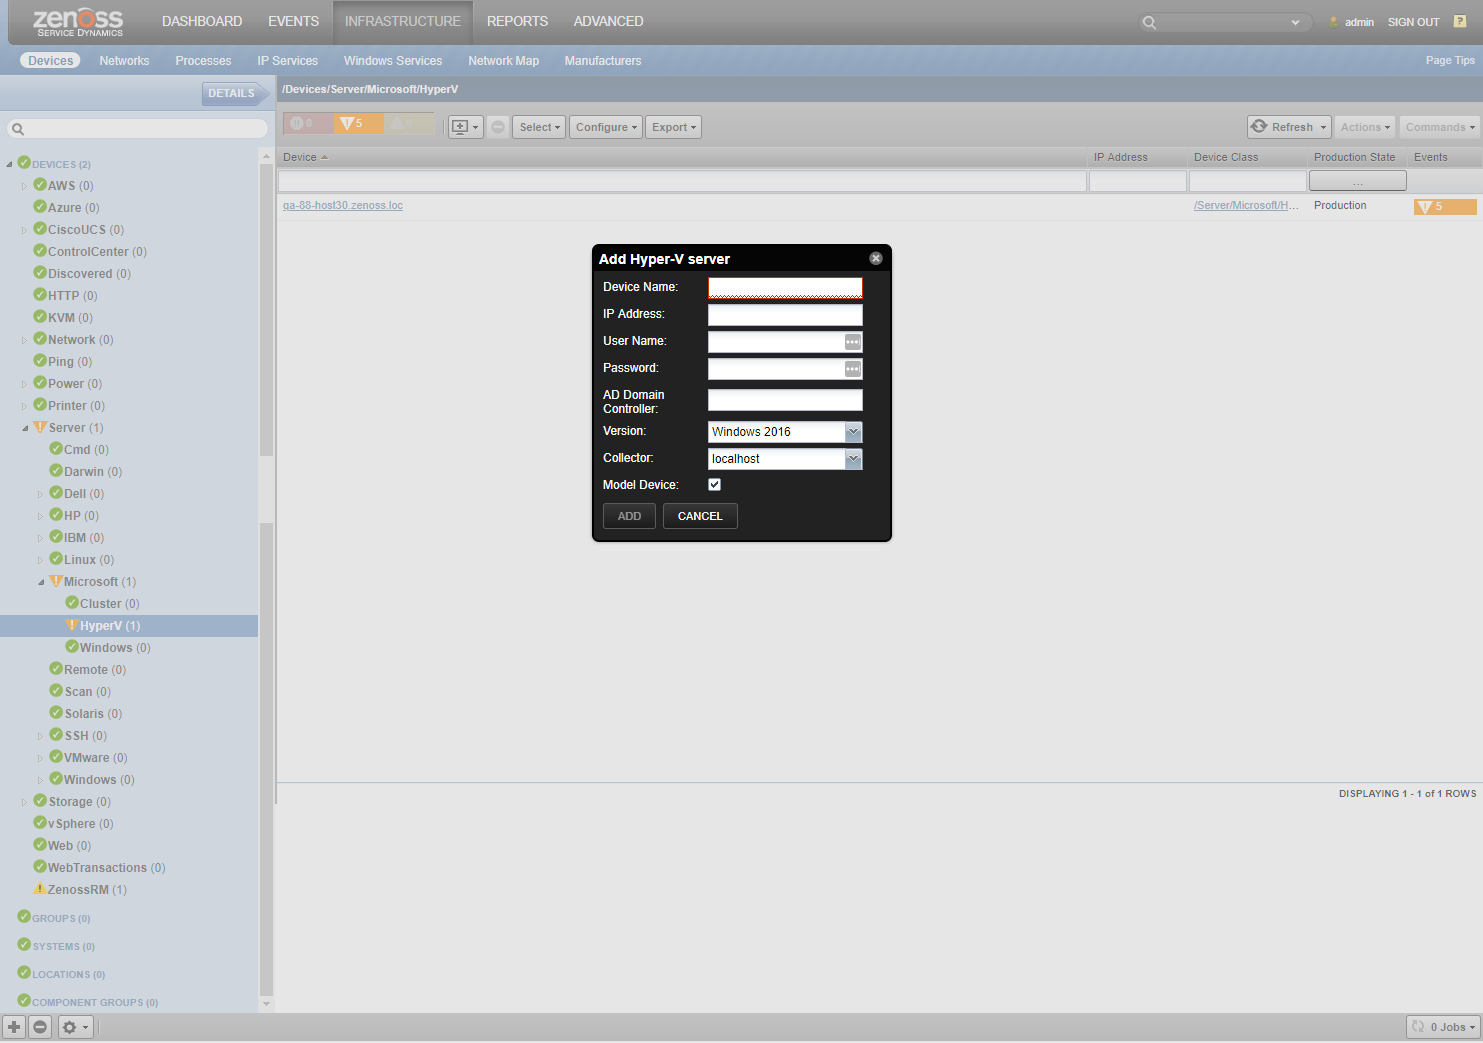
- Choose the version of your Hyper-V server's hosting machine (Windows 2008, Windows 8, Windows 2012, Windows 2016).
- Optionally you can choose a collector other than the default localhost.
- Checkmark Model Device checkbox.
- Click Add.
When adding a device, please make sure that you choose a correct Windows version. Otherwise the device modeling and monitoring may result in an error.
Add Hyper-V Device using Kerberos Authentication
Use the following steps to start monitoring Hyper-V with Kerberos Authentication using the Zenoss web interface. Please check the Prerequisites section before adding device to ensure the Hyper-V target server has the correct WinRM setting.
- Navigate to the Infrastructure page.
- Choose Add Hyper-V Server from the add device button.
- Enter the Device Name, your Hyper-V server's IP address.
- Choose the version of your Hyper-V server's hosting machine (Windows 2008, Windows 8, Windows 2012, Windows 2016).
- Enter password.
- Enter AD Domain Controller IP address or fully qualifed domain name of the Key Distribution Center.
- Choose the version of your Hyper-V server's hosting machine. (Windows 2008, Windows 8, Windows 2012).
- Optionally choose a collector other than the default localhost.
- Checkmark Model Device checkbox.
- Click Add.
HyperV and MicrosoftWindows ZenPacks share krb5.conf file as well as tools for sending/receiving data. Therefore if either HyperV or Windows device has a correct zWinKDC setting, it will be used for another device as well.
Add Windows device with same IP address as Hyper-V device
It is possible to have Hyper-V server in both /Server/Microsoft/HyperV and /Server/Microsoft/Windows. Navigate to the Infrastructure page and use Add a single device... from the add device button. Enter the Device Name, your Hyper-V server's IP address and select /Server/Microsoft/Windows device class. For more specific cases please read Microsoft Windows ZenPack documentation.
Configure existing Hyper-V Device to use WinRM HTTPS
Use the following steps to configure Hyper-V device to use WinRM HTTPS using the Zenoss web interface. Please check the Prerequisites section before adding device to ensure the Hyper-V target server has the correct WinRM setting.
- Navigate to the Infrastructure page.
- Select the Hyper-V device.
- Select Configuration Properties.
- For zWinRMPort, change value from 5985 to 5986 (default HTTPS port for WinRM).
- For zWinScheme, change value from http to https.
- Select the gear icon on the bottom left and click Model Device....
Add Hyper-V Server using zenbatchload
Alternatively you can use zenbatchload to add Hyper-V servers from the command line. To do this, you must create a text file with hostname, username and password of all the servers you want to add. Multiple endpoints can be added under the same /Devices/Server/Microsoft/HyperV section. Here is an example:
'/Devices/Server/Microsoft/HyperV'  loader='hyperv', loader_arg_keys=['device_name', 'host', 'version', 'zWinRMUser', 'zWinRMPassword', 'zWinKDC','collector']
<HOST NAME> host='<HOST NAME or IP>', version='<WINDOWS VERSION>', zWinRMUser='<USER>', zWinRMPassword='<PASSWORD>', zWinKDC='<KDC>',collector='<COLLECTOR>', device_name='<HOST NAME>'
You can then load the Hyper-V servers into Zenoss Core or Resource Manager as devices with the following command.
zenbatchload <filename>
Configuring Guest Device Discovery
Use the following steps to configure virtual machine guest device discovery. Guest device discovery must be configured individually for each Hyper-V server.
- Navigate to one of the Hyper-V servers.
- Click the edit link beside Device Class for Discovered Linux VMs
and Device Class for Discovered Windows VMs.
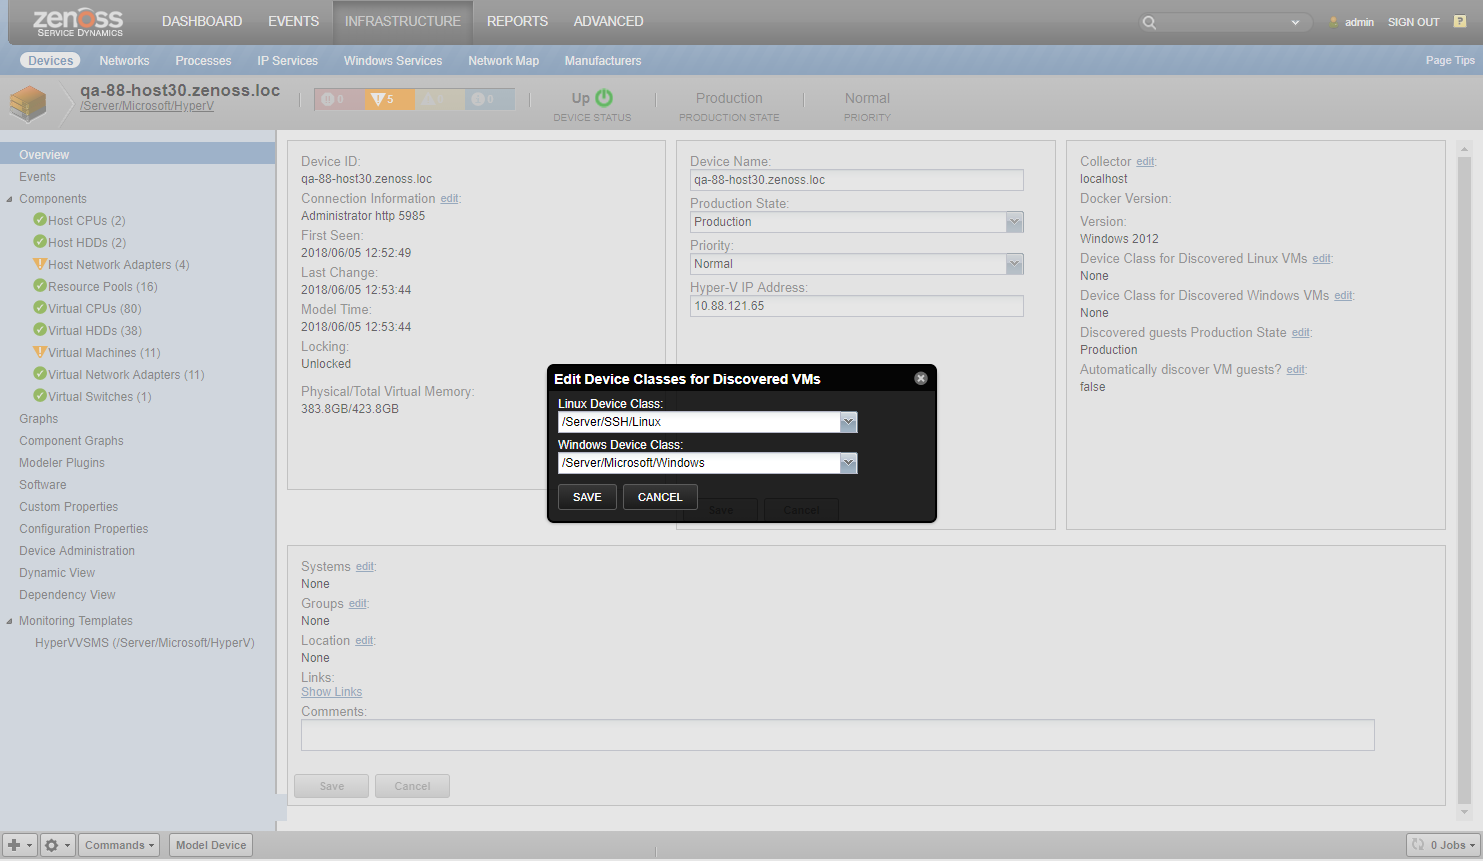
- Choose the device class for virtual machines.
- Verify that appropriate SSH, SNMP or Windows credentials are configured for the chosen device class.
- Select Configuration Properties.
- Change value of zHyperVDiscoverGuests property to True
- Default Production State of discovered guest devices is Production. Use Discovered guests Production State edit link on Device Overview to choose another one.
- Remodel the Hyper-V server by choosing Model Device from its menu.
Prerequisites
Configure the Hyper-V server's hosting machine
This ZenPack can be configured to use either the txwinrm Asynchronous Python WinRM Client or the .NET Core based zendotnet service which requires you to configure the Hyper-V server's hosting machine with the correct WinRM settings. In HyperV 2.0.0 or greater, all devices will use zendotnet by default. To use txwinrm, update zMicrosoftTxRx to txwinrm. Please refer to Microsoft Core documentation for more details. You can enable the WinRM service on the Hyper-V server's hosting machine by running Command Prompt as Administrator and executing the following commands.
This command configures the WinRM service, creates WinRM listener and enables firewall exception for WS-Management traffic. After executing the command below, make sure to type y and hit enter to approve the changes. (This step is required and must be run by an Administrator)
winrm quickconfig
This setting allows for the maximum concurrent operation and shells per user. (If you do not want to use the maximum settings, please see note below for more information)
winrm s winrm/config/winrs '@{MaxShellsPerUser="2147483647"}'
winrm s winrm/config/service '@{MaxConcurrentOperationsPerUser="4294967295"}'
Set this setting if you plan on using Basic Authentication (WinRM default is Kerberos, please see note below for more information)
winrm s winrm/config/service/auth @{Basic="true"}
Set this setting if you plan on using HTTP with basic authentication. (WinRM default is HTTPS, please see note below for more information)
winrm s winrm/config/service @{AllowUnencrypted="true"}
The above instructions use the max values for MaxConcurrentOperationsPerUser and WinRS MaxShellsPerUser. If you do not want to set these to the max, then a value of 50 should be adequate. The default is 5 on both, which will cause problems because Zenoss will open up concurrent requests for each WQL query and set of Perfmon counters.
If you choose to use Basic authentication it is highly recommended that you also configure HTTPS. If you do not use the HTTPS protocol your user name and password will be sent over in clear text. If you have challenges setting up HTTPS on the Windows clients and you don't mind sending the payload in clear text but require the user name and password to be encrypted then using the Kerberos authentication is the best option. HTTPS is not required for Kerberos but is recommended.
If you choose to take the WinRM default configurations you must supply
Kerberos authentication settings in the zProperties. The Kerberos
authentication process requires a ticket granting server. In the
Microsoft Active Directory environment the AD Server is also the KDC.
The zWinKDC value must be set to the IP address of the AD Server and
the collector must be able to sent TCP/IP packets to this server. Once
this is set your zWinRMUser must be a FQDN such as jsmith@Zenoss.com
and the zWinRMPassword must be set correctly for this user account.
The HTTPS setup must be completed on each client. At this time we do not have notes on automating this task but are currently in the process of testing several options. To successfully encrypt your payload between the Zenoss server and the Windows client you must install a Server Authentication certificate on tbe client machine. The process for requesting and installing the appropriate certificate can be found at the following URL. http://blogs.technet.com/b/meamcs/archive/2012/02/25/how-to-force-winrm-to-listen-interfaces-over-https.aspx Once the client has the correct certificate installed you only need to change the zWinScheme to HTTPS and zWinRMPort to 5986. If you are still having challenges setting up HTTPS on the client you can execute the following command on any AD server to verify the appropriate SPN record exists for Kerberos authentication.
setspn -l hostname1
If you do not see a record with HTTPS/ at the beginning of the hostname you will need to create the record. For example:
setspn -s HTTPS/hostname1.zenoss.com hostname1
Install the Integration Services on virtual machines
If you want your guest devices to be discovered, the Integration Services should be installed on your virtual machines. By default, most Windows virtual machine has Integration Services already installed by default.
Follow the directions below, if your Windows virtual machine does not have Integration Services installed.
- From the Action menu of Virtual Machine Connection, click Insert Integration Services Setup Disk.
- If Autorun does not start the installation automatically, you can start it manually navigating to the CD drive. Right-click on it and select AutoPlay.
Follow the directions below, if your Linux virtual machine does not have Integration Services installed.
- Download the Linux Integration Services from Microsoft.
- Follow the instructions in the pdf file.
Average Pressure
Configure virtual machine
Average Pressure will allow to see what the average available memory is at the host level over a period of time. This is great for establishing a baseline and continued monitoring over time to determine if workloads need to be shifted or more memory should be added to the host.
Dynamic Memory allows Hyper-V administrators to assign a dynamic allocation of memory to a VM that draws from a pool of memory on the host. The goal of Dynamic Memory is to optimize memory utilization without sacrificing performance. This also opens the door to greater virtual machine density per host which allows for a lower TCO.
In order to monitor Average Pressure, the Dynamic Memory setting has to be enabled for the virtual machine. Recommended value of Average Pressure should be around 80, if this value is at least 100, then you have virtual machines that are doing paging operations with the itself and there will be performance degradation on the virtual machine.
Troubleshooting
Please refer the the Zenoss Service Dynamics documentation if you run into any of the following problems:
- ZenPack will not install
- Adding a device fails
- Don't understand how to add a device
- Don't understand how to model a device
If you cannot find the answer in the documentation, then Resource Manager (Service Dynamics) users should contact Zenoss Customer Support.
Caveats
- After upgrading to version 1.3.4 historical data for processors will be lost.
Known Limitation
- On 4.1.1 only, there will not be a relations link from the discovered virtual machine guest device to the Hyper-V host device.
Zenoss Analytics
This ZenPack provides additional support for Zenoss Analytics. Perform the following steps to install extra reporting resources into Zenoss Analytics after installing the ZenPack.
- Copy analytics-bundle.zip from
$ZENHOME/ZenPacks/ZenPacks.zenoss.Microsoft.HyperV*/ZenPacks/zenoss/Microsoft/HyperV/analytics/on your Zenoss server. - Navigate to Zenoss Analytics in your browser.
- Login as superuser.
- Remove any existing HyperV ZenPack folder.
- Choose Repository from the View menu at the top of the page.
- Expand Public in the list of folders.
- Right-click on HyperV ZenPack folder and choose Delete.
- Confirm deletion by clicking OK.
- Add the new HyperV ZenPack folder.
- Choose Server Settings from the ''Manage' menu at the top of the page.
- Choose Import in the left page.
- Remove checks from all check boxes.
- Click Choose File to import a data file.
- Choose the analytics-bundle.zip file copied from your Zenoss server.
- Click Import.
You can now navigate back to the HyperV ZenPack folder in the repository to see the HyperV Domain added by the bundle.
Domains can be used to create Ad Hoc views using the following steps.
- Choose Ad Hoc View from the Create menu.
- Click Domains at the top of the data chooser dialog.
- Expand Public then HyperV ZenPack.
- Choose the HyperV Domain domain
Installed Items
Installing this ZenPack will add the following items to your Zenoss system.
Device Classes
- /Server/Microsoft/HyperV
Modeler Plugins
- HyperVCollector
Monitoring Templates
- HyperVVSMS (in /Server/Microsoft/HyperV)
- HyperVResourcePool (in /Server/Microsoft/HyperV)
- HyperVHostCPU (in /Server/Microsoft/HyperV)
- HyperVHostNetworkAdapter (in /Server/Microsoft/HyperV)
- HyperVHostHDD (in /Server/Microsoft/HyperV)
- HyperVHostCSV (in /Server/Microsoft/HyperV)
- HyperVVM (in /Server/Microsoft/HyperV)
- HyperVCPU (in /Server/Microsoft/HyperV)
Device Types
- HyperVVSMS(in /Server/Microsoft/HyperV)
Component Types
- HyperVHostCPU (on HyperVVSMS)
- HyperVHostCSV (on HyperVVSMS)
- HyperVHostHDD (on HyperVVSMS)
- HyperVHostNetworkAdapter (on HyperVVSMS)
- HyperVResourcePool (on HyperVVSMS)
- HyperVSwitch (on HyperVVSMS)
- HyperVVM (on HyperVVSMS)
- HyperVCPU (on HyperVVM)
- HyperVHDD (on HyperVVM)
- HyperVNetworkAdapter (on HyperVVM)
Changes
2.1.1
- Make HyperV ZenPack compatible with Ubuntu-based CZ 7.2.0 (ZPS-8849)
- Tested with Zenoss Resource Manager 6.7.0, Zenoss Cloud and Service Impact 5.6.0
2.1.0
- Add custom command datasource for monitoring using WinRM. (ZPS-4498)
- Add graph definition for Virtual CPU load. (ZPS-7134)
- Add Host HDD utilization monitoring. (ZPS-5548)
- Add monitoring of Virtual machines count at the Device level. (ZPS-6793)
- Add zendotnet metrics to be able to observe in RM Monitor. (ZPS-6787)
- Fix HyperV Traceback seen during collection. (ZPS-5671)
- Fix PowerShell 6x deprecated Get-WmiObject cmdlet. (ZPS-4920)
- Refine CallHome data reported by HyperV ZenPack. (ZPS-7246)
- Tested with Zenoss Resource Manager 6.4.1, Zenoss Resource Manager 6.5.0, Zenoss Cloud and Service Impact 5.5.2
2.0.1
- Add Utilization metrics for Hypervisor Logical Processor. (ZPS-4266)
- Tested with Zenoss Cloud, Zenoss Resource Manager 6.2.1, Zenoss Resource Manager 5.3.3
2.0.0
- Add option to configure Production State of discovered guest devices. (ZPS-400)
- Fix error handling for proper events generation. (ZPS-823)
- Fix issue with uncleared events for Processor component. (ZPS-2646)
- Convert ZenPack to be based on ZenPackLib. (ZPS-3235)
- Fix issue related to re-adding a device. (ZPS-3659)
- Make use of new Microsoft.Core ZenPack
- Tested with Zenoss Cloud, Zenoss Resource Manager 6.2.0, Zenoss Resource Manager 5.3.3 with Service Impact 5.3.1 and Analytics 5.1.0
1.3.3
- Fix erroneous Hyper-V VM creation events. (ZPS-841)
1.3.0
- Fix graphs to have a minimum Y axis of 0.
- Remove "Capacity" graph point from resource pool graph. (ZEN-20926)
1.2.2
- Fix potential Impact modeling performance issue.
1.2.1
- Fix potential LocationError when modeling. (ZEN-20947)
1.2.0
- Add AD Domain Controller field to Add Hyper-V Server dialog
- Allow guest discovery to be set from overview. (ZEN-20690)
1.1.0
- Add support for Zenoss Analytics.
- Add support for Windows 8.1 version.
- Improvements to impact model.
- Add modeling Virtual Network Adapters, CPUs and HDDs components for virtual machines in down (Off) state.
1.0.5
- Fix 'NoneType' object has no attribute 'timetuple' job error. (ZEN-16638)
1.0.4
- Add guest device discovery based on IP/ID in case virtual machine has no network adapters modeled.
- Improvements to impact model.
- Add Dynamic View support.
- Fast lookup of virtual network adapters by MAC address via catalog.
- Fast lookup of virtual machines by matching NIC MAC addresses.
- Improvements to guest device linking.
- Bug fixes.
1.0.2
- Automatic adding of Windows and Linux VMs as Zenoss devices.
- Honor zWinRMUser and zWinRMPassword properties for Hyper-V host credentials.
- Other bug fixes.
1.0.1
- Add link between Hyper-V device and corresponding Windows server.
- Make password a required field for adding Hyper-V.
- Add descriptions to monitoring templates.
- Prevent deleted guests from being re-added.
- Honor zWinRMServerName property.
1.0.0
- Initial release.