IBM DB2
ZenPacks.zenoss.DB2
This ZenPack provides support for monitoring IBM DB2 Database on Linux, Unix, or Windows (LUW) hosts. Monitoring is performed using IBM JDBC Driver.
This ZenPack treats the databases as the fundamental component thereby allowing multiple databases to be associated with a single server.
The features added by this ZenPack are listed below. They are each detailed further below.
- Data Collection has done with DB2 JDBC (Java)
- Multiple instance support via components
- TableSpace Support
- Split TableSpace Support
- Custom BufferPool Support
Applications Monitored: IBM DB2 (10.5+)
Commercial
This ZenPack is developed and supported by Zenoss Inc. Commercial ZenPacks are available to Zenoss commercial customers only. Contact Zenoss to request more information regarding this or any other ZenPacks. Click here to view all available Zenoss Commercial ZenPacks.
Releases
Version 1.0.10 Download
- Released on 2024/05/15
- Compatible with Zenoss Resource Manager 6.x and Zenoss Cloud
Version 1.0.9 Download
- Released on 2023/07/18
- Compatible with Zenoss Resource Manager 6.x and Zenoss Cloud
Prerequisites
- DB2 must be running and listening on a target device's TCP port.
- DB2 access for the monitor user must be provided
- The following DB2 monitoring switches must be enabled
- Buffer Pool
- Lock
- Sort
Gallery
Connection String Formats
The Connection String is the data format that is used to specify a database. The connection string can have the following formats:
<fqdn.domain.com>:<Port>/<DB-Name>:user=<Username>;password=<Password>;
or (the official DB2 form):
jdbc:db2://<fqdn.domain.com>:<Port>/<DB-Name>:user=<Username>;password=<Password>;
Make sure to note the use of colons (:) and semi-colons(;) in the string, as DB2 is quite picky about the format.
For example:
Ex 1: s1.example.com:50000/SAMPLE:user=db2inst1;password=bird_flu;
Ex 2: jdbc:db2://s1.example.com:50000/SAMPLE:user=db2inst1;password=bird_flu;
Valid Usernames and Passwords
Valid username characters only allow the alpha-numeric characters plus:
@#$%^&()-_{}.!
Valid password characters only allow the alpha-numeric characters plus:
@#$%^&()-_{}.
Discovery
Databases will be automatically discovered via a connection string that contains the username, password, port, and instance name you provide. If starting from a new server without any DB2DB monitoring, simply bind the DB2 template from the gear menu on the bottom left of the server's infrastructure page.
Performance Monitoring
Host monitoring is separately done by the server monitoring template. This zenpack is a component-only addition to the host system. The host statistics are thus handled by the respective host template independently.
The following metrics are collected every 5 minutes by default.
| NAME | System | Description |
|---|---|---|
| CURRENT_PARTITION_MEM | Instance | Current partition memory |
| INSTANCE_MEMORY | Instance | Instance memory |
| MAX_PARTITION_MEM | Instance | Total memory use for an instance |
| APPLS_CUR_CONS | Database | Applications connected currently |
| BP_NPAGES | Database | Number of buffer pool pages allocated |
| COMMIT_SQL_STMTS | Database | Total SQL statements committed |
| DBPARTITIONNUM | Database | DB partition number |
| DEADLOCKS | Database | Deadlocks detected |
| LOCK_WAIT_TIME | Database | Lock wait time |
| LOG_WRITE_TIME_NS | Database | Log write time in nano-seconds |
| LOG_WRITE_TIME_S | Database | Log write time in seconds |
| POOL_DATA_WRITES | Database | BP data page writes to disk |
| POOL_WATERMARK | Database | Highest memory pool use from db start |
| ROWS_DELETED | Database | Rows deleted |
| ROWS_INSERTED | Database | Rows inserted |
| ROWS_READ | Database | Rows read |
| ROWS_SELECTED | Database | Rows selected |
| ROWS_UPDATED | Database | Rows updated |
| SELECT_SQL_STMTS | Database | Total select SQL statements |
| TOTAL_CONS | Database | Total connections to the DB |
| TOTAL_HIT_RATIO_PERCENT | Database | Buffer Pool hit ratio |
| TOTAL_PHYSICAL_READS | Database | Physical reads from storage |
| TOTAL_SORT_TIME | Database | Total Sort Time |
| UID_SQL_STMTS | Database | Update/Insert/Merge/Delete Statements |
| POOL_DATA_L_READS | TableSpace | Pool Logical Reads |
| POOL_DATA_P_READS | TableSpace | Pool Physical Reads |
| POOL_INDEX_L_READS | TableSpace | Pool Index Logical Reads |
| POOL_INDEX_P_READS | TableSpace | Pool Index Physical Reads |
| POOL_TEMP_DATA_L_READS | TableSpace | Pool Temp Data Logical Reads |
| POOL_TEMP_DATA_P_READS | TableSpace | Pool Temp Data Physical Reads |
| POOL_TEMP_INDEX_L_READS | TableSpace | Pool Temp Index Logical Reads |
| POOL_TEMP_INDEX_P_READS | TableSpace | Pool Temp Index Physical Reads |
| TBSP_FREE_SIZE_KB | TableSpace | Tablespace Free Size (KB) |
| TBSP_TOTAL_PAGES | TableSpace | Tablespace total pages |
| TBSP_TOTAL_SIZE_KB | TableSpace | Tablespace Total Size (KB) |
| TBSP_USABLE_PAGES | TableSpace | Tablespace usable pages |
| TBSP_USED_PAGES | TableSpace | Tablespace used pages |
| TBSP_USED_SIZE_KB | TableSpace | Tablespace used size (KB) |
| TBSP_UTILIZATION_PERCENT | TableSpace | Tablespace Utilization Percentage |
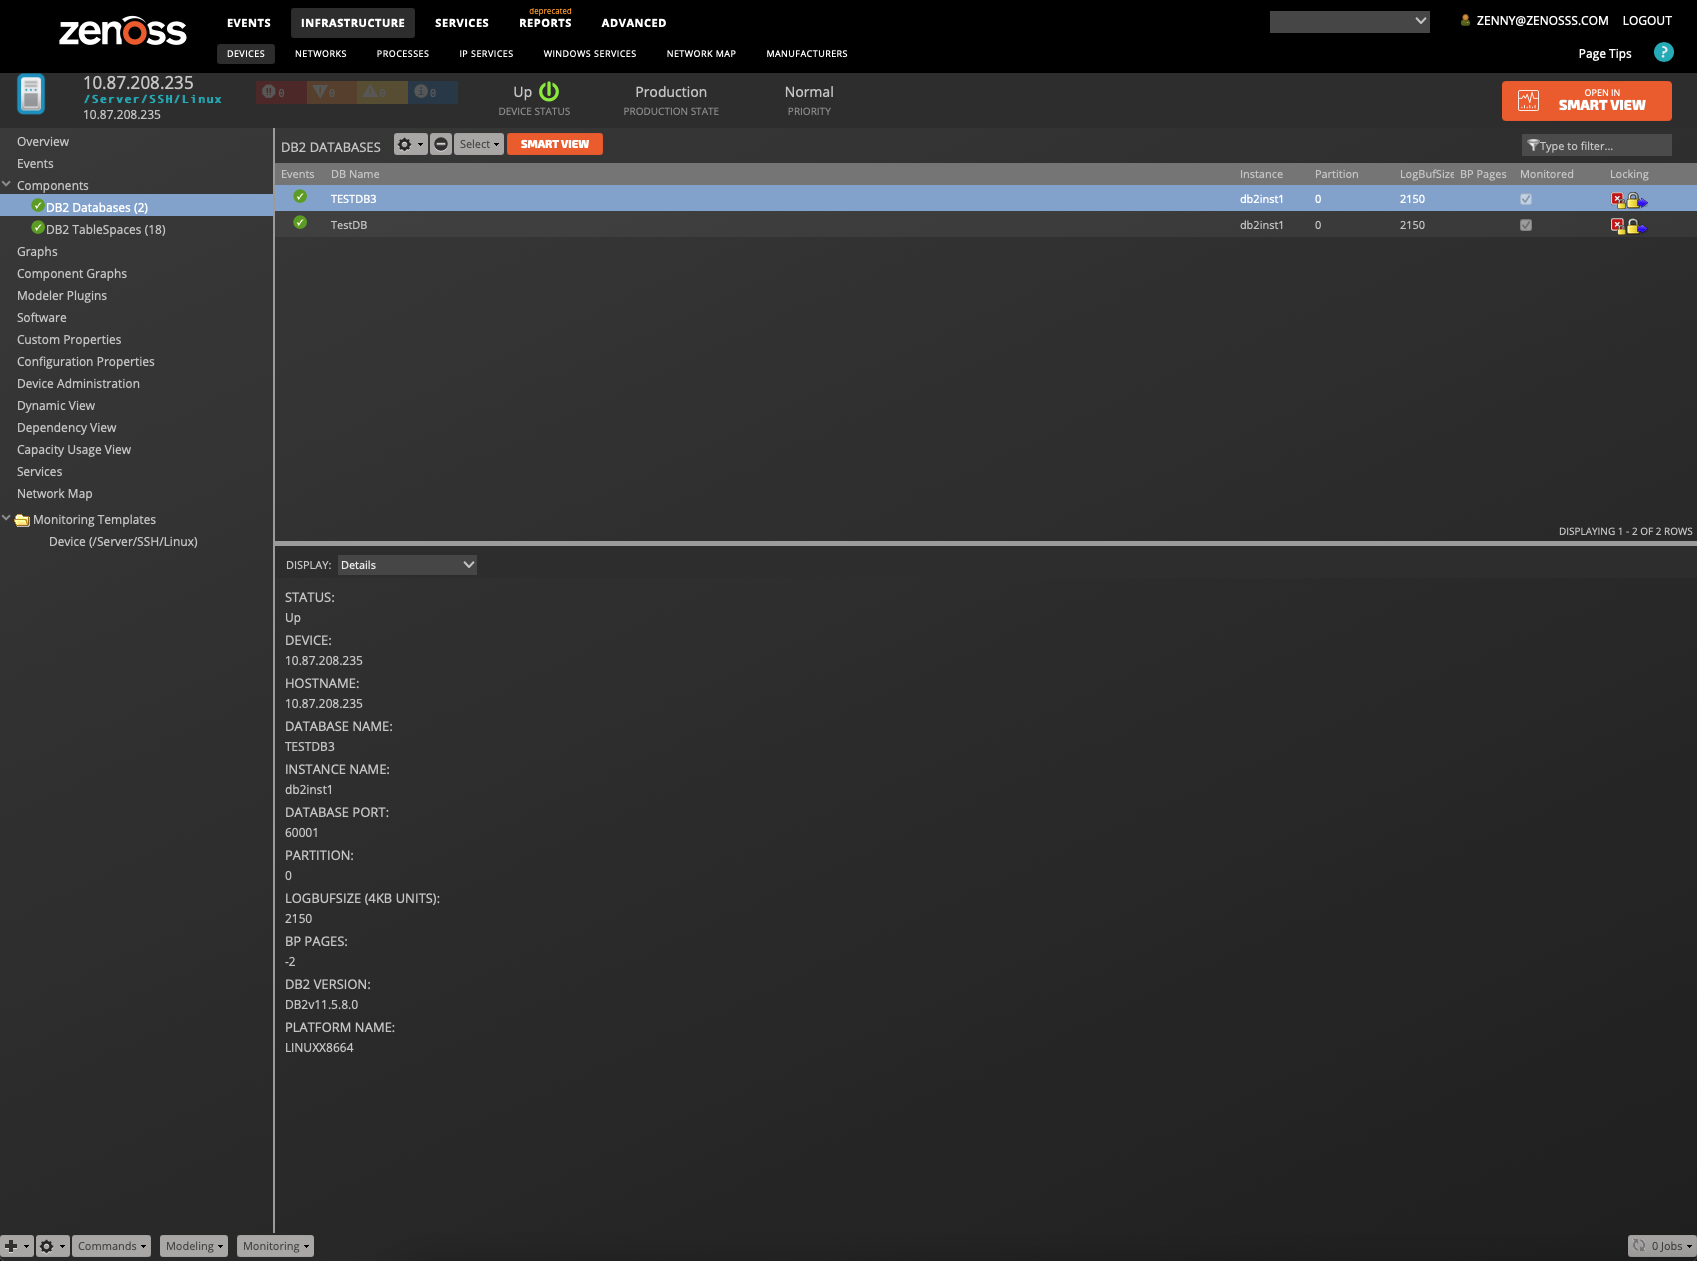
Database Support
This ZenPack allows for multiple databases per server to be monitored. The Context Display area has the following:
- Graphs
- Events
- Details
- Templates
- TableSpaces
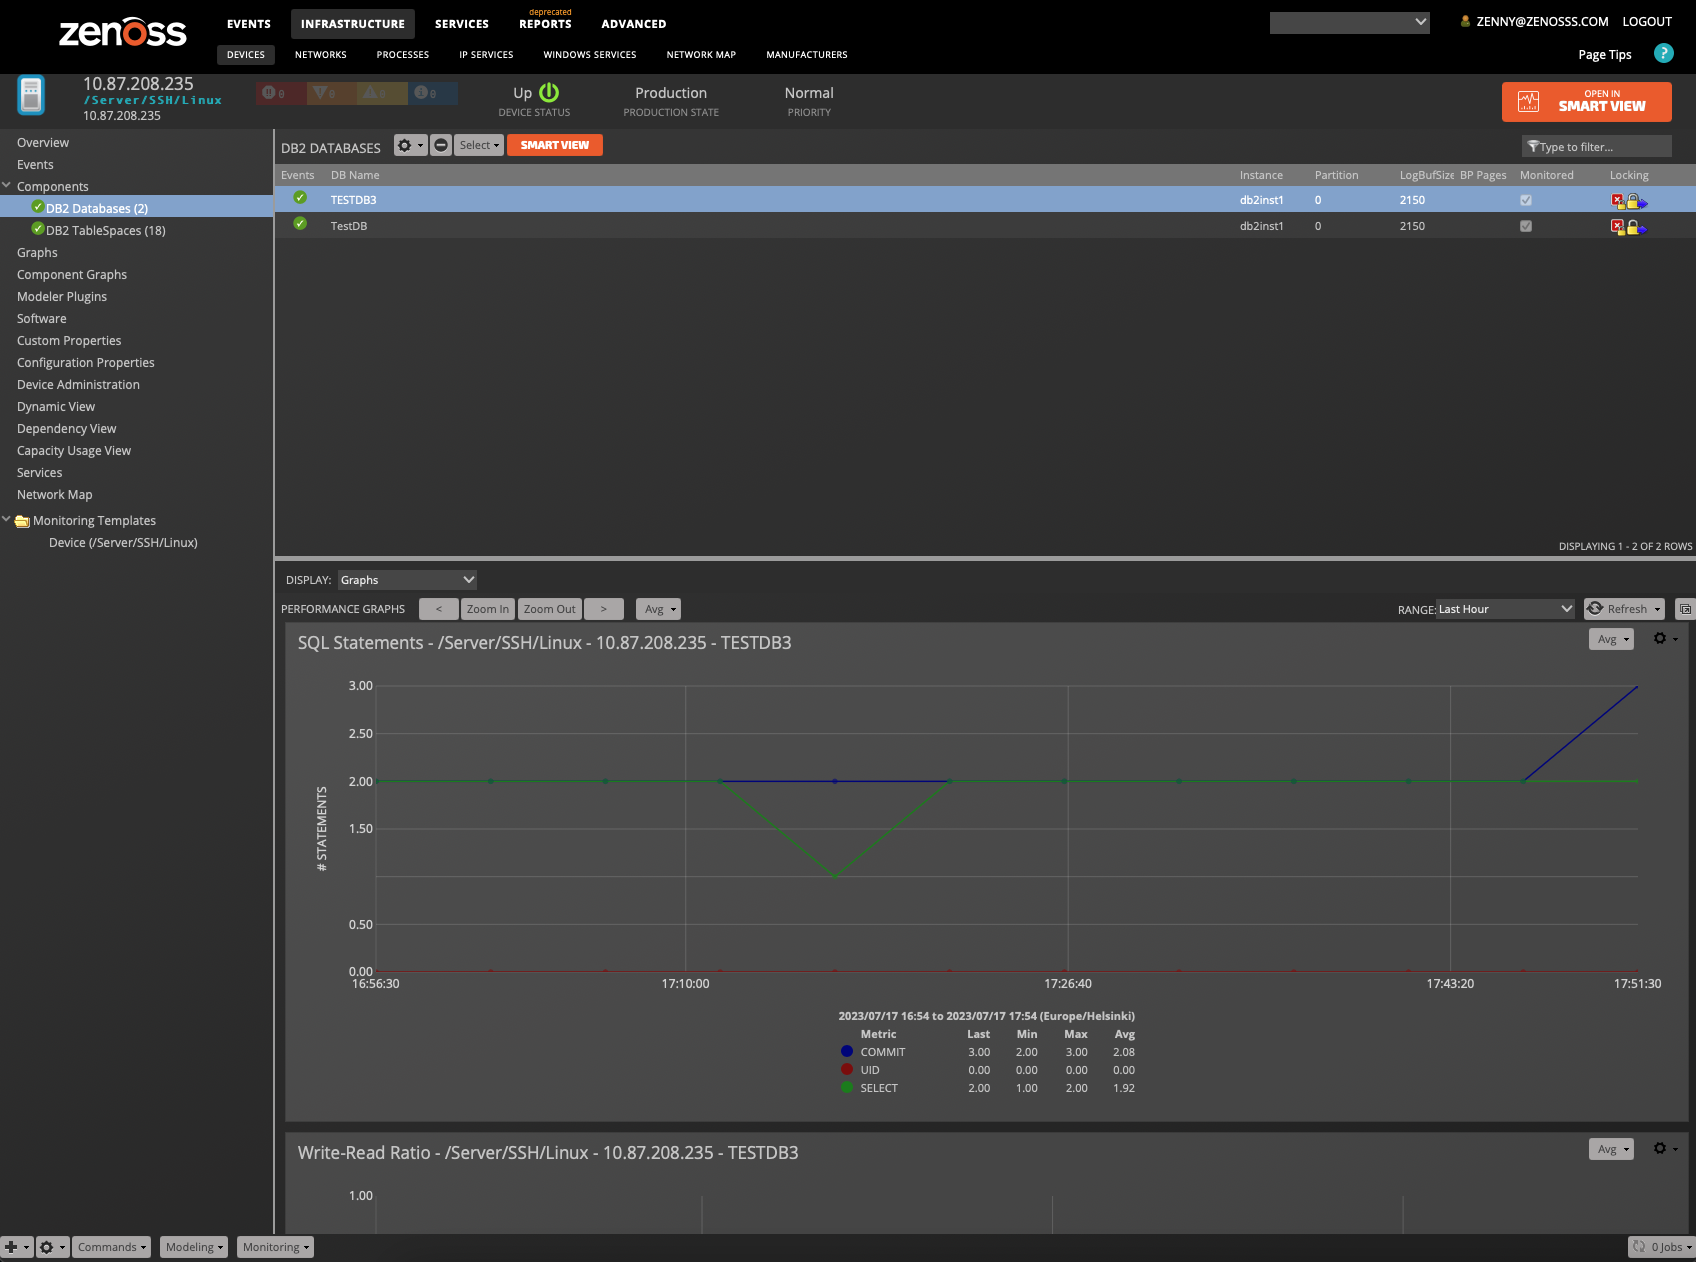
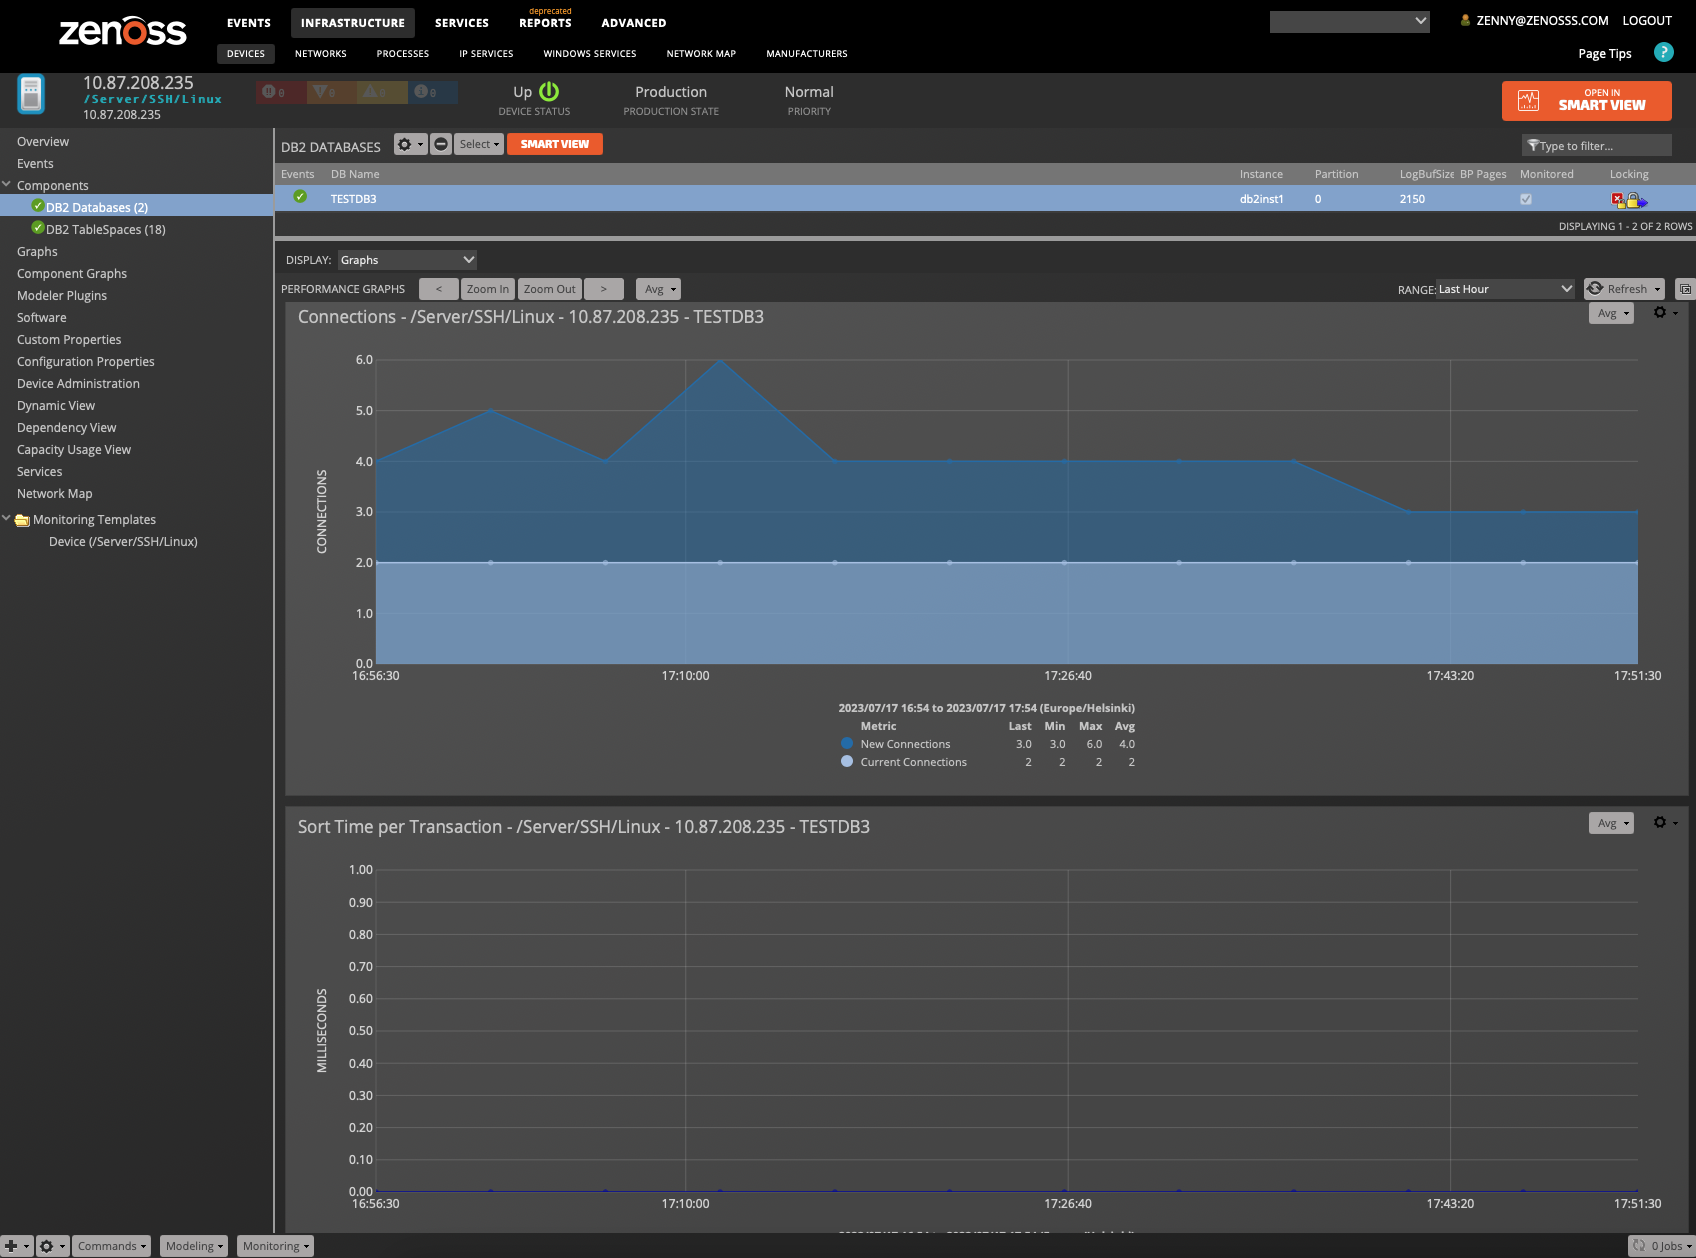
Database Graphs
Database support includes the following graphs:
- Cache Hit Ratio
- SQL Statements
- Write/Read Ratio
- Reads and Writes
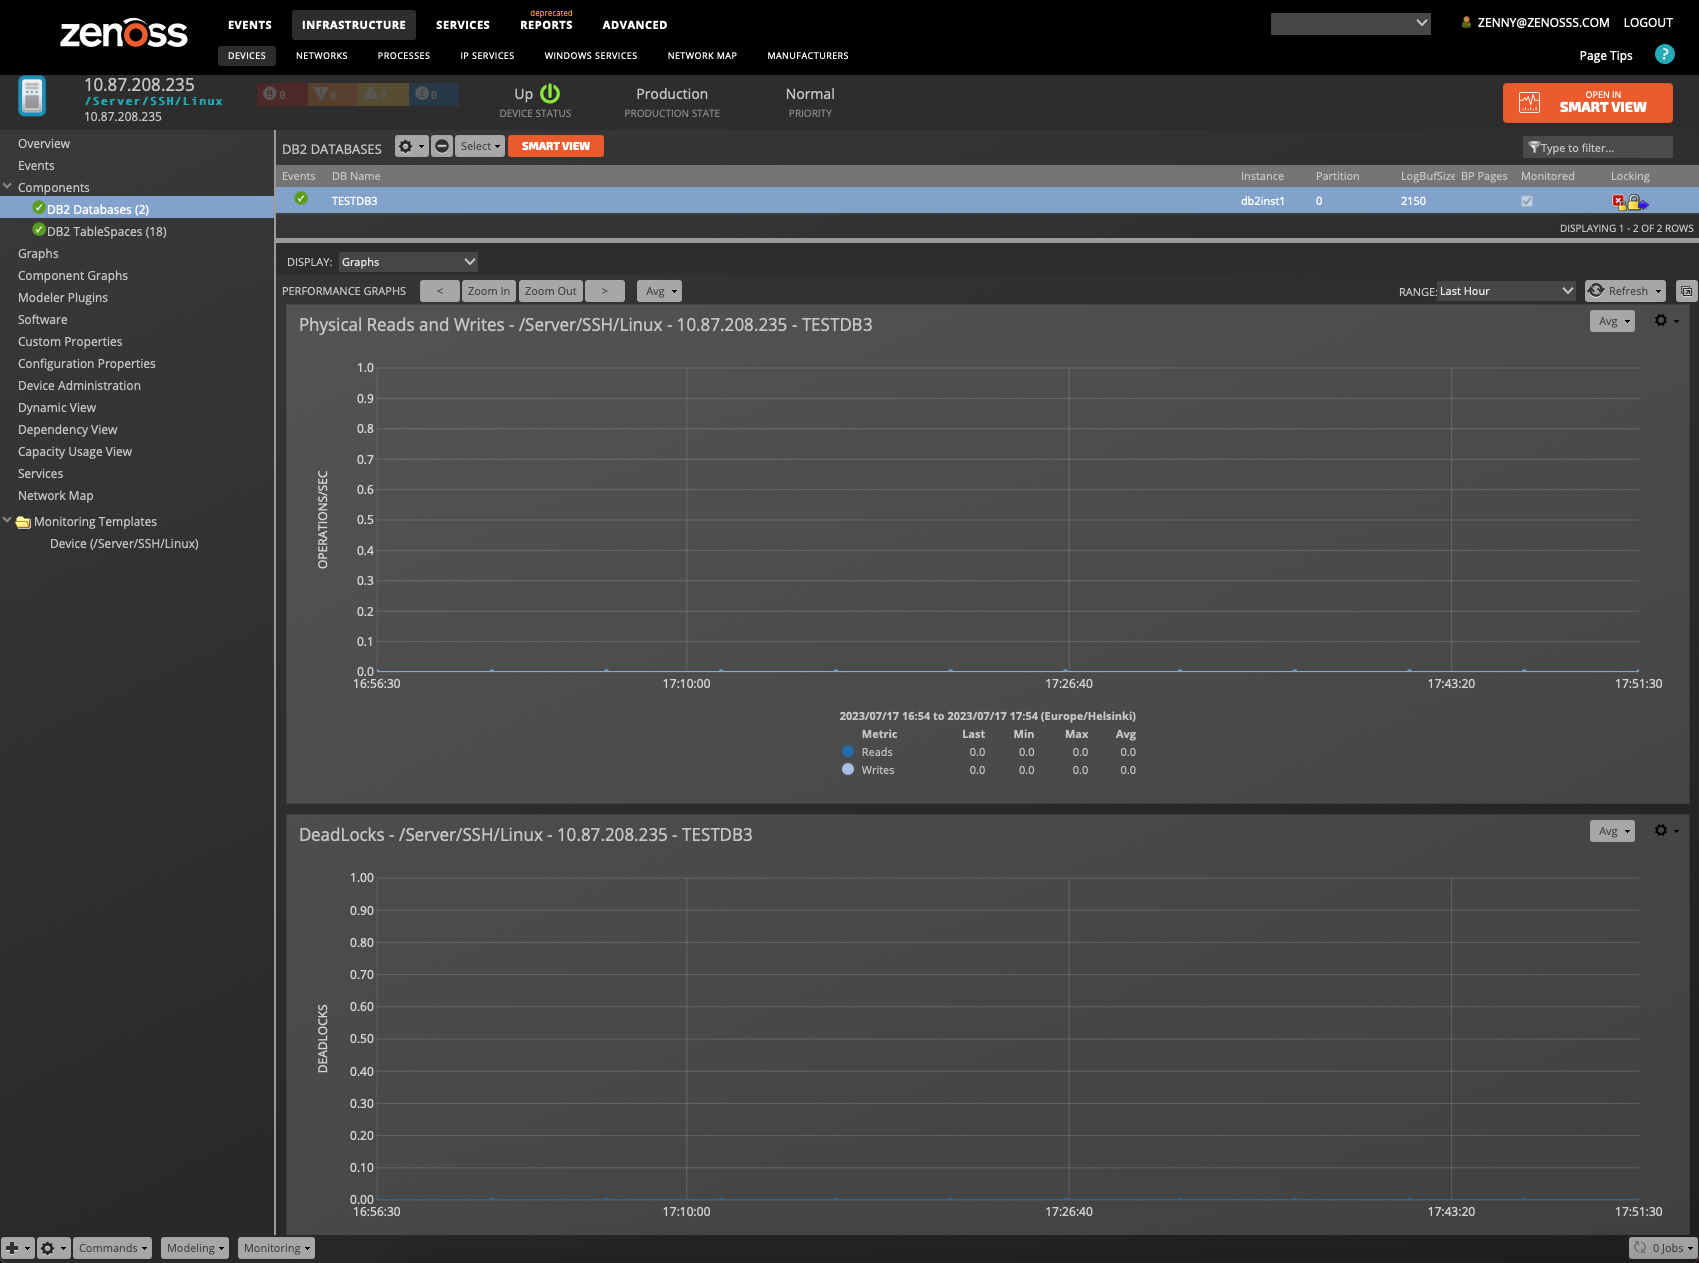
- Deadlocks
- Redo Size (bytes)
- Physical Reads and Writes
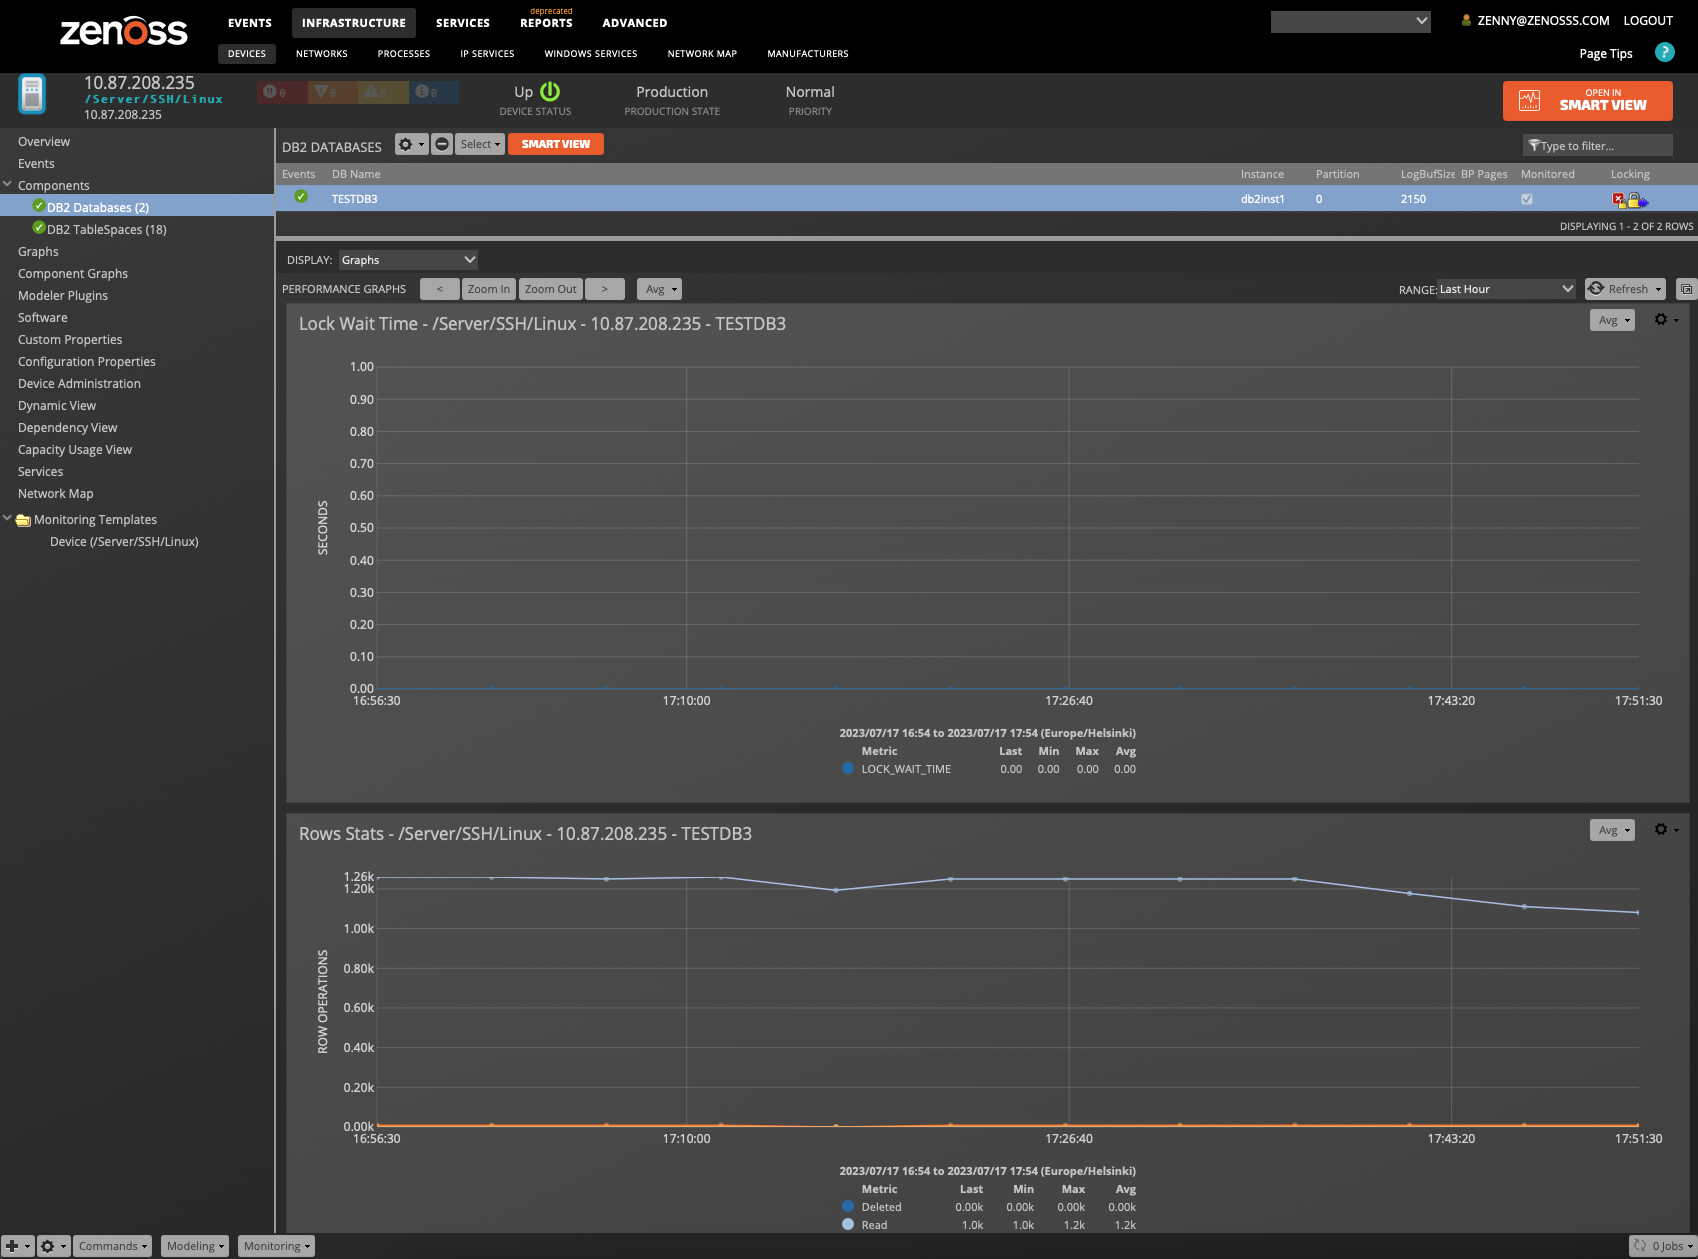
- Row Statistics
- Connections: Current and New
- Sort Time per Transaction
- Lock Wait Time
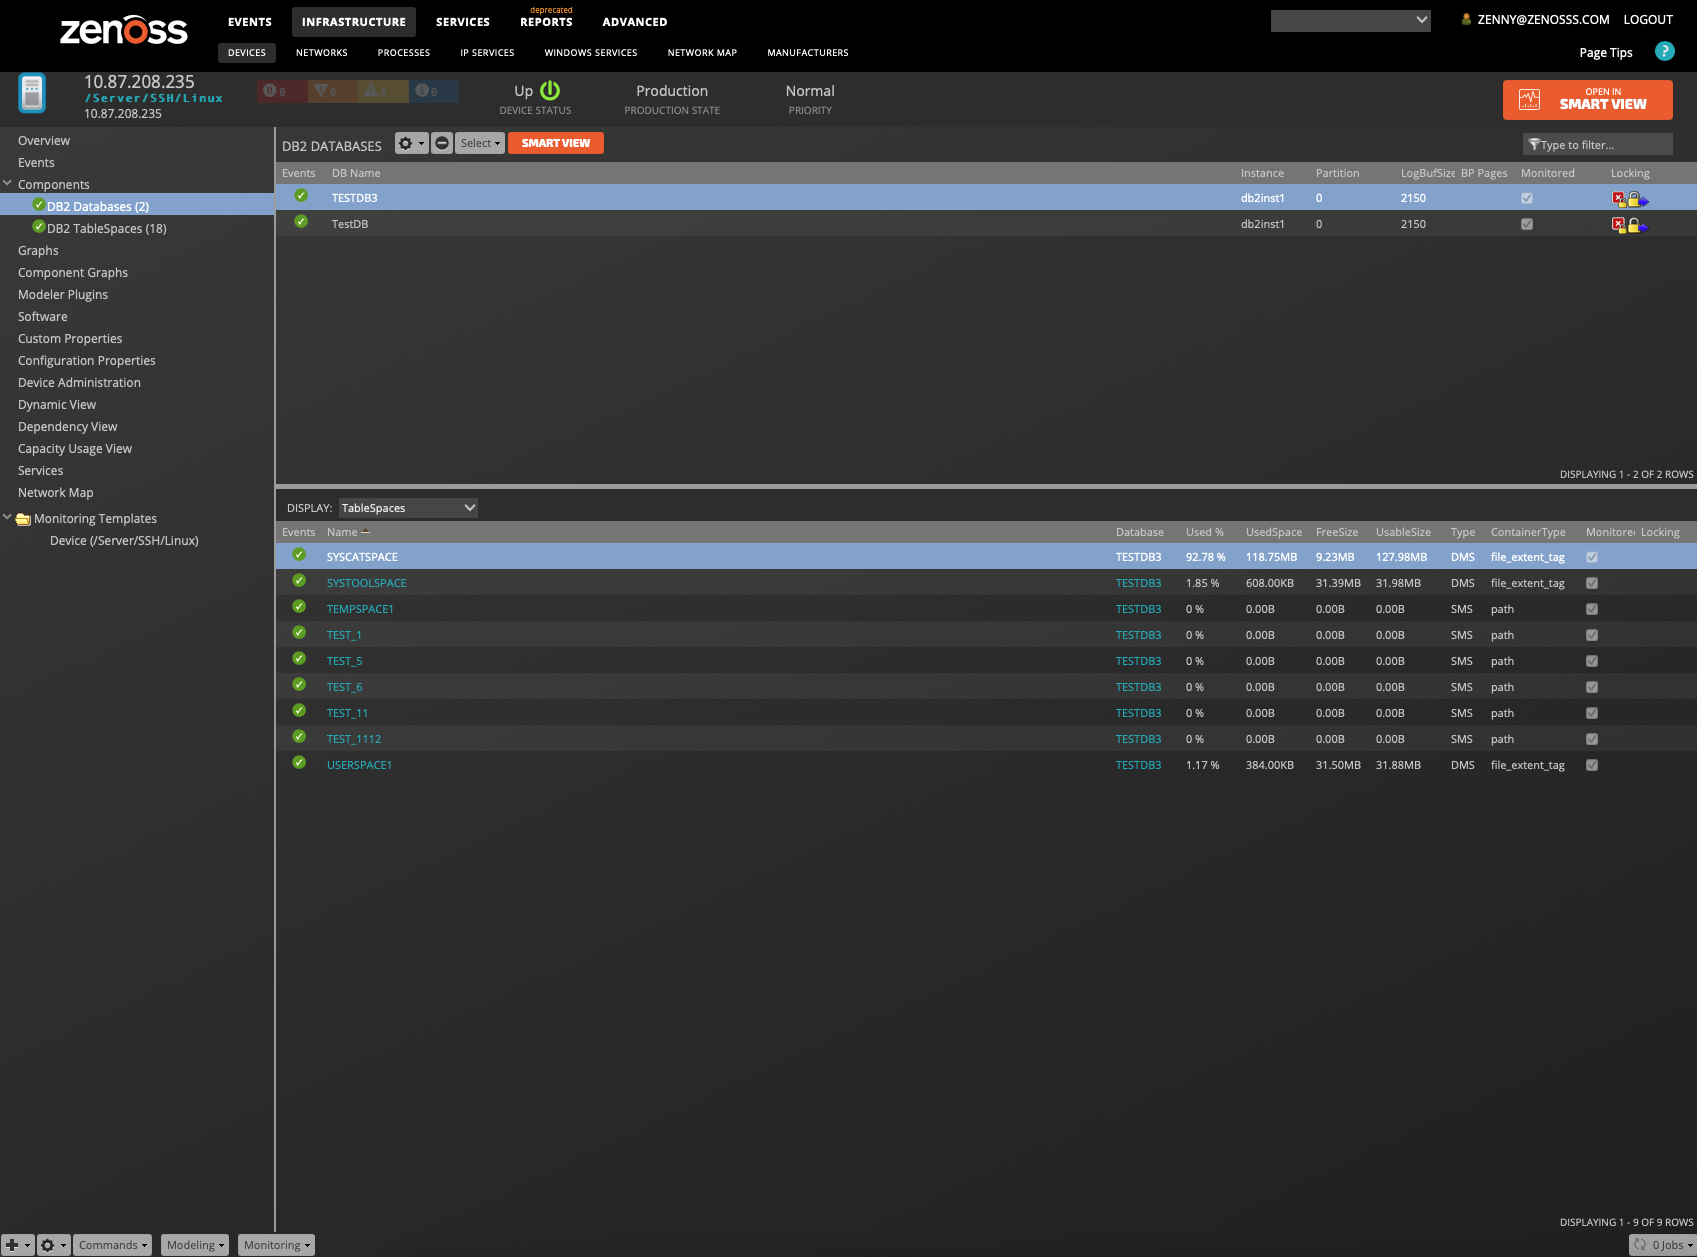
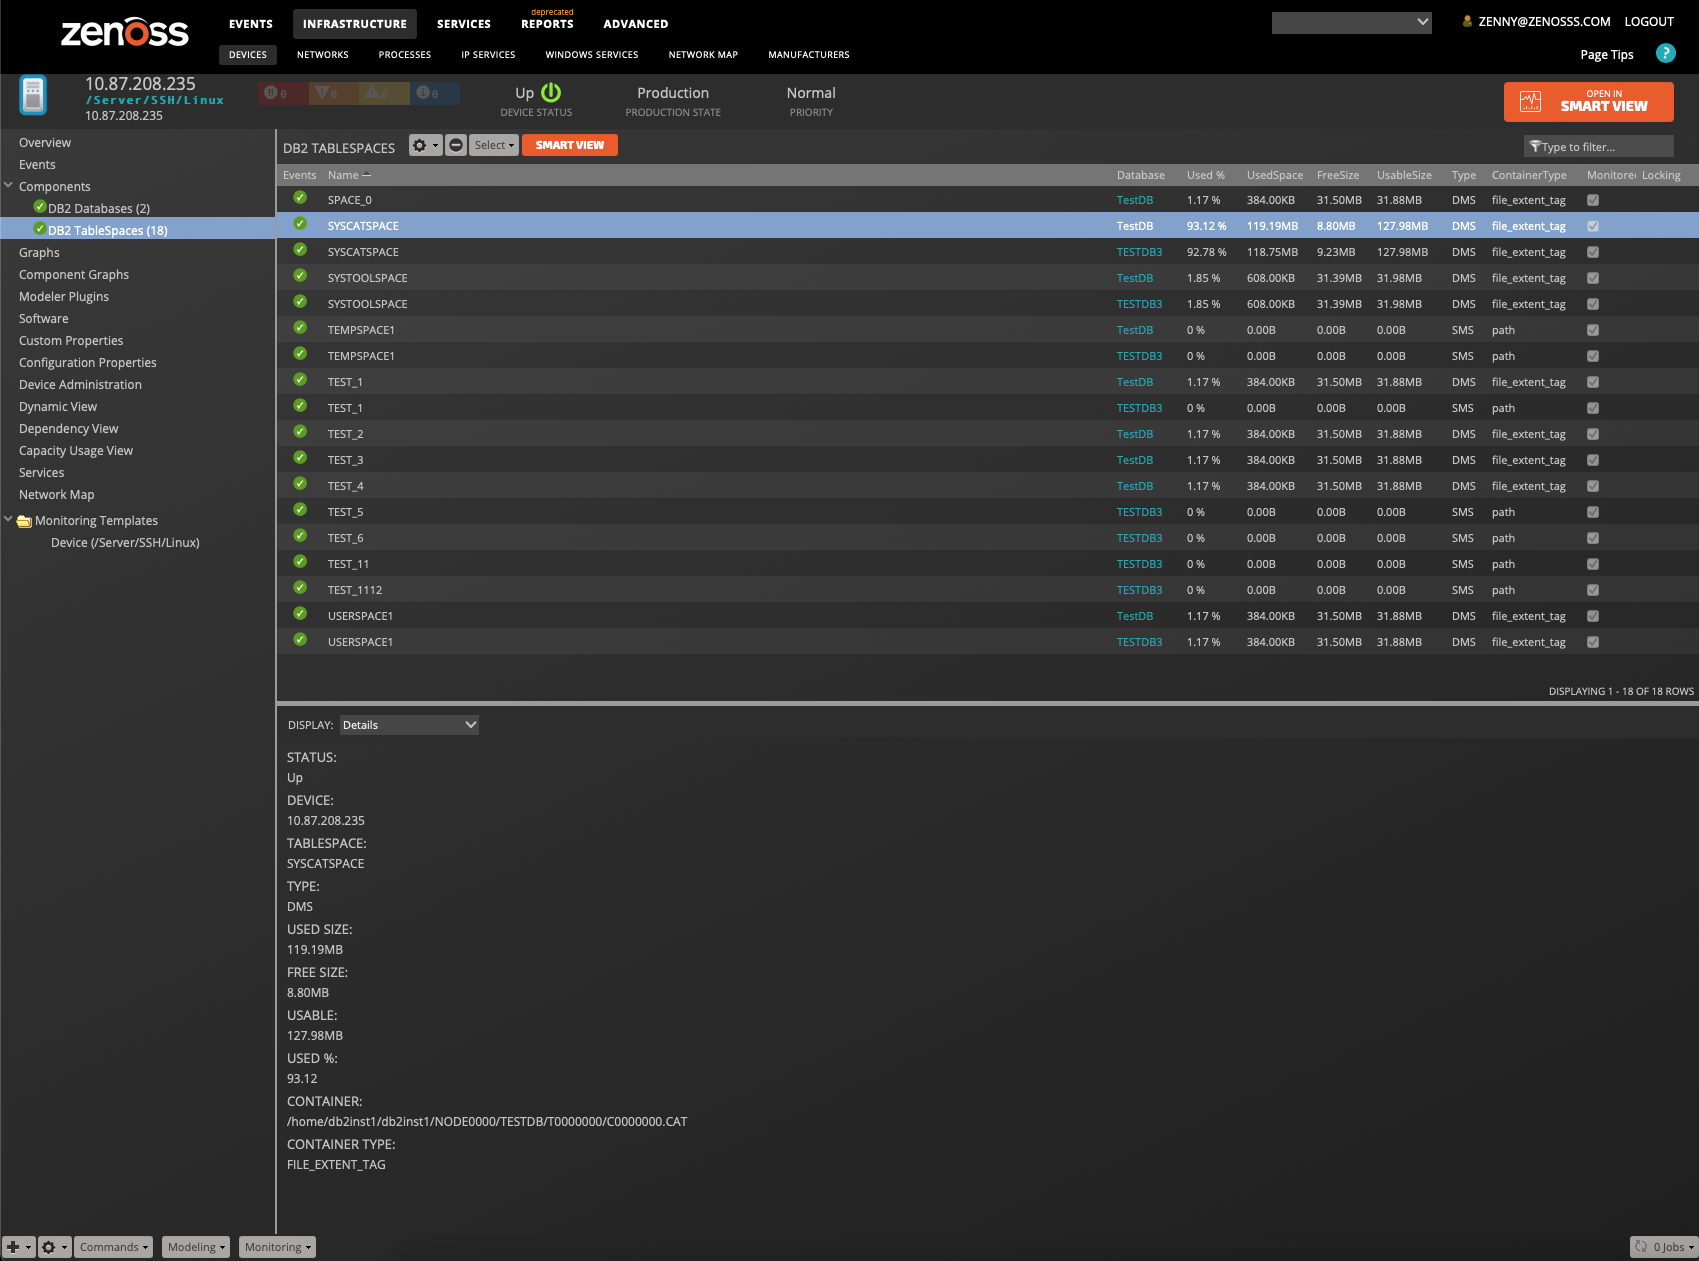
Tablespace Support
DB2 TableSpace is included. The TableSpace grid has links to the parent Database. The Context Display area has the following:
- Graphs
- Events
- Details
- TableSpaces
- Templates
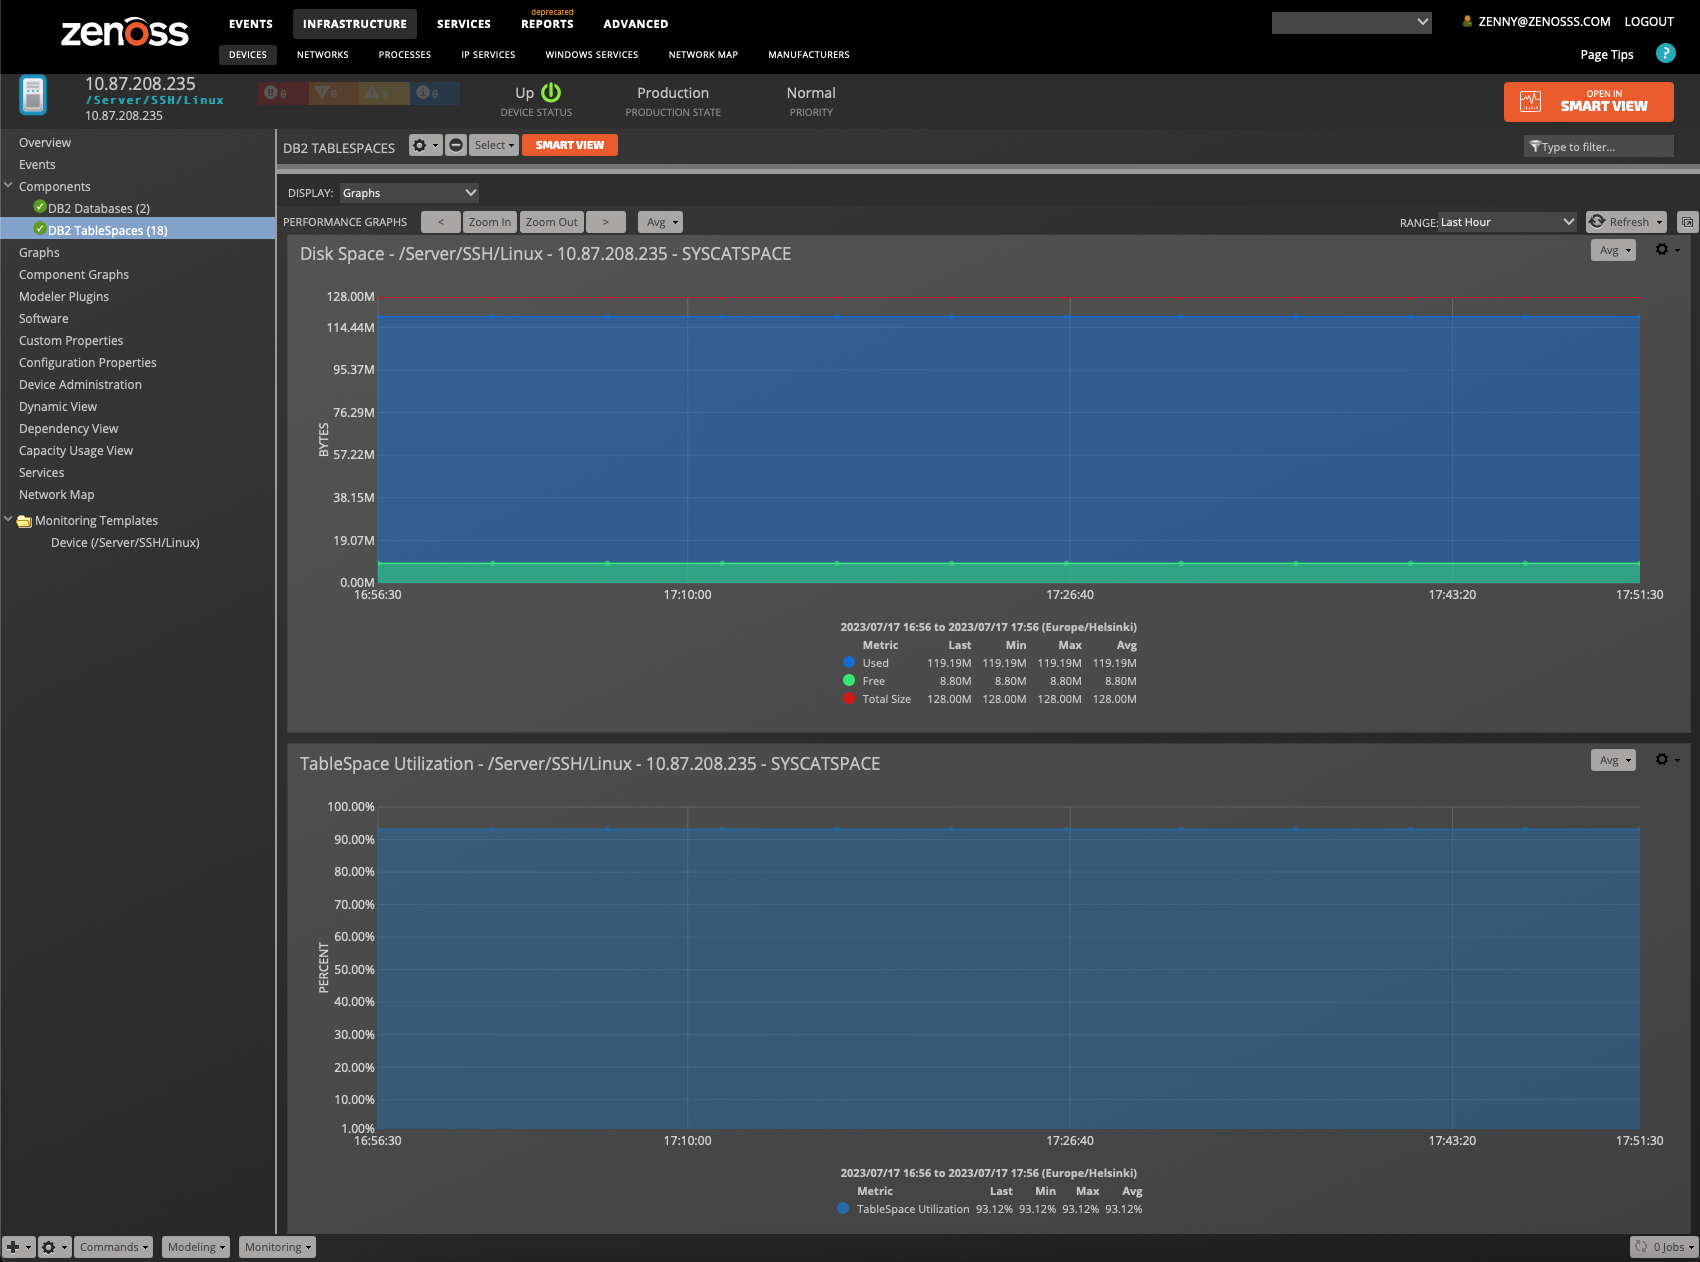
TableSpace Graphs
DB2 TableSpaces can have dynamically allocated disk space. This can cause some confusion when considering currently allocated space vs reserve allocated space.
TableSpace graphs include the following:
- Disk Space: Used, Free, Total
- Utilization
- Buffer Pool Hit Ratios: Data, Index, Temp
Impact Support
In DB2, the natural object of connection is the "Database" (rather than "Instance" as in Oracle). We, therefore, focus on the database and associated tablespaces. Here is a diagram of the DB2 structural dependency tree:
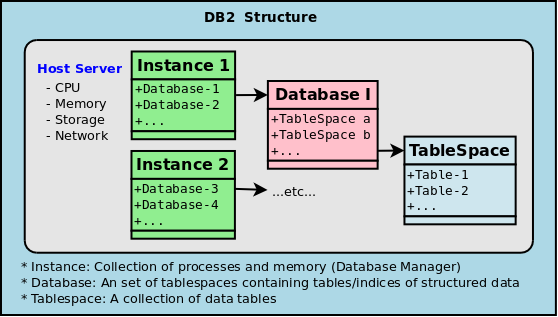
Given that we ignore the DB2 Instance objects, the Zenpack supports Impact as follows:
- Database objects depend on
- The containing host systems
- The contained tablespace objects
- Tablespaces depend on Database objects
Limitations
The following extra features are not supported:
- Advanced Copy Services
- Connection concentrator
- DBF partitioning
- DB2 governor
- PureScale data sharing
- Geodetic Extender
- HADR
- Homogeneous Q replication
- Sybase compatibility
- MDC
- Table partitioning and workload management
Installed Items
Installing this ZenPack will add the following items to your Zenoss system:
Configuration Properties
- zDB2ConnectionStrings
- zDB2User
- zDB2Password
Modeler Plugin
- zenoss.db2jdbc.Databases
Datasource Types
- DB2
Monitoring Templates
- DB2Database: SnapDB (Type DB2)
- DB2TableSpaces: SnapTBSP (Type Command)
Installation and Configuration
The installation consists of the following steps which will be covered in depth:
- Configure DB2 Server for monitoring
- Install the target device in Zenoss
- Install the ZenPack on Zenoss
- Bind the plugin modeler template to a server
- Set the zDB2ConnectionStrings property
- Model the device
Configure DB2 Server
The DB2 server must be configured correctly and granted access in order to allow access to the tables needed for monitoring. These steps are required:
- Make sure the DB2 server is listening on the correct TCP port (usually 50000)
- Configure DB2 for monitoring Access. We recommend setting the system up with a dedicated user as per the Security Section (see Security).
Install the Target Device in Zenoss
Install the target server as you normally would. Just select the type of server that DB2 will run on (Linux, Solaris, Windows, etc.). The host server should have its base data collection services running as usual in order to monitor its vitals. Make sure to set the zProperty: zCommandCommandTimeout to 120.
Note
In case you have a highly scalable environment with a number of table spaces greater than 1000 you should increase the value of zCommandCommandTimeout and DB2Database monitoring template SnapDB datasource timeout value. Leaving the default value of 120 seconds may lead to gaps and errors during the monitoring process.
Installing the ZenPack
You can install the ZenPack egg via the GUI or manually.
To manually install the ZenPack egg, take the following steps:
sudo su - zenoss
zenpack --install ZenPacks.zenoss.DB2-*.egg
zenoss restart
where ZenPacks.zenoss.DB2-*.egg should match your egg version.
Now you are ready to bind the modeler:
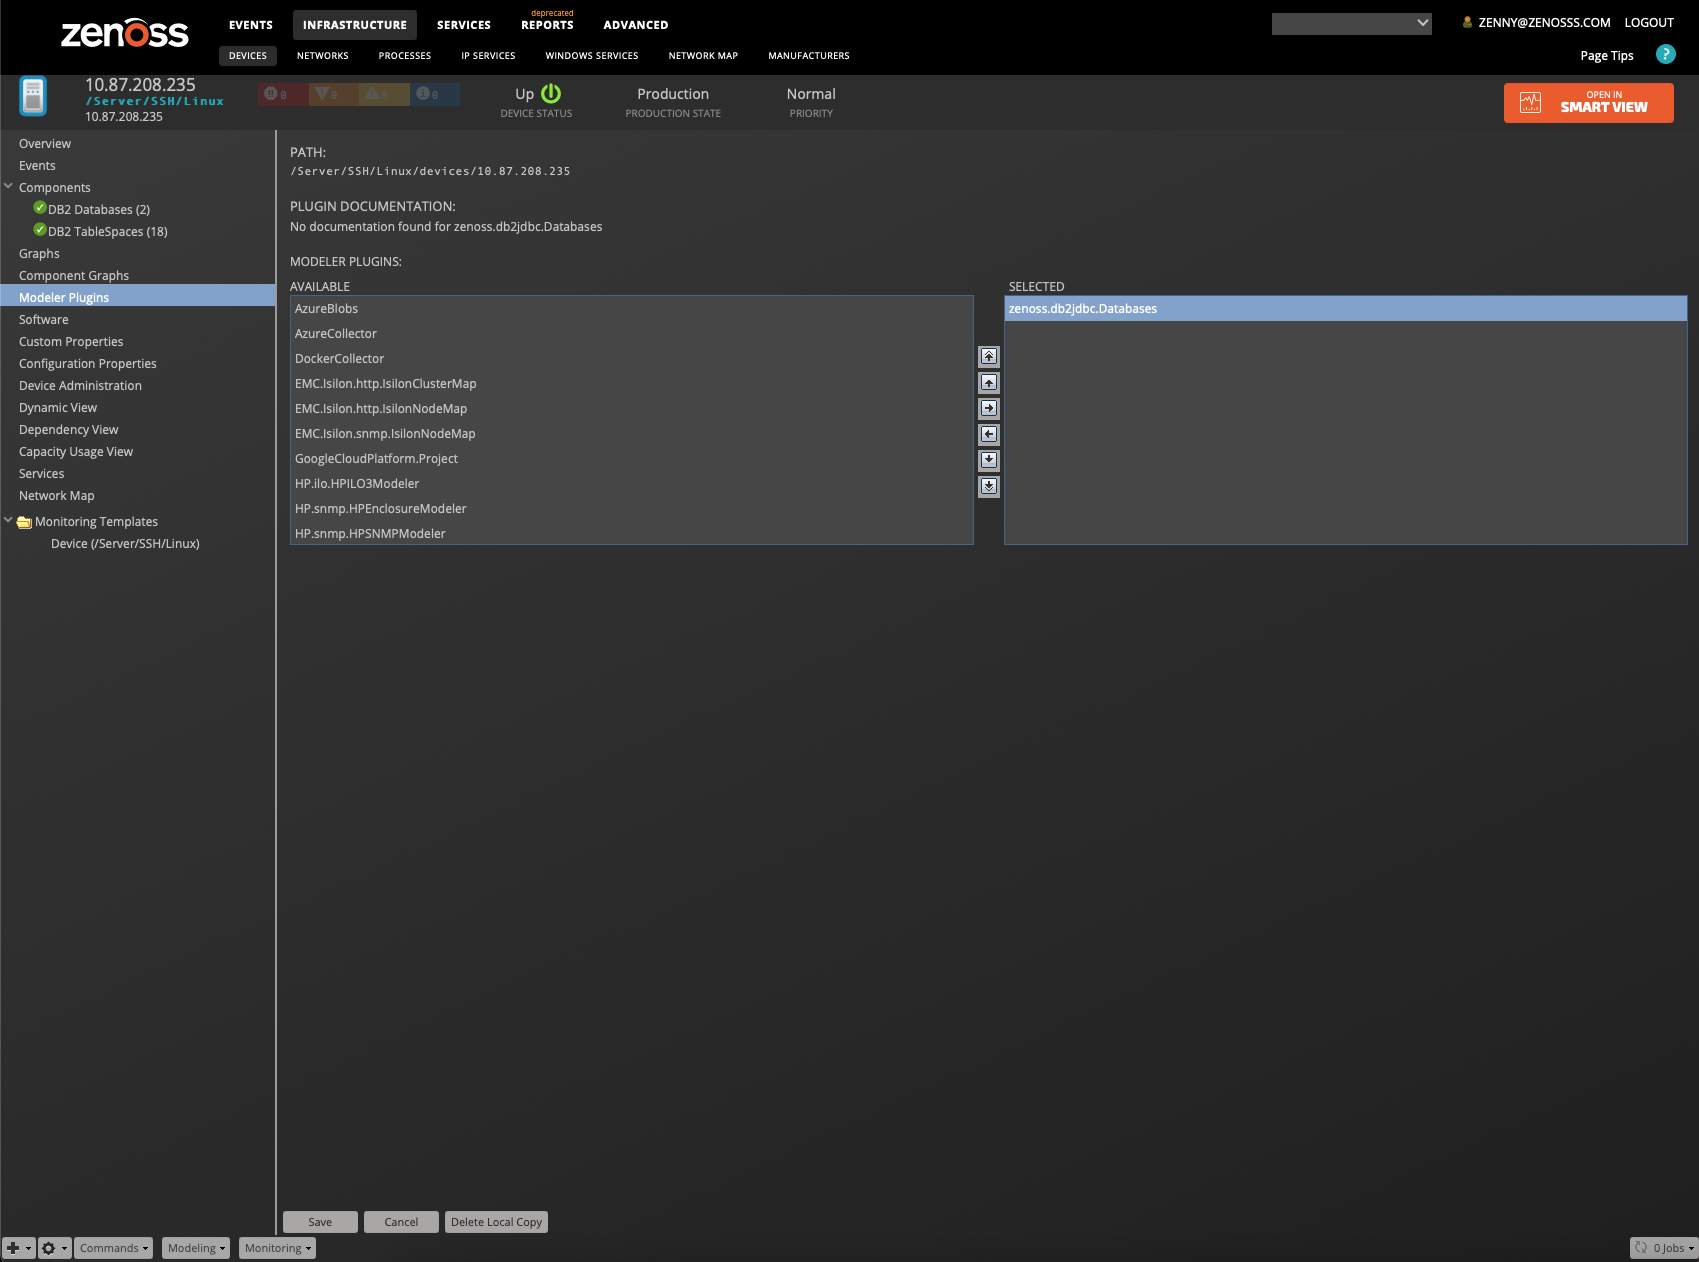
Bind the Plugin Modeler Template to Server
- From the Infrastructure page, select your server.
- From Modeler Plugins, push zenoss.db2jdbc.Databases to the Selected group
- Save
- Now you are ready to add the ConnectionStrings
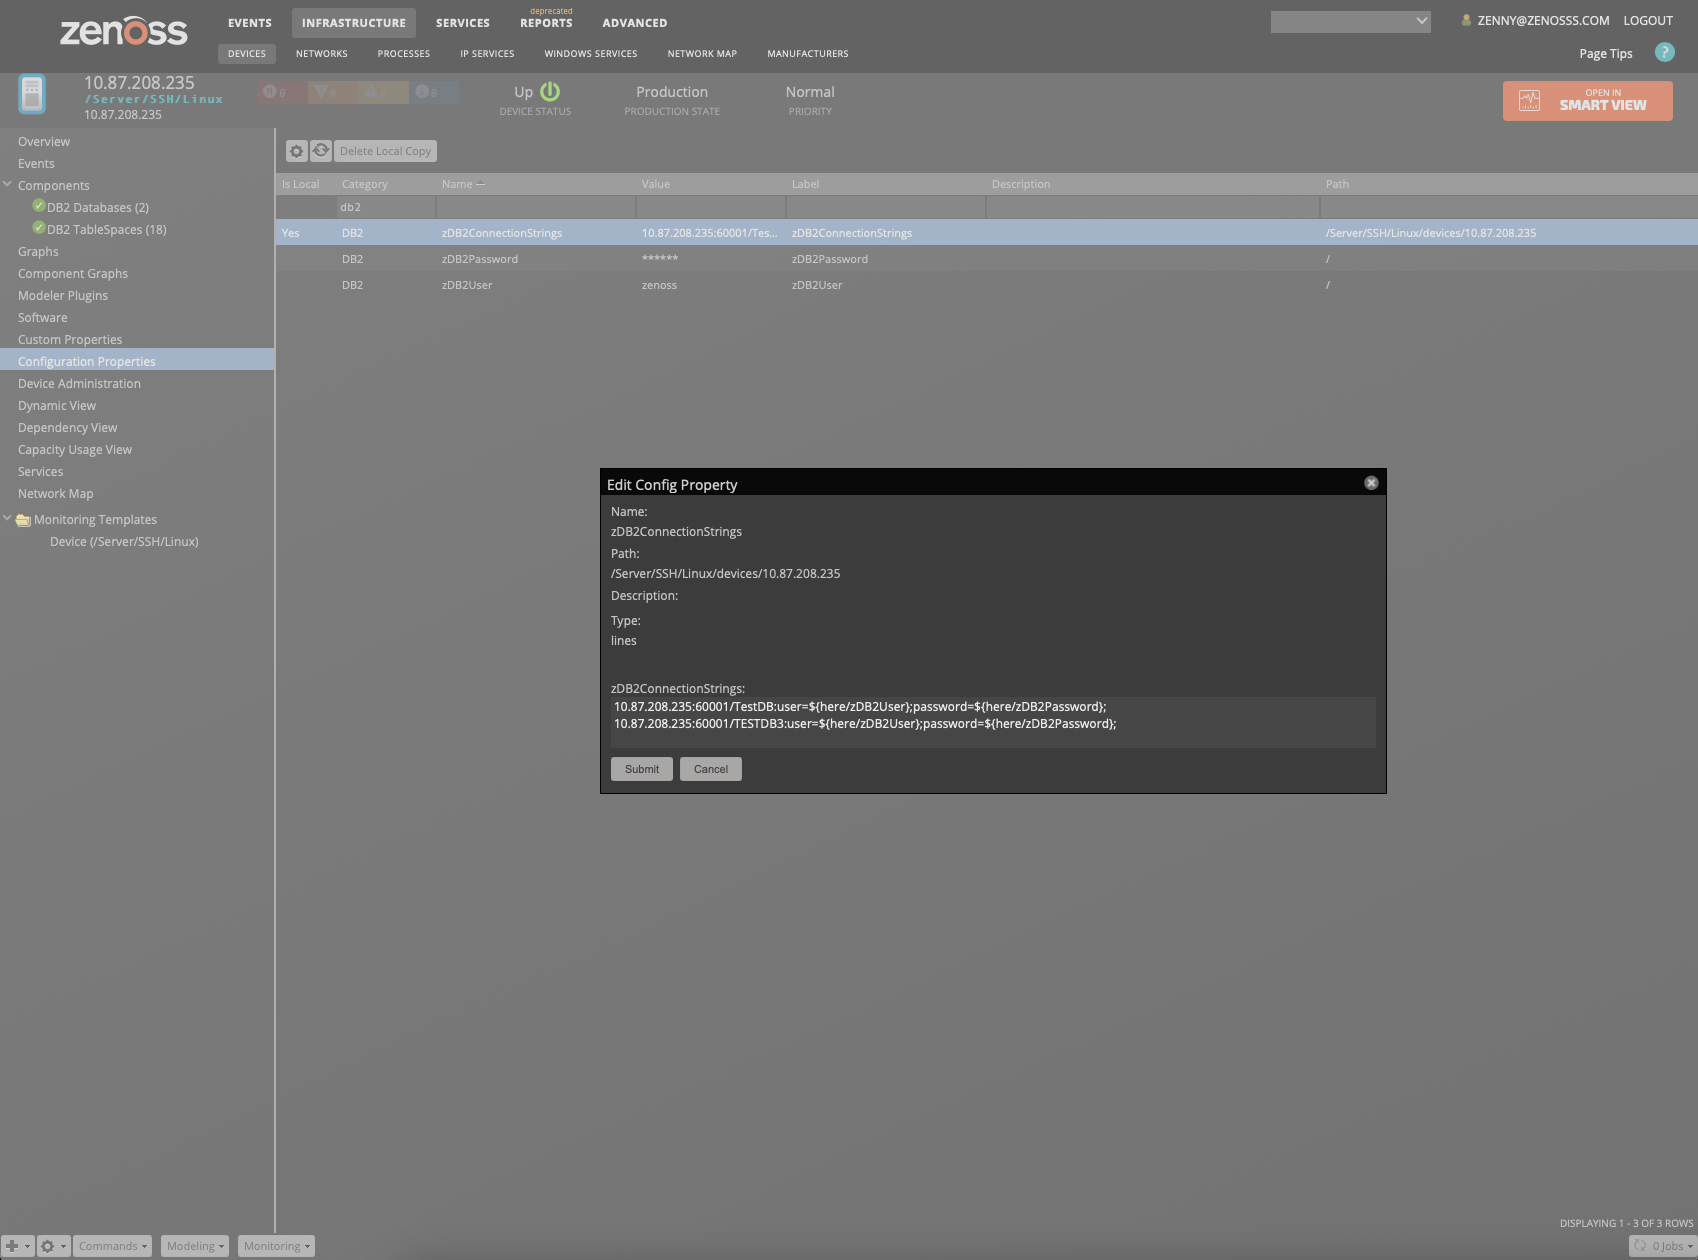
Set the zConnectionStrings Property
-
Select your server from the Infrastructures Tab
-
Click on Configuration Properties
-
Search for zDB2User: Enter your username for the DB (zenoss by default)
-
Search for zDB2Password: Enter your password for the DB (zenoss by default)
-
Search for zDB2 and locate and select zDB2ConnectionStrings
-
Double-click (open) the zDB2ConnectionStrings dialog. You can protect your passwords by setting ${here/zDB2Password} in the connection string as in the following examples:
s1.db2.com:50000/SAMPLE:user=${here/zDB2User};password=${here/zDB2Password};
${here/manageIp}:50000/SAMPLE:user=${here/zDB2User};password=${here/zDB2Password};
We STRONGLY recommend that you install the same read-only user in your databases so that you don't have to chase down usernames and passwords for your instances. A read-only DB user will also enhance your security and be less of a risk of data corruption in your DB. See the Security section below for details.
Optional Java Path
You can use the default version of Java or select a custom version. To use a custom version you can set one of the following environment variables in the zenoss account (in order of priority):
- JAVA_BIN
- JAVA_HOME
Batch Configuration with zenbatchload
You can also add your devices in batch for convenience and automation.
-
Create a text file (filename:
/tmp/db2.txt). Each server has a stanza like:'/Devices/Server/SSH/Linux' 'test.com' setManageIP='10.175.210.160', zDB2ConnectionStrings=['jdbc:db2://test.com:50000/SAMPLE:user=zenoss;password=${here/zDB2Password};', 'jdbc:db2://test.com:50000/HOLD:user=zenoss;password=${here/zDB2Password};', 'jdbc:db2://test.com:50002/EVAL:user=zenoss;password=${here/zDB2Password};',] -
Run the command on the terminal
zenbatchload /tmp/db2.txt
Model the Component
- From the device view, select Model Device from the gear menu.
- If all goes well Zenoss should model the device.
- Since the Instances are just components of the server, you should see them hanging off of the device as components.
Reconfiguration and Remodeling
Deleting or Changing
If you want to delete or change a database from the zDB2ConnectionStrings, follow these steps:
- Delete or change the connection string from zDB2ConnectionStrings
- Manually delete the Database component
- Model the device as before
Adding a Database
To add a device, you simply:
- Add the connection string to zDB2ConnectionStrings
- Model the device as before
Security: DB Credentials
In order to secure the DB2 credentials, we recommend that you create a dedicated user that has read-only access, and then use TALES-masked zProperties to further protect them. The process is as follows:
- Create a dedicated system user and group (zenoss, zenoss)
- Set this users group permissions in DB2 into the SYSMON group
- Setup zProperties for User and Password
- Setup the Connection string to use TALES expressions for credentials
- Test the setup
Create a Dedicated DB2 User and Group
From inside your Linux/Unix system create a user (zenoss) and group (zenoss) as you would any user. You should give that user the least privileges that your security system provides. The user's group identity will be added to DB2 in the next section to give access to the DB.
Set the Group Permissions in DB2
For each running instance, you must log into that instance account. Then connect to DB2 Instance account. For DB2 10.5 it goes like this:
[db2inst1@mp3:~]: source sqllib/db2profile
[db2inst1@mp3:~]: db2 attach to DB2INST1
[db2inst1@mp3:~]: db2 update dbm cfg using SYSMON_GROUP zenoss
[db2inst1@mp3:~]: db2 detach
Note
You must restart the DB2 instance for these changes to take effect.
You can test the setup with the following:
[db2inst1@mp3:~]: db2 connect to SAMPLE
[db2inst1@mp3:~]: db2 GET DATABASE MANAGER CONFIGURATION | grep SYSMON
 *SYSMON group name      (SYSMON_GROUP) = ZENOSS*
The last line indicates success.
Setup the zProperties for User/Password
In Infrastructure -> DeviceName you select Configuration Properties and set:
zDB2User: zenoss
zDB2Password: YourSecretPassword
Setup the ConnectionString with TALES
The full ConnectionString format is:
jdbc:db2://host.example.net:Port/DB_NAME:user=USERNAME;password=PASSWORD;
    or optionally without the prefix:
host.example.net:Port/DB_NAME:user=USERNAME;password=PASSWORD;
With our actual values of username, and password:
mp3.zenoss.loc:50000/SAMPLE:user=zenoss;password=zenoss;
We can generify this considerably by using our TALES expressions:
${here/manageIp}:50000/SAMPLE:user=${here/zDB2User};password=${here/DB2Password};
If you use the recommended username and password you would only need to modify Port and DB_NAME for each connection string
${here/manageIp}:50000/SAMPLE:user=${here/zDB2User};password=${here/zDB2Password};
${here/manageIp}:50001/HOLD:user=${here/zDB2User};password=${here/zDB2Password};
${here/manageIp}:50002/DEFECT:user=${here/zDB2User};password=${here/zDB2Password};
${here/manageIp}:50002/RELOAD:user=${here/zDB2User};password=${here/zDB2Password};
Custom Queries and DataPoints
In order to set up a custom query, you should create a query that returns a single row of data. The data points should be uppercase as that is how DB2 returns the data.
Create the DataSource
Here are the steps to create a call at the database level:
-
Goto Advanced -> Monitoring Templates -> DB2Database
-
Click on plus to add a new datasource, type db2sql, and provide a unique Name
-
Fill in the other values as the original datasource
-
Provide the SQL query. Here is an example:
select * from sysibmadm.snapdb
Create the DataPoints
- From your new DataSource, select the options wheel, and select "Add Data Point"
- Make sure your datapoint name is in uppercase to match the SQL query return
Create Graphs and Thresholds
You can now use your new data points to create graphs and thresholds in the standard way.
References
- IBM JDBC Drivers: https://www.ibm.com/support/pages/db2-jdbc-driver-versions-and-downloads
Changes
1.0.10
- Make DB2 ZenPack compatible with Ubuntu-based CZ 7.2.0 (ZPS-8864)
- Tested with Zenoss Cloud, Zenoss Resource Manager 6.7 and Service Impact 5.6.0
1.0.9
- Fixed DB2 Databases associating with incorrect devices (ZPS-8512)
- Fixed DB2 modeler plugin parsing for more than 1000 DB2 Tablespaces (ZPS-8588)
- Added an event for connection to database issues during DB2 components modeling (ZPS-8579)
- Tested with Zenoss Cloud, Zenoss Resource Manager 6.6.0, and Service Impact 5.5.5.
1.0.8
- Improved the tablespace parser for mixed case results (ZPS-2913)
- Fixed the scripts missing execute permissions (ZPS-2147)
- Tested with Zenoss Cloud, Zenoss Resource Manager 6.6.0, and Service Impact 5.5.5.
1.0.7
- Secure exposed passwords in the process list and events (ZPS-2207)
- Enhance username/password analysis in modeler and docs (ZPS-2548)
- Tested with Zenoss Resource Manager 4.2.5 RPS 743, 5.3.3, 6.0.1, and Service Impact 5.2.2.
1.0.6
- Add CallHome metrics (ZPS-1242)
1.0.5
- Improve sanity checks for ConnectionString in modeler (ZEN-24868)
1.0.4
- Improve Graphs
- Added failsafe for multi-partitioned databases
- Datapoints Changed from Derive to Gauge:
- COMMIT_SQL_STMTS:
- LOCK_WAIT_TIME
- ROWS_READ
- ROWS_SELECTED
- TOTAL_CONS
- Affected Graphs due to datapoint change:
- SQL Statements
- Lock Wait Time
- Rows Stats
- Connections
Note
4.2.X users will have to remove the RRD data files associated with those data points so that affected graphs will populate.
1.0.3
- Improved Java detection
- Allow Java Binary to be set by an environment variable
- Improve ConnectionString handling
- Add Europa Support for graphs
1.0.2
- Improved modeler handling