ZenPacks.zenoss.ConfigurationManager
Subscription
This integration is a subscription-based Professional Services engagement. Integration Services are sold as subscriptions that cover initial setup, ongoing compatibility, and maintenance. All standard packages renew every 12 months from the date of purchase.
Overview
The Configuration Manager ZenPack provides a facility for exporting, importing, and comparing Zenoss monitoring configurations. You can define selection criteria to determine what configuration data is exported. After importing a package of configuration data, you can selectively apply it to the running Zenoss system, or use it in comparisons with other imported configuration change packages.
Note
You must install the ZenPack on both the source and the target system.
Features
Configuration Manager provides the following features:
- A daemon that reads exported data from queues and automatically imports changes.
- A user interface for comparing imported change packages.
- File-based and RabbitMQ AMQP-based import and export.
- One-click configuration snapshot export.
- Pre-configured selection criteria templates and an export wizard.
Prerequisites
Before you install the Configuration Manager ZenPack, verify that your environment meets the following requirements:
| Prerequisite | Requirement |
|---|---|
| Product | RM 5.2.6 or higher (untested on earlier versions) |
| Required ZenPacks | ZenPacks.zenoss.PS.Util 1.9.0 or higher |
| Other dependencies | None |
Base usage
Configuration Manager moves configuration data from an exporting system to an importing system. Configure both systems before you export anything:
- On the exporting system, configure selection criteria, selection criteria groups, and configuration targets that subscribe to those groups.
- On the importing system, configure a configuration source.
If you're using queue-based transport, make sure that your configuration target and your configuration source refer to the exact same RabbitMQ host and routing key, and that only one configuration source reads from any RabbitMQ queue.
Exportable Zenoss configuration objects
Configuration Manager exports two broad categories of configuration data: the objects that describe your monitored infrastructure, and the objects that define monitoring behavior and system settings.
You can export the following infrastructure objects:
- C-properties (user-defined and user-modifiable)
- Device classes
- Device groups, systems, and locations
- Devices
- IP services
- OS processes
- Windows services
You can export the following monitoring and system objects:
- Configuration Manager settings
- Event class information (transforms, mappings, and classes)
- Event triggers and notifications
- MIB definitions
- Monitoring template definitions
- Reports
- User commands
- Users and groups
- Zenoss base settings
- Zenoss events settings
User commands
Commands defined on infrastructure objects are only imported and applied to infrastructure objects that already exist on the target system.
Default collector for device imports
Under Advanced > Configuration Manager > Settings, click Edit Collector Mappings. In the dialog that appears, select a currently defined collector as the default for devices that are imported to this system and have a collector that doesn't exist on this system.
Choosing __NONE__ (the default) causes devices not to be created if the collector specified in the export doesn't exist on the importing system.
Export changes
To export configuration changes:
- Log in to the system you'll use to export changes.
- Create a target (either a file or a queue).
- If the target is a queue, specify the host, port, and routing key. These values must be specified identically in the configuration source object on the importing Zenoss system.
- Create a selection criteria group to contain selection criteria.
- Create one or more selection criteria and attach them to the selection criteria group.
- Subscribe the configuration target to the selection criteria group.
- Export the configuration by clicking the configuration target and selecting Export from the menu, or by using the
zensyncercommand-line tool.
Export notes
Keep the following points in mind when you export configuration changes:
- You can verify exports to queues using the
rabbitmqctl list_queuescommand or the RabbitMQ UI. If the importing system is runningzensyncd, it may import queued changes before you can see them in the queue list. - Exports can be required to contain a description or change ID for business reasons.
- You can't export data from a system in the Disabled or Target role.
Import changes
How you import configuration changes depends on the transport type used for the export. File-based exports require you to move the export file to the importing system, and queue-based exports are retrieved by the zensyncd daemon.
File-based exports
To import a file-based export:
- Move the file to the importing system. See the Advanced usage section for container and directory recommendations.
- Import the file using the command
zensyncer --import -s /absolute/path/to/file. This creates a change package and a set of associated change sets. The system isn't modified at this point unless the automatic apply feature has been selected. - Log in to the system you'll use to import changes.
- To view the contents of the change sets, navigate to a specific change set and view its contents.
- Apply the change package or change sets to update the system with the changes.
Queue-based exports
To import a queue-based export:
- Log in to the system you'll use to import changes.
- Create a source definition to allow the changes to be retrieved. Specify the routing key from the target. The system isn't automatically updated unless the automatic apply feature has been selected.
- The
zensyncddaemon imports the changes from the source, creating a change package and a set of associated change sets. - To view the contents of the change sets, navigate to a specific change set and view its contents.
- Apply the change package or change sets to update the system with the changes.
Import notes
Keep the following points in mind when you import configuration changes:
- Configuration Manager has no undo capability, so you can't revert applied changes. Review change sets before you apply them.
- You can't import or apply change sets on a system that is disabled or in the Source role.
- For the greatest success with configuration import, install the same version of ZenPacks on the target system as on the source system. The greater the difference between ZenPack versions, the greater the risk of unforeseen issues.
- Application of change sets can be required to contain a description or change ID for business reasons.
- The Export to Target option lets you export using a selected configuration target's settings (selection criteria groups) to a selected target URI. Use this option to export data multiple times with the same settings. You can also update the settings using the Migration Wizard.
- The Export to Local option performs the same action as Export to Target, but imports the exported change sets directly to the same RM where the export was initiated, bypassing the transport stage.
If you apply changes that you didn't want, you have the following options:
- Apply a new change set that reverses the changes.
- Revert the changes manually.
- Use the Differences in Change Packages menu option to compare the applied change package against a recent snapshot change package. Select the difference change sets to build a package set that you can use to revert the selected changes.
Migration Wizard
The Migration Wizard is designed to simplify configuration migration in a few steps.
When you install the ZenPack, it creates two new default targets with different transport types: file and rabbitmq.
The wizard configures the source machine, which is the machine you export from. To open the wizard, click the appropriate button on the Configuration Manager Settings page. Each step includes inline help.
The transport type you choose determines what you do after the wizard finishes:
- If you're using
fileas the transport, move the created file to the destination machine and run the following command in the container:zensyncer --import -s path_to_file. - If you're using
rabbitmqas the transport, configure the RabbitMQ routing key and host on theConfigurationSourcesettings of the target machine.
Note
Zenoss Cloud doesn't support migration using file as the transport type.
Migration Wizard steps
The wizard guides you through five steps:
- Select the templates you want to migrate.
- Select any custom selection criteria groups that you created outside of the wizard and want to include.
- Select an existing configuration target or create a new one, and configure the target details. You can choose one of two transport types,
fileorrabbitmq. Each transport type has its own required configuration details. - Enter any additional information for change tracking.
- Review an overview of the tasks the wizard performs, and start the migration.
After migration is complete, you can remove all wizard-generated configurations, including all selection criteria groups and selection criteria that the wizard created.
Criteria templates
Criteria templates are predefined selection criteria groups containing common selection criteria used for migration.
In criteria templates, you choose the templates you're interested in and instantiate them as new selection criteria groups. You can then modify or delete the resulting selection criteria groups as needed.
Selection criteria
Selection criteria determine what to export to a target. Each selection criterion consists of a selector plugin and configuration information. You can modify the configuration information.
The Ignore objects installed by ZenPacks? checkbox lets you exclude objects installed by ZenPacks from the export. If objects you expected aren't being exported, try turning off this option.
Redaction policy
Redaction is the process of removing security-sensitive information from data. Use a redaction policy to completely remove or redact specified data in exported change packages.
Default redaction policies
Configuration Manager provides three default redaction policies:
- All: Enables all existing redaction controls.
- None: Disables all existing redaction controls.
- Custom: Redaction controls can be enabled or disabled by the user.
Redaction controls
Each policy includes the following redaction controls. Only the Custom redaction policy allows you to enable or disable individual controls.
| Redaction control | Description |
|---|---|
RedactPasswords |
Redact password content information. |
RedactUserNames |
Redact usernames from exported content. |
RemoveUserCommands |
Remove user commands from export. |
RedactZProperties |
Redact zProperty content information. |
RemoveCustomProperties |
Remove custom properties from export. |
RedactSNMPConfiguration |
Redact SNMP configuration information. |
RemoveBaseSettings |
Remove base settings from export (Advanced > Settings > Settings). |
RemoveUsers |
Don't export user objects. |
RemoveUserGroups |
Don't export user group objects. |
RemoveDeviceLocations |
Remove device locations from device exports (/Locations). |
RedactDeviceLocations |
Redact device location information in device exports (/Locations). |
Add or remove a redaction policy
To add a redaction policy, click + and complete the following fields:
- Policy type: Select from the dropdown list (All, None, or Custom). This field is optional; a Custom redaction policy is created by default.
- Redaction policy name: Enter a name for the policy. This field is required.
- Redaction policy description: Enter a description for the policy. This field is optional; if left blank, the description of the selected policy type is used.
To delete a redaction policy, select it and click -. Deletion can't be undone.
Select a redaction policy for export
You can select a redaction policy per target under Advanced > Configuration Manager > Configuration Targets > Export to Target / Export to Local > Redaction Policy.
Differences Engine UI
The Differences Engine UI provides a visual way to review the differences between two imported change packages, and to select change sets to place in a new change package that you can transport or apply. The Differences Engine UI also supports comparisons between a change package and the live system configuration, and between two live system configurations.
UI panels
The Differences Engine UI is made up of six panels and one dialog, described in the following sections.
Choose packages panel
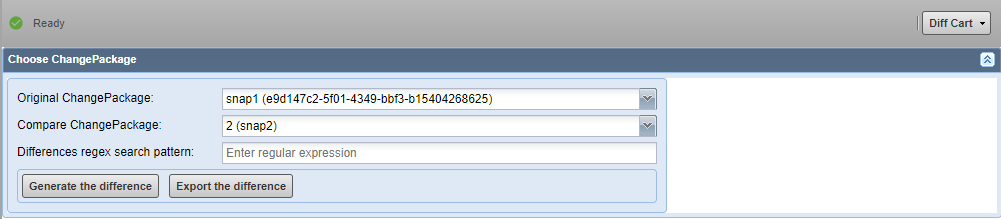
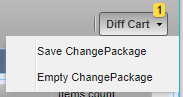
The top left of the panel displays a status indicator showing whether a difference is being generated. The Diff Cart button and dropdown are in the top right; use them to review collected change sets and either save the cart to a new change package or empty the cart.
After a change set is added to the differences cart, a tooltip appears in the top right corner, below the Diff Cart button.
The header line is below the status line, and contains identifiers for the selected change packages once the difference has been generated. Click the header text or background to toggle the panel's collapsed state, or click the Toggle collapse button on the left side of the header line.
The panel below the header contains the selectors and buttons for configuring difference generation on the left, and the Categories panel on the right.
To generate a difference report, configure the following fields:
- Original ChangePackage: Select the comparator that serves as the base for the difference report. All difference report actions (insert, delete, and replace) represent the changes needed to transform the original comparator into the compare comparator. This field is required; differences can't be generated without it.
- Compare ChangePackage: Optionally, select a change package to compare against the original. If you don't select one, the generated difference represents adding the entire contents of the original change package to an empty system.
- Differences regex search pattern (optional): Enter a regular expression to search and filter identified differences. The expression is checked against the change object's
Pathattribute while differences are being generated. You can use regex negative constructs, for example:^((?!-(backup|preupgrade)).)* $.

Click Generate the difference to start generating the change package differences. Clicking this button updates the header for the Choose packages panel and replaces the contents of all other panels. The button is disabled until you select an original change package.
Click Export the difference to generate and download the change package differences as a CSV file. The CSV columns are described in the following table.
| Column name | Description |
|---|---|
| Original ChangeSet | The original comparator item's path. |
| Diff Orig Value | The original item value used in the comparison. |
| Diff Type | The type of data that was compared. |
| Comparing ChangeSet | The comparison comparator item's path. |
| Diff Details | Any details that resulted from the item's comparison. |
| Diff Operation | The action needed for the original comparator item to become the compare comparator item. |
| Diff Comp Value | The compare item value used in the comparison. |
| Diff Path | The path of the item being compared. |
| Type | The object type of the item being compared. |
| Selector | The Configuration Manager selection criteria of the original and/or compare items. |
Note
Live (Live System) is a special selector option available in both the Original ChangePackage and Compare ChangePackage dropdowns. Selecting this option uses the live configuration item for the comparison.
Note
Generating differences between change packages can take some time. If multiple users try to generate differences for the same change packages simultaneously, a Differences already being calculated. Please retry in a few moments warning appears. The status indicator may or may not show Ready while the difference is still being calculated in the background. Press the Generate the difference button again after some time to see the result.

The left-side navigation panel and the Choose packages panel collapse when difference generation begins. You can still access them using the Toggle collapse button on the respective panels.
Categories panel
The Categories panel displays all available change categories that have differences for the selected change packages, along with the count of change set items in each category. Selecting a category replaces the content in the remaining panels. Categories in the Differences Engine UI correspond to the selection criteria used for export.

ChangeSets Hierarchy panel
The ChangeSets Hierarchy panel displays a tree view of differences for the currently selected category. It shows counts for attribute differences on the displayed items and counts for directly contained change set items that have attribute differences. The number in parentheses next to each count shows the total differences for the subtree at that point.
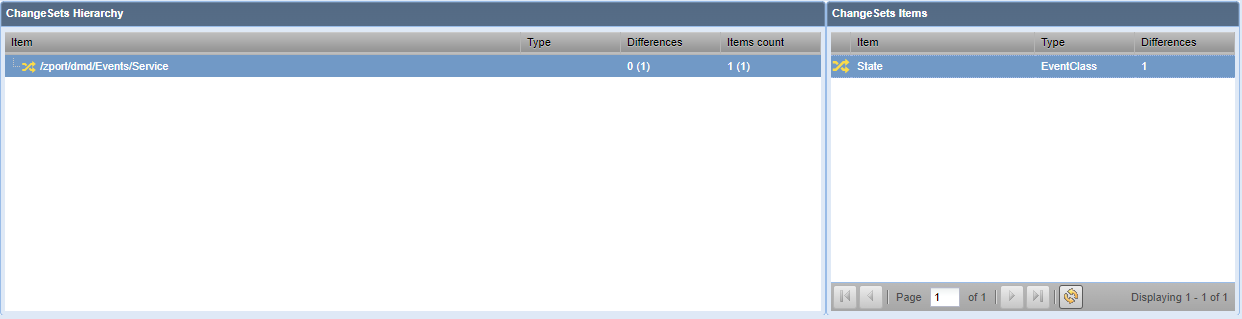
The first column of the ChangeSets Hierarchy panel shows the type of changes in the tree below that point:
| Icon | Action | Description |
|---|---|---|
| (insert icon) | insert | Add an item to the original comparator. |
| (replace icon) | replace | Modify the value in the original comparator. |
| (delete icon) | delete | Remove an item from the original comparator. |
Note
The "delete" action is in the context of the comparison only. Configuration Manager doesn't delete configurations.
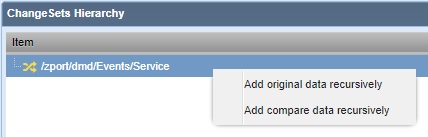
Selecting an item in the ChangeSets Hierarchy updates the ChangeSet Items and Differences panels. Right-clicking an item opens a context menu that lets you recursively add change sets below that item in the tree. You can add either all original change sets or all compare change sets.
ChangeSet Items panel
The ChangeSet Items panel displays change set items, their object types, and a count of attribute differences, along with the difference operation code in the first column. Operation code values are add, remove, and replace. Each value indicates the action needed for the original change package to match the comparing one.
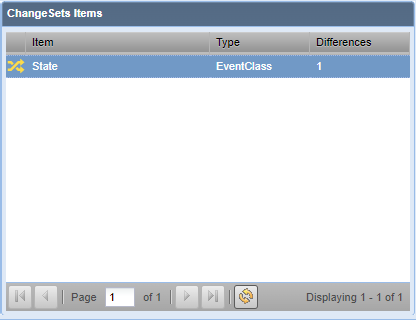
By default, this panel shows 25 items per page, with pagination available in the bottom toolbar. Selecting an item updates the Differences panel with the attribute differences for that item.
Differences panel
The header of the Differences panel displays the name of the selected item for which attribute differences are shown.

The Differences panel includes the following buttons:
- Add original ChangeSet to ChangePackage: Adds the change set from the original package to the change sets cart for the selected item. Disabled if the original package contains no differences for the selected item, or if the selected item from the original package is already in the cart.
- Add compare ChangeSet to ChangePackage: Adds the change set from the compare package to the change sets cart for the selected item. Disabled if the compare package contains no differences for the selected item, or if the selected item from the compare package is already in the cart.
- Remove ChangeSet from ChangePackage: Removes the selected item from the change sets cart. Disabled if the selected item isn't in the cart.
The panel displays attribute differences including the attribute ID (labeled Text) and type for the selected item, as well as the values from each change package with the exact changes highlighted.
Changesets Cart panel
The Changesets Cart panel displays the change sets you've selected to save to a new change package. The table shows the following fields for each item in the cart: Id, Type, and Source. The last column provides a Delete item action to remove a single item from the cart.
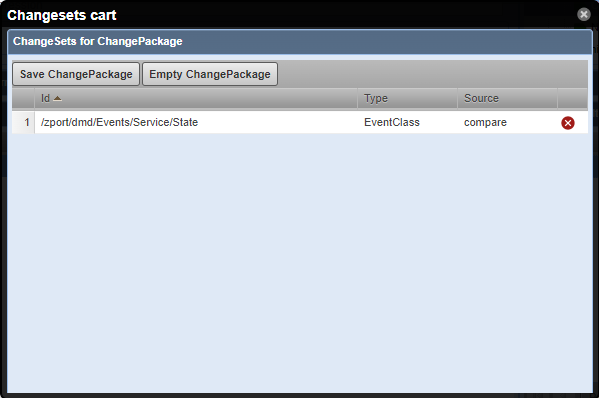
The Changesets Cart panel includes the following buttons:
- Save ChangePackage: Saves all items in the change sets cart to a new change package. Opens a dialog where you can configure the change package. Empties the cart on successful save.
- Empty ChangePackage: Empties the change sets cart after confirmation.
Navigating away from this page with unsaved items in the cart opens a warning dialog.
Save Package dialog
The Save Package dialog lets you set the description and ID for the new change package that is created from the cart contents.
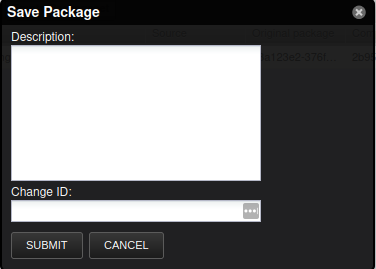
The dialog includes two buttons:
- Click Cancel to close the dialog without creating a new change package. The cart contents are preserved.
- Click Submit to attempt creating a new change package from the cart contents. If successful, the cart is emptied.
Differences Engine UI usage flow
To use the Differences Engine UI:
- Select the original change package from the Original ChangePackage dropdown. The package list refreshes each time you open the dropdown.
- Optionally, select a compare change package from the Compare ChangePackage dropdown, and enter a search term.
- Click Generate the difference.
- In the Categories panel, select a category from the tree to view that category's change set differences.
- In the ChangeSets Hierarchy panel, select an item from the tree to view its attribute differences and contained items.
- In the ChangeSet Items panel, select a contained item to view its attribute differences.
- In the Differences panel, review the listed attribute differences. Use this panel to add or remove original or compare change sets from the change sets cart.
- View your selected change sets in the Changesets Cart panel.
- Save the change sets to a package set, or discard them.
Extended use
The Differences Engine UI supports additional functionality beyond the core export, import, and apply workflow. For example, you can compare two live template configurations. This functionality is still in development and can be accessed by manually editing the URL.
To compare two live system templates, use a URL in the following format:
/zport/dmd/configurationManager?orig=/zport/dmd/Devices/Server/Linux/rrdTemplates/Device&comp=/zport/dmd/Devices/Server/...
Snapshots
The Configuration Manager snapshot facility lets you export all configuration data with a single click. This is equivalent to using the AllItems criteria template and setting the Ignore objects installed by ZenPacks? property to false on all selection criteria.
Every snapshot creates a local export of all configuration data. If you need to compare the snapshot with another Zenoss system, send the resulting change package to the target system. When you initiate a snapshot from the UI or command line, a zenjobs job is created to perform the snapshot function.
Take a snapshot
To export all configuration data as a snapshot:
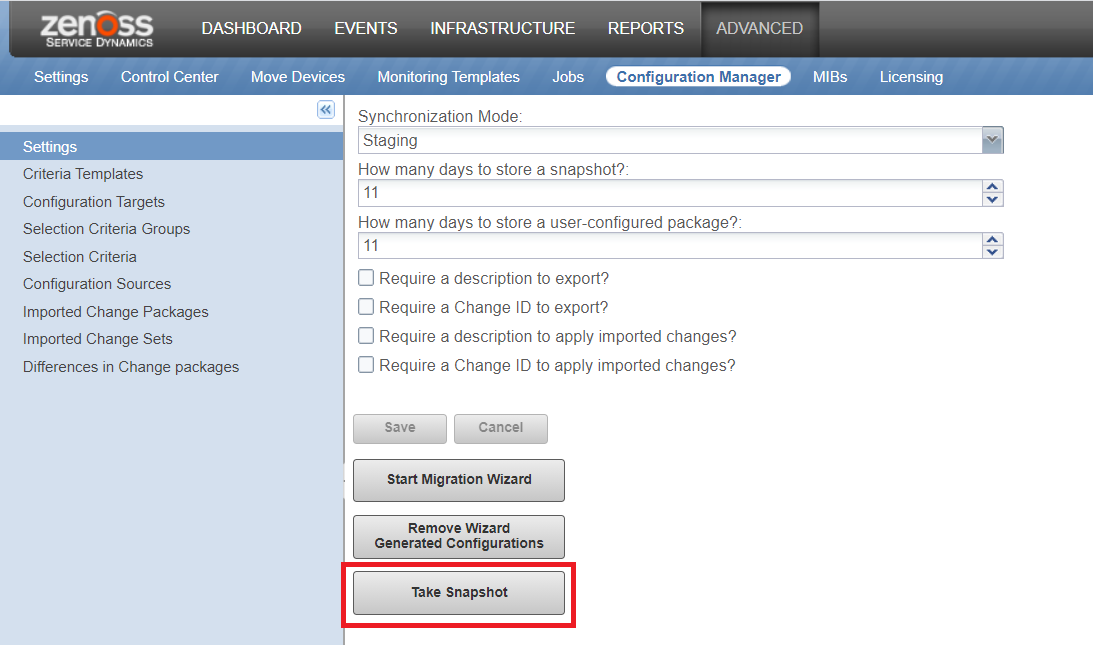
- Go to Configuration Manager > Settings.
-
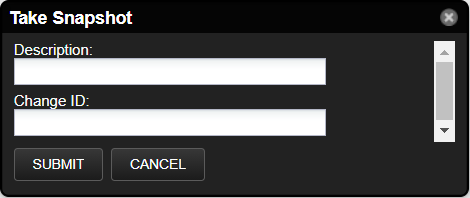
Click Take Snapshot. A pop-up window appears.
-
Optionally, fill in the Description and Change ID fields.
-
Click SUBMIT. A UI notification confirms that the Take snapshot job has started. You can monitor progress in Advanced > Jobs.

-
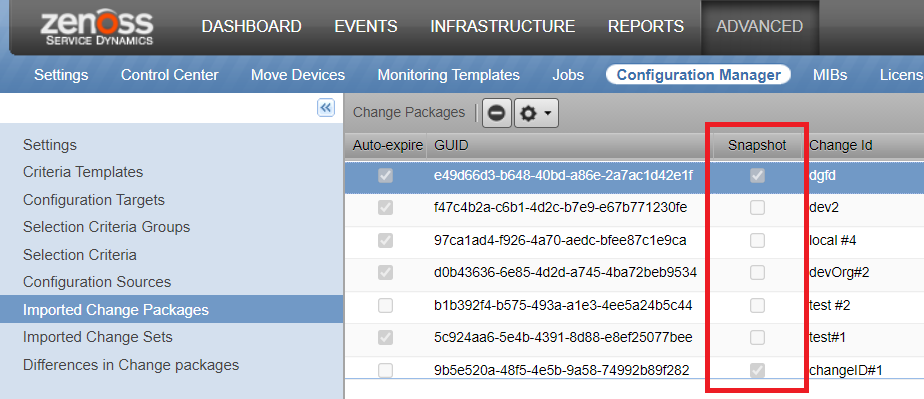
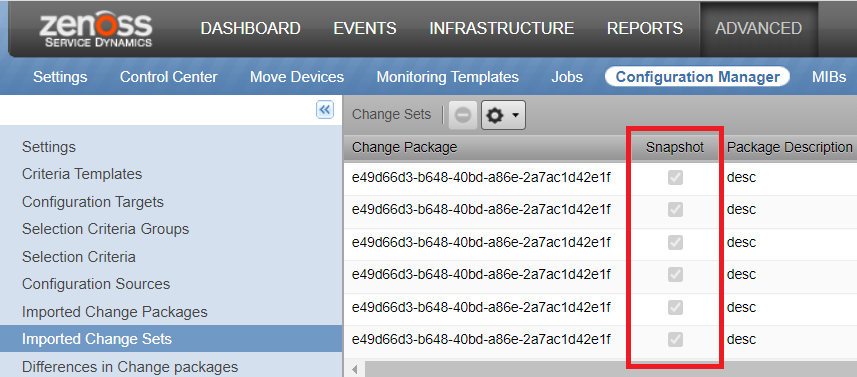
When the job completes, the snapshot change package appears in the Imported Change Packages view. A Snapshot column is added to the Imported Change Packages and Imported Change Sets views to indicate whether an entry is part of a snapshot.
ChangePackage auto-expiration
Automatic removal of change packages prevents the overall number of imported change sets and change packages from growing too large, which can consume significant amounts of storage and affect UI performance. In typical usage scenarios, imported configuration data is applied to the system shortly after import and is no longer needed.
Expiration can be configured separately for change packages resulting from snapshots versus those from user-configured exports. By default, all change packages expire and are removed after 11 days. While expiration can't be disabled entirely, you can update individual change packages to ignore the automatic expiration process if you need to retain them for a longer period.
Note
The zensyncd service must be running for ChangePackage expiration to occur.
Configure automatic expiration
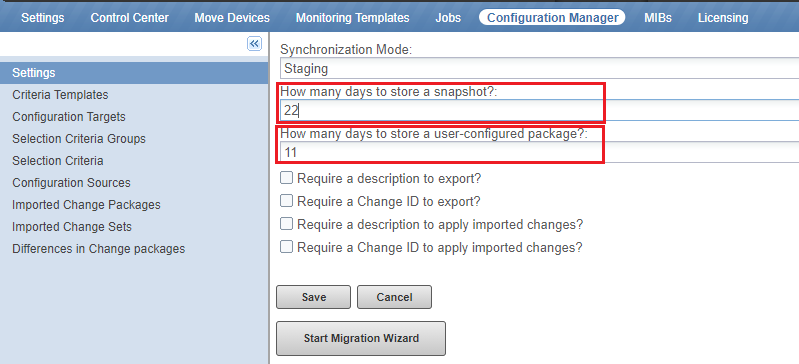
Snapshot packages and user-configured packages have separate expiration settings. To change either value:
- Go to Advanced > Configuration Manager > Settings.
- To change snapshot package expiration, update the How many days to store a snapshot? field.
-
To change user-configured package expiration, update the How many days to store a user-configured package? field.
-
Click Save.
Disable auto-expiration for a ChangePackage
You can disable auto-expiration for an individual change package in two ways: from the Other actions menu, or from the Details panel.
Option 1: Use the Other actions menu
To disable auto-expiration from the toolbar menu:
- Go to Advanced > Configuration Manager > Imported Change Packages.
-
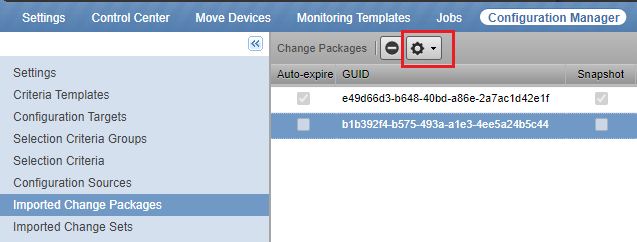
Select the change package from the table.
-
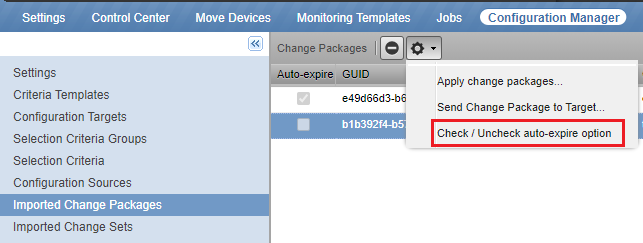
Click the wheel button (Other actions) in the toolbar.
-
Select Check / Uncheck auto-expire option from the dropdown menu.
-
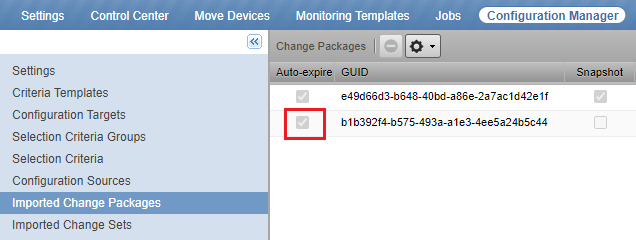
The Auto-expire checkbox for the selected change package toggles to its new value.
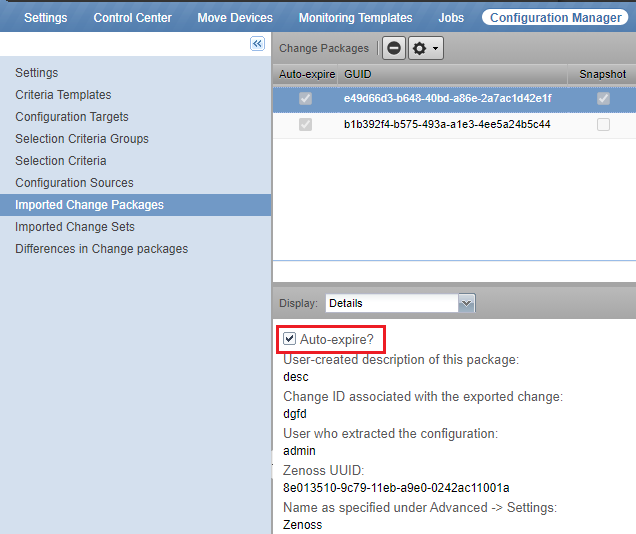
Option 2: Use the Details panel
To disable auto-expiration from the package details:
- Go to Advanced > Configuration Manager > Imported Change Packages.
- Select the change package from the table.
-
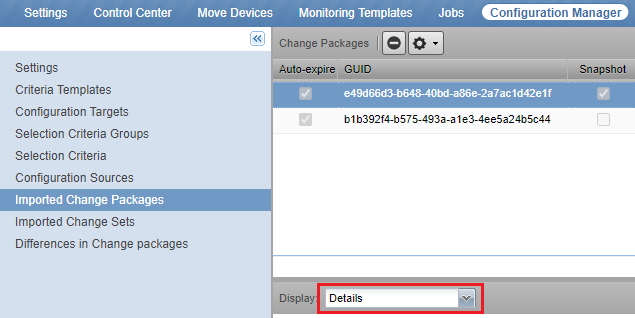
In the Display dropdown in the lower panel, select Details.
-
Click the checkbox next to Auto-expire? and then click Save at the bottom of the panel.
Advanced usage
Configuration Manager provides a command-line interface for automation, and a set of zensyncer options for scripted exports, imports, and snapshots.
Command-line usage
You can automate Configuration Manager tasks using the zensyncer command. The suggested containers for command-line usage are zensyncd or zope.
For a file to be accessible to these containers, copy it to /opt/serviced/var/volumes/<SERVICE_ID>/var-zenpacks/. That location is mounted in the containers at /var/zenoss.
zensyncer command options
The following options are available for the zensyncer command:
| Option | Description |
|---|---|
--decode |
Read the --importFile and export in plain text to --exportFile. |
--encode |
Read the plain-text --importFile and export to --exportFile. |
--import |
Import the --importFile onto this Zenoss master. |
--export |
Export configuration items to the specified target. |
--sync |
(Deprecated) Same as --export. |
--localExportImport |
Export configuration items and import locally. |
--exportChangePackageToTarget=TARGET |
Export an existing change package to the specified target. |
--takeSnapshot |
Take a snapshot of all configuration items and import locally to the target snapshot. |
--set_sync_mode=MODE |
Set the synchronization mode: Disabled, Target, Source, or Staging. |
--show_sync_mode |
Show the current synchronization mode. |
--list_sources |
List available sources. |
--show_package_options |
Show the available key=value pair packaging options. |
--list_targets |
List available targets. |
--show_change_packages |
Show the list of change packages in the system. |
--show_change_sets=PACKAGE |
Show the list of changes in a change package. |
--apply_change_package=PACKAGE |
Use this change package to apply specific changes. |
-c SETS, --apply_change_sets=SETS |
Apply specific changes. Omit to apply all changes. Can be specified more than once. |
--show_redaction_policies |
Show the available redaction policies. |
-t TARGET, --target=TARGET |
Destination to send data. |
-s SOURCE, --source=SOURCE |
Source from which to retrieve data. |
-o FILE, --exportFile=FILE |
Specify the file to which zensyncer writes output. |
-i FILE, --importFile=FILE |
Specify the file from which zensyncer reads. |
-p OPTION, --package_options=OPTION |
key=value pair packaging option. Can be specified multiple times. |
--comment=COMMENT |
Comment for applying changes. |
--change_id=ID |
Change ID for applying changes. |
--redact=POLICY |
The redaction policy to use for removing sensitive information (for example, passwords). |
--importStatusCount=COUNT |
How often to emit progress information during import. |
--auto_commit |
Apply changes after import. |
--force_apply |
Re-apply any previously applied changes. |
Examples
Take a snapshot:
zensyncer --takeSnapshot -p change_id={} -p description={}
Import a file:
zensyncer --import -s /absolute/path/to/file
Changelog
The following sections list the new features and bug fixes in each release of the Configuration Manager ZenPack, starting with the most recent release.
3.6.4
Bug fixes
- SVC-4082: Updated
setup.pyversion 3.6.3 to 3.6.4. - SVC-4082: Fixed error log wording.
- SVC-4082: Fixed incorrect logging call.
- SVC-4082: Added new exception class to return
MARKERwhen appropriate. - SVC-4082: On config apply, avoided failure caused by a bad ZODB object that fails to fully resolve.
3.6.3
New features
- SVC-4056: Added new "Events Settings" selection criteria plugin.
Bug fixes
- SVC-4068: Updated "Apply Change" logic; errors are now logged and processing continues to the next configuration when failing to set an entity relation.
3.6.2
Bug fixes
- SVC-4044: Added migrate script to add a
zenjobsendpoint to thezensyncdservice.
3.6.1
Bug fixes
- SVC-4030: Device selection criteria: device OS and HW exports now use the same criteria logic.
- SVC-4030: Device selection criteria: filtering criteria now works correctly.
- SVC-4030: Device export now excludes the last model time attribute value.
New features
- SVC-3991: Added new documentation and basic overview section.
3.6.0
New features
- SVC-3907: Initial implementation of destructive applies of imported change packages.
- SVC-3907: Added additional audit logging of actions and changes.
Bug fixes
- SVC-3907: Reduced Zope memory utilization by moving tasks to jobs.
- SVC-3907: Improved logging messages and reduced log verbosity.
- SVC-3907: Fixed device default collector mapping.
- SVC-3907: Fixed trigger and notification importers' handling of exported object additional data.
3.5.8
Bug fixes
- SVC-3930: Removed non-decodeable string characters on export.
3.5.7
Bug fixes
- SVC-3829: Added safer handling of device and device component object recursion results.
3.5.6
Bug fixes
- SVC-3747: Fixed
isliceint error that was breaking imports.
3.5.5
New features
- SVC-3215: Diff UI can now compare a change package against the live system configuration.
Bug fixes
- SVC-3668: Reduced Zope memory consumption when viewing imported change sets.
- SVC-3680: Importing change packages is now faster, improving snapshot times as well.
- SVC-3682: Fixed issue caused by SVC-3668 that limited change package import to a maximum of 50 change sets.
- SVC-3686: Fixed device component monitor value being updated without updating the catalog.
- SVC-3706: Fixed report exporter attempting to export twice and logging the error.
- SVC-3707: Fixed snapshot export with an error being re-run by
zenjobs.
3.5.4
New features
- SVC-3585: Added new tooltip for the diff action icon in the "Differences in Change Packages" view.
- SVC-3579: Removed the relationship requirement between an imported object and a ZenPack for a successful import.
- SVC-3522: Added new "Maintenance Window" selection criteria plugin.
- SVC-2676: Added new Compare to Live menu action for imported change sets.
- SVC-3649: Added support for importing change package change sets that reference non-existent object types (for example, a ZenPack that isn't installed).
Bug fixes
- SVC-3616: Fixed difference export's "Diff Path" to use the object's full path.
- SVC-3445: Added configurable cache time-to-live (TTL) for generated diffs under Configuration Manager settings.
- SVC-3442: Difference panel value columns now honor line breaks and are selectable for copying.
- SVC-2676: The
zensyncer --importFilecommand argument now honors relative file paths. - SVC-3636: Updated comparison mismatch object logic to reduce false positives and apply only to
insertordeleteitem actions.
3.5.3
Bug fixes
- SVC-3538: Fixed installation on older versions of RM.
3.5.2
Bug fixes
- SVC-3521: Implemented
makeTargetforAmqpTransporter.
3.5.1
Bug fixes
- SVC-3521: Fixed monitoring filter logic where path was not properly determined.
- SVC-3521: Fixed locally bound component templates not being exported.
- SVC-3521: Fixed change set configuration path to show path without extraneous attributes.
- SVC-3521: Fixed inconsistency in
myReferenceID attribute between ZODB and non-ZODB exported objects. - SVC-3521: Improved clarity of logging wording.
- SVC-3521: Fixed
ExportedObjectReferenceresolver caching to use object path and not cacheMARKERobjects. - SVC-3521: Fixed apply logic to only apply data when there is a difference.
3.5.0
New features
- SVC-3478: Added new configuration option to set the TTL for caching change package differences.
Bug fixes
- SVC-3476: Fixed error when applying an export redaction policy to
cProperties. - SVC-3443: Fixed large memory usage during large exports or snapshots.
- SVC-3297: Performance enhancement: cache
ExportedObjectresolvers.
Note
Configuration Manager 3.5.0 can't import exports generated by previous versions.
3.4.3
Bug fixes
- SVC-3464: Fixed failed diff and import caused by a string comparison against
Noneand an empty string.
3.4.1
Bug fixes
- SVC-3446: Fixed failed diff generation;
NoneTypeobject has no attributegetConfigItemId.
3.4.0
New features
- SVC-1818: Added redaction checks.
- SVC-1818: Renamed
REDACT_USER_COMMANDStoREMOVE_USER_COMMANDS. - SVC-1818: Added tests for redaction.
- SVC-1818: Added check for redacted passwords.
- SVC-1818: Added
isPasswordandisUserNamechecks. - SVC-1818: Added export/import of redacted usernames and passwords in
cProps. - SVC-1818: Added
RedactionControlclass and YAML templates. - SVC-1818: Added redaction policies.
- SVC-1818: Added redaction control to UI.
- SVC-1818: Added
RedactionPolicyPanelandRedactionControlsas a subcomponent panel. - SVC-1818: Added
RedactionPolicyInfoobject andcontrolsEnabledproperty. - SVC-1818: Added new redaction policy and controls facade methods.
- SVC-1818: Added migration script for
RedactionPoliciesandRedactionControls. - SVC-1818: Added documentation for redaction policy.
- SVC-3170: Added all information about objects with no items inside.
- SVC-3194: Added selector for device component properties.
- SVC-3194: Added
DeviceComponentReferenceand custom importer. - SVC-3194: Extended importer and
DeviceComponentPropertiesDataReference. - SVC-3194: Added filtering of devices by device class, device regex, path regex,
prodState, andperfServer. - SVC-3194: Added basic exporter and selector for device component.
- SVC-3194: Added device component importer and comparator; fixed exporter.
- SVC-3204: Added methods to filter and collect selected manufacturers.
- SVC-3204: Added export/import for manufacturers and products.
- SVC-3204: Added exporter/importer for
DeviceHWand operating system objects. - SVC-3204: Added comparator for
manufacturerNameandproductNamefor operating system andDeviceHWobjects. - SVC-3375: Added individual service selectors.
- SVC-3375: Deprecated
SelectionCriteria_servicesselector. - SVC-3419: Added reports to list of exportable objects.
Bug fixes
- SVC-1573: Removed
savedEventFilterproperty that doesn't exist. - SVC-1818: Fixed return value when a value is redacted, to avoid errors.
- SVC-1818: Added check for
passwordTypes. - SVC-1818: Updated documentation about removing groups, locations, and systems in export.
- SVC-3170: Fixed
origSetPathorcompSetPathfordiffItemContainer. - SVC-3170: Added
SetPathstogroupingNodePathdiffContainer. - SVC-3170: Fixed
groupingNodecontainer logic. - SVC-3170: Updated
saveChangePackagelogic to order change sets byexport_id. - SVC-3170: Added
origSetPathandcompSetPathfor diff sets. - SVC-3208: Updated diff UI dark theme and color palette.
- SVC-3211: Changed change set re-applying log level to
INFO. - SVC-3211: Changed redundant log level to
debug. - SVC-3214: Improved diff item compare message and error details; added logic for including warning diff items.
- SVC-3282: Added exception handling during export to continue on individual object failure.
- SVC-3298: Added export of device-local templates.
- SVC-3317: Added custom importers for
MibOrganizer,MibModule, andMibNode. - SVC-3317: Added custom instantiation of
MibOrganizer,MibModule,MibNode, andMibNotificationobjects. - SVC-3357: Updated
DetailedStringcompare logic and simplified. - SVC-3358: Fixed diff exporter.
- SVC-3359: Updated
diffPackagesto catch any errors and update cached build status with error. - SVC-3375: Fixed error when no diffs exist for a selector.
- SVC-3376: Updated comparator; removed
ConfigManDiffTreeObjectandConfigManDiffLeafObjectclasses. - SVC-3376: Updated
getPkgDiffObjectItemsto show only leaf containers. - SVC-3376: Removed
metatypefromitemDiffobject; addediconClstohTreewith opcode value. - SVC-3376: Fixed handling of unknown selectors.
- SVC-3409: Set default
zenpack-ignoreon appropriate selection criteria. - SVC-3409: Added migration for existing criteria with
ignore_if_in_zenpackset. - SVC-3410: Used
aq_baseobject when evaluating if an object is from a ZenPack. - SVC-3418: Updated import for cloud.
3.3.1
Bug fixes
- Hotfix 3.3.1: Fixed tuple import when existing value is falsey.
3.3.0
New features
- SVC-3180: Added filtering of devices by collector for export.
Bug fixes
- SVC-3279: Added
unicodeas a valid type and logging for unknown types. - SVC-3289: Stopped exporting relation to containing parent; now imports non-containing relations.
- SVC-3291: Fixed creation of properties when only setting values was intended.
- SVC-3290: Added guard against missing and renamed triggers.
- SVC-3285: Implemented
nonAQgetattr. - SVC-3281: Used value from
ExportedDataValueforperfServer; ignored some old-style attributes. - SVC-3281: Added guard against missing
perfServer. - SVC-3295: Added support for exporting
Nonevalues. - SVC-3295: Added several fixes for resolving and applying objects properly.
- SVC-3295: Used trigger ID instead of name; no longer coerces
Nonevalues.
3.2.0
New features
- SVC-3193: Added exporting and importing of RM reports.
- SVC-3229: Added documentation for the Export to Local option.
- SVC-3195: Added documentation about the Ignore objects installed by ZenPacks? export checkbox.
Bug fixes
- SVC-3212: Added common data value object for improved diff and apply consistency.
- SVC-3103: Changed sorting approach for change sets; added auto re-apply for change sets that failed to apply.
- SVC-3207: Improved handling of attributes from ZenPack-supplied objects.
- SVC-2965: Changed
source_system_idandsource_system_name. - SVC-3168: Improved change sets cart behavior when navigating the UI.
- SVC-3275: Fixed various issues from testing; avoided halting on unresolvable property types; fixed tuple import.
- SVC-3270: Fixed issue with version 3.1.0 failing to install.
3.1.0
New features
- SVC-3101: Fixed and extended selection criteria for
userCommandsto include infrastructure user commands. - SVC-3181: Added ability to set a default collector for device imports where the exported collector doesn't exist.
Bug fixes
- SVC-3107: Fixed
CPropImporterand multiple value type handling; fixed list object compare. - SVC-3108: Added
descriptionfield when applyingcProps. - SVC-3113: Fixed object attribute processing.
- SVC-3116: Fixed
ListImporterto processitemDiffsin order. - SVC-3118: Added new
ThresholdClassImporterto handle proper setup of thedsnamesattribute. - SVC-3118: Updated
ListImporterto handle attributes. - SVC-3120: Added check for unwanted acquisition objects.
- SVC-3123: Added new exporter for graph points.
- SVC-3124: Stopped comparator coercion of items to strings.
- SVC-3128: Reworked notification subscription export/import.
- SVC-3129: Reworked notification recipients export/import.
- SVC-3130: Added export of data from trigger subscribers tab.
- SVC-3131: Improved diff UI in change sets selectors panel.
- SVC-3134: Added exporters and importers for process class and organizer for additional properties.
- SVC-3137: Added
IpServiceClassimporter for name. - SVC-3138: Added export of title for services organizer and OS process.
- SVC-3174: Added paging for change package combo box.
- SVC-3209: Removed old reports.
3.0.2
Bug fixes
- SVC-3093: Fixed use of
ExportedObjectReference.idwhen checking for existing objects. - SVC-3087: Fixed sending of
ServiceOrganizerandOSProcessOrganizer.
3.0.1
Bug fixes
- SVC-3076: Added dependency on
PS.UtilZenPack. - SVC-2791: Made change set loading more robust.
3.0.0
New features
The export and import functionality was completely rewritten in this release. The rewrite provides far more granular control and more efficient exports, no longer relies on ZenBatchDump and ZenBatchLoad, lets ZenPacks define their own custom export, import, and compare plugins, and fixes numerous bugs.
This release also adds the following features:
- Ability to re-ship an existing change package to another server.
- Ability to select change sets from existing change packages to create new change packages.
- Auto-expiration of change packages.
- Local export directly to imported change package.
- New comparison engine and UI.
- One-click and automated snapshot capabilities.
2.5.3
Bug fixes
- SVC-2862: Fixed
BatchDeviceLoaderfailure when properties are greater than 255 characters.
2.5.2
Bug fixes
- SVC-2711: Updated
config.zcmlto prevent ETL from picking up Configuration Manager-related items.
2.5.1
Bug fixes
- Fixed invalid character encodings causing issues with daemon startup.
2.5.0
New features
- SVC-2673: Added support for
passwordandbooleanzTypes.
2.4.0
New features
- SVC-1027: Added
force_applyto UI. - SVC-1027: Enhanced logging.
- SVC-1027: Added test access for targets and sources.
- SVC-1027: Added device export based on production state.
- SVC-2480: Removed
DiffDeviceClassTree.py. - SVC-2641: Added globals to
bin/zensyncer. - SVC-2623: Enhanced device dumper to omit non-serializable values.
- SVC-2639: Updated routing key information.
- SVC-2646: Patched properties in
zensyncerif the CMDB ZenPack is installed.
2.3.0
New features
The release adds a templating facility:
- SVC-2093: Created criteria template entity.
- SVC-2093: Added migration for criteria templates.
- SVC-2093: Added methods for criteria templates.
- SVC-2093: Implemented UI for instantiating templates.
The release also adds the Migration Wizard:
- SVC-2094: Added Migration Wizard dialog.
- SVC-2094: Added two default targets during ZenPack installation.
- SVC-2094: Added tips on every step.
- SVC-2094: Added validation for instantiating templates.
- SVC-2094: Added Remove Wizard Generated Configurations button.
Bug fixes
- SVC-1369: Implemented migration of email notifications with inherited SMTP settings; fixed migration of notification passwords.
- SVC-1486: Fixed empty user timezone after migration; set timezone after updating user.
- SVC-1492: Fixed migrating more than 255 properties.
- SVC-1856: Fixed importing trigger users.
- SVC-2014: Fixed creation of extra locations after migration.
- SVC-2095: Added many unit tests.
- SVC-2116: Fixed error during looping over modes in
setMode. - SVC-2270: Prevented user and group creation in CZ.
2.2.7
New features
- SVC-1750: Used
run -cfor service startup command. - SVC-1750: Added monkey patch to disable sending collection metrics.
2.2.6
Bug fixes
- Fixed filter configs for
zensyncd(unhandled exception:tag). - Fixed installation on pre-5.2 RM.
- Simplified property export filters and expanded coverage to fix additional cases.