Layer2
ZenPacks.zenoss.Layer2
This ZenPack provides support to model OSI Layer 2 (or data link layer) topology. That topology information is used to suppress events from devices, connection to which was lost because they are connected to broken devices. Data collection is performed using SNMP.
The features added by this ZenPack can be summarized as follows. They are each detailed further below.
- Discovery and periodic remodeling of Neighbor Switches using CDP/LLDP.
- Discovery and periodic remodeling of MAC address or forwarding tables.
- Event suppression based on discovered forwarding table information.
Open Source
This ZenPack is developed and supported by Zenoss Inc. Contact Zenoss to request more information regarding this or any other ZenPacks. Click here to view all available Zenoss Open Source ZenPacks.
Releases
Version 1.5.2 Download
- Released on 2026-04-09
- Requires: PythonCollector ZenPack (>= 1.1)
- Compatible with Virtana Service Observability (formerly Zenoss Cloud) and Virtana Resource Manager 6.9.0
Version 1.5.1 Download
- Released: 2025-08-13
- Requires: PythonCollector ZenPack (>= 1.1)
- Compatible with Zenoss Cloud and Zenoss 6.x
Version 1.5.0 Download
- Released: 2023-06-22
- Requires: PythonCollector ZenPack (>= 1.1)
- Compatible with Zenoss Cloud and Zenoss 6.x
Discovered Components
Assigning the zenoss.snmp.CDPLLDPDiscover modeler plugin to the device(s) will result in SNMP discovery of neighbor switches using a combination of CISCO-CDP-MIB and LLDP-MIB. The discovered neighbor switch information will be shown as Neighbor Switches in the device's component list.
Assigning the zenoss.snmp.ClientMACs modeler plugin to the device(s) will result in SNMP discovery of the device's forwarding tables using BRIDGE-MIB. This information will be stored on existing Network Interfaces, and won't result in any new components being created.
Monitoring
This ZenPack performs no monitoring.
Event Suppression
This ZenPack supports two types of event suppression.
- Suppression of ping failures when one or more upstream ping failures can be identified as the reason for the failure.
- Suppression of non-ping events on devices with open ping failure events.
We will use the term symptomatic event to refer to events that are a symptom of a problem, but not the root cause.
Ping Event Suppression
Suppression of ping events can be enabled on a per-device or device class basis by enabling the zL2SuppressIfPathsDown configuration property. This mode of suppression requires that the zenoss.snmp.ClientMACs modeler plugin be enabled and successfully functioning on all network devices such as switches and routers that you believe could be a root cause of other monitored devices becoming unreachable.
There are two ways symptomatic ping events can be suppressed. By manually configuring the ultimate gateway(s) of the device(s) using the zL2Gateways property, or by leaving the zL2Gateways property empty and setting the zL2PotentialRootCause property appropriately so that the gateway(s) can be automatically discovered.
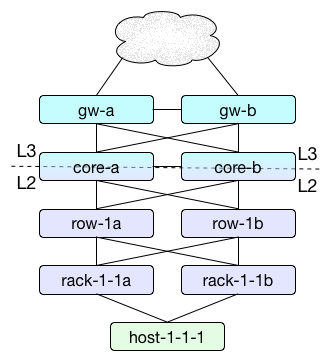
The diagram above depicts a common data center network topology where each rack has a redundant pair of access switches sometimes referred to as top-of-rack switches. Each of those top-of-rack switches connects to a redundant pair of end-of-row switches. Each of those end-of-row switches connects to a redundant pair of core switches for the data center. Then perhaps the pair of core switches connect to a pair of gateway routers to connect the data center to the Internet or other data centers over private links. In this kind of topology, the layer 3 gateway for hosts is often the core switches.
In this type of topology, the gateways for host-1-1-1 can be automatically discovered to be rack-1-1a and rack-1-1b if zL2PotentialRootCause is enabled for the switches, and disabled for the hosts. zL2PotentialRootCause should be enabled for devices that could potentially be a root cause for other devices becoming unreachable, and disabled for devices that cannot be a root cause. This property is important to prevent root-caused events from incorrectly being suppressed.
By relying on this automatic discovery of gateways we can only achieve suppression of events from the hosts. We'd get all of the host events suppressed in the case of an entire data center outage, but all of the rack, row, core, and gateway events would remain unsuppressed and it would be left as manual identification of the gateways as the root cause.
To achieve multi-hop suppression the zL2Gateways property must be configured. Despite the name of the property containing "L2", the configured gateways need not be restricted to the layer 2 gateways. In the example topology above, the best value for zL2Gateways would likely be gw-a and gw-b (one per line). It's important to use the Zenoss device id(s) for the gateways, and to enter one per line in zL2Gateways. There's no limit to the number of gateways, but more than two probably isn't realistic.
With zL2Gateways set to gw-a and gw-b in the above topology, a complete failure of the data center would result in all events being suppressed except for two events: a ping failure on each of gw-a and gw-b. This is assuming that zL2SuppressIfDeviceDown is enabled. See ''Non-Ping Event Suppression' below for more information on zL2SuppressIfDeviceDown.
Non-Ping Event Suppression
Suppression of non-ping events can be enabled on a per-device or device class basis by enabling the zL2SuppressIfDeviceDown configuration property. No other configuration or modeling is necessary. Events will only be suppressed for a device with this property enabled when they have a new, acknowledged, or suppressed critical event in the /Status/Ping event class. This suppression is effective at reducing the potential clutter of symptomatic events when a device is no longer reachable on the network either because it has failed, or because the Zenoss collector is no longer able to reach it.
This suppression can be used together with ping event suppression for the most complete reduction of symptomatic event clutter.
Event Suppression Performance
All forms of event suppression as described above have a cost in terms of event processing performance. When zL2SuppressIfDeviceDown is enabled, there is a small additional overhead for processing all events. When zL2SuppressIfPathsDown is enabled and first-hop suppression is performed using either automatic gateway discovery or manual gateway configuration, there is another small overhead for processing ping failure events.
In worst case scenario testing the effective processing rate for non-ping events with the zL2SuppressIfDeviceDown configuration is approximately 80%, 75% for processing ping failure events in the case of a first-hop switch failure, and 70% in the case of a third-hop gateway failure.
All suppression is performed by an event plugin executed within zeneventd processes. Given that zeneventd can be scaled by adding more workers/instances, this additional event processing overhead can be offset by running more zeneventd instances as event processing throughput needs require.
In order to achieve acceptable event processing performance, a variety of caches are used within zeneventd processes. These caches can lead to events not being suppressed in some cases when the configuration, model, or status of devices is coming from stale cache information. The following types of caches are used with different timeouts.
Caches
- Device status changes can take up to 50 seconds to affect suppression.
- Configuration changes can take up to 10 minutes to affect suppression.
- Modeling changes can take up to 55 minutes to affect suppression.
Network Map
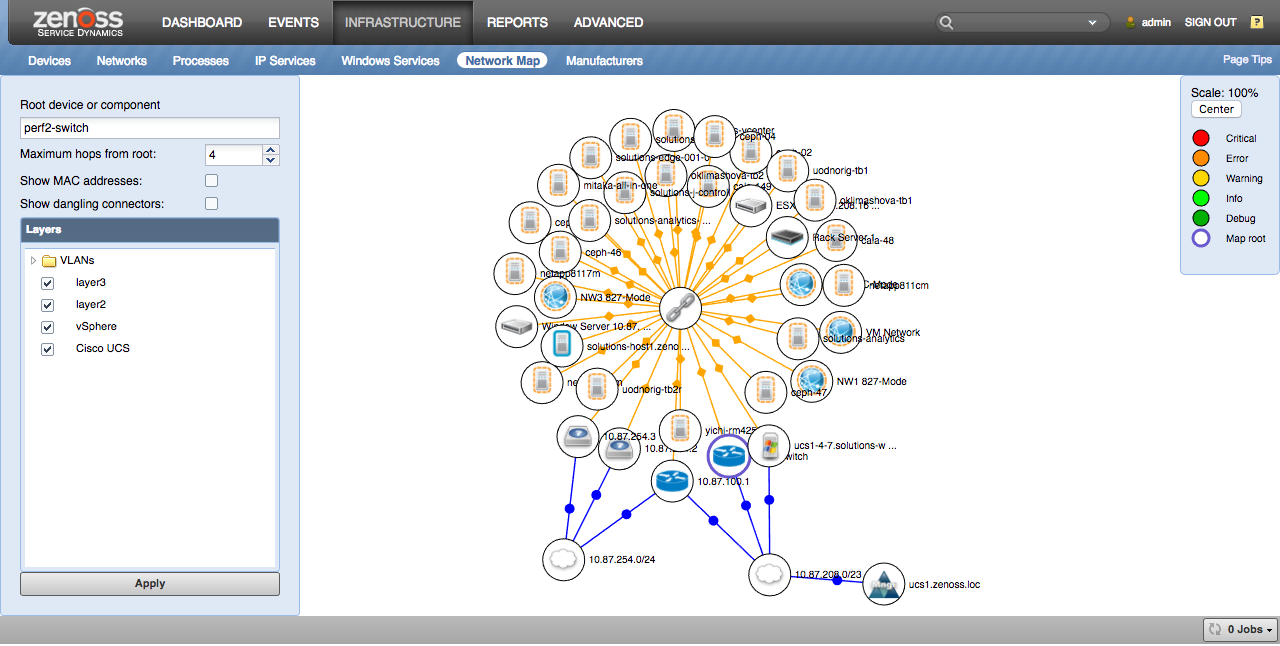
The network map can be used to see connections between devices. The network map can be found in two places. The first is under Infrastructure -> Network Map where you can manually select the device from which to draw the network map, or from individual devices by clicking on ''Network Map'' from the device's left navigation pane. This will present a network map centered on the current device.
Filtering
There are several controls that can be used to filter and otherwise control what you see on the network map. You must click the "Apply" button after adjusting any of these controls to see the resulting network map.
- Root device or component
- Maximum hops from root
- Show MAC addresses
- Show dangling connections
- Layers
The network map must start with a node from which connections can be followed. Setting the "Root device or component" is what allows that starting node to be chosen.
The maximum number of hops controls how many hops outward from the root node will be followed. This is the primary mechanism to reduce the size of the resulting network map.
The "Show MAC addresses" option allows more detail to be seen about layer2 connections at the expense of a much busier map. When "Show MAC addresses" is not selected, the map will attempt to consolidate bridge domains into a single cloud node that connects all nodes in the bridge domain. This emulates what you see with layer3 networks. When "Show MAC addresses" isn't selected, individual MAC address nodes used to make connections from node to node will be shown. These MAC addresses can often be clicked to link directly to the network interface associated with the MAC address.
The "Show dangling connections" option allows connector-type nodes such as MAC addresses and IP networks that don't connect to other nodes to be displayed. By default, these are filtered out to prevent the network map from being cluttered by MAC addresses and IP networks that are only connected to a single device.
Note: The network map will only display a maximum of 1,000 nodes to avoid performance issues both on the Zenoss server and in the web browser. If you attempt to view a network map with more than 1,000 nodes, an error message will appear to inform you that the map contains too many nodes, and to adjust the filters.
Note: If the user does not have permission to view a particular device or component, it will be shown as empty icon without a name and link.
Layers
The network map can be filtered by layers. Layers are tags that Zenoss automatically adds to each link between devices and components. For example, when Zenoss identifies that the host is connected to a switch, it will create nodes and links such as the following.
(host) -> (host MAC address) -> (switch MAC address) -> (switch)
Each of the arrows above represents a link, and in this case, each of those links will have the "layer2" tag.
In the same way, if Zenoss identifies that a host is on the same IP network as a router that's its default gateway, it will create nodes and links such as the following.
(host) -> (192.0.2.0/24) -> (router)
Each of the arrows above represents a link, and in this case, each of those links will have the "layer3" tag.
These layers can be used to filter the network map to just the kind of links you're interested in.
The VLAN and VXLAN layers have special handling. If any VLAN or VXLAN layer is selected, the layer2 layer will automatically be included. This is done because you likely wouldn't see the VLAN or VXLAN layer(s) chosen without also following layer2 links.
The selected layers operate as an "OR" filter on the map. Choosing the layer2 and layer3 layers will cause all nodes to be displayed that have at least one of the selected filters. There is currently no support for "AND" filters, or negations.
Colors and Shapes
Different colors and shapes are used on the network map to convey information about the nodes and links on the map.
The fill color of each node's circle depends on the highest severity event currently open on the node. The colors only differ from Zenoss' normal event colors for info, debug, and clear severity events for higher clarity on the map.
Node Colors
- Critical = Red
- Error = Orange
- Warning = Yellow
- Info = Bright Green
- Debug = Dark Green
- Clear = White
The map's current root node will be circled with a purple band.
The links between nodes each have a color and a shape.
Link Color
- Blue = layer3
- Green = layer2
- Yellow = VLAN
- Gray = Default
Link Shape
- Circle = Default
- Diamond = VLAN
Interaction
You can interact with the map using your pointer in a number of ways.
- Clicking and Dragging
- Scrolling
- Left-Clicking
- Right-Clicking
The map can be panned by clicking and dragging on the map's background. Each node can be moved by clicking and dragging the node. Panning the map won't cause nodes to reorganize, but moving nodes will.
Scrolling, pinching, or mouse-wheeling can all be used to zoom in and out.
Left-clicking on a node will navigate to that node's default page in Zenoss. This only works for nodes that have a page in Zenoss such as devices, components, IP networks, and some MAC addresses. Nothing will happen if a node with no default page is left-clicked.
Right-clicking a node will open its context menu. See below for node context menu details.
Context Menu
Each node on the network map can be right-clicked to open its context menu. Some of the following options may be available depending on the node.
- Pin Down
- Put Map Root Here
- Device Info
- Open Node in New Tab
The "Pin Down" option freezes the selected node in place on the network map. It will stay wherever you place it, and any unpinned nodes will reorganize around it.
Choosing "Put Map Root Here" is equivalent to changing the "Root device or component" option, but saves typing when you see the node you want to be the center on the map. Some types of nodes such as MAC addresses can't be the root.
The "Device Info" option opens a small pop-up over the network map with more information about the selected node. This option is only available for device and component nodes.
The "Open Node in a New Tab" option will open another tab in your browser to the default Zenoss page for the selected device, component, or IP network. Some types of nodes such as MAC addresses can't be opened in a new tab.
Zenmapper daemon
To update the catalog with connections for the network map, the
zenmapper daemon is used. It runs every 5 minutes by default,
but this option could be changed by passing the desired number of seconds
to the --cycletime argument.
By default, zenmapper is configured to start 2 workers. This may be changed
in the config file by setting the "workers" option value. Consider using more
than 2 workers in case you have >1000 devices monitored in Zenoss
system. In a small or test environment, one may disable workers by setting
its value to 0. This affects the memory used by zenmapper as well as the speed
of indexing L2 connections.
zenmapper connects to the ZODB and indexes all the connections provided
by providers in the ZODB catalog. On 4.2.x RM, running zenmapper on the
remote collectors will do nothing because zenmapper runs against the
hub. If desired, the additional zenmapper can be disabled by updating
/opt/zenoss/etc/daemon.txt on the remote collector.
Writing Your Own Connection Provider
Imagine, for example, that we want to display on the network map connections of VMware NSX components. They are modeled in NSX ZenPack.
We need to create new class, called for example NSXConnectionsProvider,
which inherits from BaseConnectionsProvider, like this:
# our provider will inherit from this:
from ZenPacks.zenoss.Layer2.connections_provider import BaseConnectionsProvider

# and will yield this:
from ZenPacks.zenoss.Layer2.connections_provider import Connection

class NSXConnectionsProvider(BaseConnectionsProvider):
    def get_connections(self):
        # self.context is a entity for which we will provide connections
        for switch in self.context.nsxvirtualSwitchs():
            # so, our device is called NSXManager, and it has switches
            # yield connections to the switches
            yield Connection(self.context, (switch, ), ('layer3', 'nsx'))

            # each switch has interfaces:
            for i in switch.nsxinterfaces():
                # yield connection to the interfaces
                yield Connection(switch, (i, ), ['layer3', 'nsx'])

                # and each interface has many to one connection to edges:
                yield Connection(i, (i.nsxedge(), ), ['layer3', 'nsx'])
So, we described how to get connections, now we need to tell Zenoss,
that this will be a connection provider for any NSXManager devices. We do
it by registering an adapter in our ZenPack's configure.zcml:
<configure zcml:condition="installed ZenPacks.zenoss.Layer2.connections_provider">
    <!-- Add this adapters only when module connections_provider is possible to import
         (Which means that there is installed recent version of Layer2). -->
    <adapter
        factory=".connections_provider.NSXConnectionsProvider"
        for="ZenPacks.zenoss.NSX.NSXManager.NSXManager"
        provides="ZenPacks.zenoss.Layer2.connections_provider.IConnectionsProvider"
        />
</configure>
Another way to include adapters is to put them in separate file, called
for example layer2.zcml:
    <?xml version = "1.0" encoding = "utf-8"?>
<configure
    xmlns="http://namespaces.zope.org/zope"
    xmlns:zcml="http://namespaces.zope.org/zcml"
    >

    <adapter
        factory=".connections_provider.DeviceConnectionsProvider"
        for=".HyperVVSMS.HyperVVSMS"
        provides="ZenPacks.zenoss.Layer2.connections_provider.IConnectionsProvider"
        />

</configure>
and then include that file conditionally:
    <include file="layer2.zcml"
             xmlns:zcml="http://namespaces.zope.org/zcml"
             zcml:condition="installed ZenPacks.zenoss.Layer2.connections_provider" />
To test connections that your provider yields, you could run
zenmapper run -v10 -d <name or id of your modeled device>
And then look it up on the network map.
Installation
This ZenPack has the following special circumstances that affect its installation.
Zenoss 5.0
If you are re-installing or updating this ZenPack on Zenoss 5.0, you
should first check in Control Center that the zenmapper daemon is stopped,
and if not - stop it. It should be stopped automatically, but while this
issue is not fixed, you should do that by hand.
Open vSwitch ZenPack
Open vSwitch ZenPack version prior to 1.1.1 should be updated or removed before Layer2 ZenPack installation.
Usage
This ZenPack has two separate capabilities. The first is to collect clients connected to switch ports so that event suppression can be done when the switch fails, and the second is to discover neighbor relationships between network devices using the CDP (Cisco Discovery Protocol) and LLDP (Link Layer Discover Protocol).
Collecting Switch Port Clients
To enable the discovery of clients connected to switch ports, you must enable
the zenoss.snmp.ClientMACs modeler plugin for the switch devices.
There is no need to enable this plugin for hosts, servers, or other
endpoint devices. It is recommended to only assign the modeler plugin to
access the switch to which monitored servers are connected.
The discovery is done using BRIDGE-MIB forwarding tables, so it's a prerequisite that the switch supports BRIDGE-MIB.
Collecting Network Device Neighbors
To collect neighbor information from network devices that support CDP or
LLDP, you must enable the zenoss.snmp.CDPLLDPDiscover modeler plugin
for the devices.
Update Control
Many of this ZenPack's features such as the network map, event suppression, impact analysis, and root cause analysis depend on quick access to information about the connectivity between devices and components. To support this, the ZenPack updates a dedicated database of connectivity information at two different times. When modeling a device results in a change, and periodically in the background to catch any changes not caught during modeling updates.
Updating the connectivity database does have some performance cost, and it isn't always necessary to have the information updated during modeling if the most up-to-date information isn't required, or in the background if you expect the modeling-time updates to catch all relevant changes. Towards this end, there are two configuration properties that allow you to selectively disable modeling-time updates (zL2UpdateOnModel), background updates (zL2UpdateInBackground), or both. By default, both of these properties are enabled.
Bear in mind that setting both properties to false will prevent all of this ZenPack's functionality from working for the device(s) in question. If you find that modeling is slowed down to unacceptable levels, then you might consider setting zL2UpdateOnModel to false and allowing the background processing to reconcile changes periodically. However, if you find that the zenmapper service is consuming too many resources you may want to consider setting zL2UpdateInBackground to false and allowing the modeling-time updates to do all of the work. Using the default of having both properties set to true results in the best experience on systems not suffering from performance problems because the connectivity information is as up-to-date as possible, and will be periodically reconciled in case of external changes.
Zenoss Service Impact
When combined with the Zenoss Service Dynamics product, this ZenPack adds built-in Service Impact capability based on Layer 2 data. The following Service Impact relationships are automatically added. These will be included in any services that contain one or more of the explicitly mentioned entities.
Service Impact Relationships
- Device impacted by upstream switch device.
Troubleshooting
Empty Map/Links for Device
In case the index for a certain device is broken, one may force zenmapper to
reindex this specific device. Daemon should be run with --force
option.
Layer2 Forwarding Table
Let's discuss Layer2 connections in particular.
The essential mechanism that distinguishes network switches from network hubs is the MAC forwarding table. Instead of broadcasting incoming link layer frames to all it's interfaces, as hubs do, switches look into the forwarding table to find out which particular interface is connected to the destination device. The switch learns which devices are connected to which interface by looking at the source MAC address of incoming frames. Those MAC addresses are called "client MAC addresses".
For Zenoss to discover Layer 2 connections between some devices, the MAC
address of some interface of one device should be equal to the client MAC
address of some interface of another device. You could check if the client MAC
addresses for the interface are modeled by looking at its "Clients MAC
addresses" display. If there are none, check that
zenoss.snmp.ClientMACs modeler plugin is bound to the device and remodel it.
It is also possible that there are no MAC addresses required to discover the connection in the forwarding table. To check that, you could run the debug utility bridge_snmp.py:
python bridge_snmp.py clientmacs -c <community_string> <host>
and see if your client's MAC addresses are visible at the switch at all.
Records in the forwarding table are aged pretty fast, by default in 5
minutes. So, when there was no network activity on connection for more
than 5 minutes, the entry will be removed from the switch forwarding table. You
could check dot1dTpAgingTime object to know exact timeout period in
seconds:
$ snmpget -v2c -c <community_string> <host> 1.3.6.1.2.1.17.4.2.0
SNMPv2-SMI::mib-2.17.4.2.0 = INTEGER: 300
Service Impact
This ZenPack also adds Impact relations for layer2 connections. Switches impact devices connected to them. But this will work only when such a connection is present on the network map (see two previous sections for the guide on troubleshooting that).
If there is a connection on the network map, but still no Impact relation, it is likely that Impact relations were not rebuilt. You could do that by indexing the device (changing some field on the overview and saving it, for example) or by remodeling the device.
Limitations
Delay in Discovering Connections
There are no client MACs data on interfaces modeled for the first time.
This happens because zenoss.snmp.ClientMACs plugin runs before
interfaces are modeled by another network modeler plugin (for example
cisco.snmp.Interfaces or zenoss.snmp.InterfaceMap), so there are no
entities to save this attribute on. Currently, it is not possible to
define order of modeler execution, so this remains a limitation.
A possible workaround is to wait for the next model cycle or just model the device again manually.
Note
There should be only one plugin that is responsible for Interfaces
modeling enabled at the same time (cisco.snmp.Interfaces,
zenoss.snmp.InterfaceMap, zenoss.snmp.CatOSInterfaceMap, etc.).
Enabling several plugins may lead to an incorrect representation of Client MAC addresses
for the interfaces on the UI and in ZODB.
No Layer 3 (IP) Connectivity for Cisco UCS
Cisco UCS infrastructure will only add layer 2 (Ethernet or MAC address) connections to the network map. Layer 3 (IP) connections will not exist. This is scheduled to be fixed (ZPS-2465) in version 2.6.3 of the Cisco UCS ZenPack.
Installed Items
Installing this ZenPack will add the following items to your Zenoss system.
Modeler Plugins
- zenoss.snmp.CDPLLDPDiscover
- zenoss.snmp.ClientMACs
Configuration Properties
- zL2UpdateOnModel (default: True)
- zL2UpdateInBackground (default: True)
- zL2Gateways (default: [])
- zL2PotentialRootCause (default: True)
- zL2SuppressIfDeviceDown (default: False)
- zL2SuppressIfPathsDown (default: False)
- zLocalMacAddresses (default: ["00:00:00:00:00:00"])
- zZenossGateway (deprecated by zL2Gateways)
Services / Daemons
- zenmapper
Changes
1.5.2 - Fix LLDP binary string handling in CDPLLDPDiscover plugin to prevent XML parsing errors (ZPS-9234) - Tested with Virtana Service Observability (formerly Zenoss Cloud) and Virtana Resource Manager 6.9.0
1.5.1
- Fix zenmapper MariaDB connectivity issue in ControlCenter (ZPS-9134)
- Tested with Zenoss Resource Manager 6.8.0 and Zenoss Cloud.
1.5.0
- Layer2 DB interface/queries have been optimized (ZPS-7885)
- Binascii base_ports are now converted to a hex string (ZPS-8486)
- Generators are only iterated over once (ZPS-8536)
- Checks for None now include empty sets too (ZPS-8537)
- Client MACs are now properly formatted for ADM (ZPS-8538)
- Monkey-patching was replaced with ADM subscription/notify events (ZPS-8567)
- ADM now successfully updates interface components with client MACs (ZPS-8568)
- Layer2 DB now distinguishes device/interface edges (ZPS-8569)
- SnmpClient was extended to include failure information (ZPS-8570)
- Tested with Zenoss Resource Manager 6.7.0 and Zenoss Cloud.
1.4.6
- Fix user permissions issue for network map (ZPS-1249)
- Fix CDPLLDPDiscover Modeler plugin fails when encountering HEX values (ZPS-7165)
- Tested with Zenoss Cloud and Zenoss 6.6.0
1.4.5
- Added checks to skip DB Compact operations that would trigger a DB clear() operation. (ZPS-7612)
1.4.4
- Add compatibility with MySQL-python 1.2.5 (ZPS-7117)
1.4.3
- Improve performance of calculating network impact relationships. (ZPS-5712)
1.4.2
- Reduce fragmentation of database tables. (ZPS-4402)
- Add "optimize-interval" option to zenmapper. (ZPS-4402)
- Disable daily table optimization by default. (ZPS-4402)
- Tested with Zenoss Cloud and Zenoss Resource Manager 6.2.1, and 5.3.3.
1.4.1
- Fix unnecessary ZODB growth caused by zenmapper. (ZPS-3548)
- Fix zProdStateThreshold error on client MAC addresses table. (ZPS-4048)
- Fix links to work in Zenoss Cloud. (ZPS-4113)
- Fix missing neighbor switches on Cisco devices. (ZPS-4062)
- Tested with Zenoss Resource Manager 5.3.3, 6.2.0, and Zenoss Cloud.
1.4.0
- Fix suppression when zL2PotentialRootCause is set, and zL2Gateways is not. (ZPS-2313)
- Move zenmapper service from the root to Zenoss organizer. (ZPS-1352)
- Optimize memory usage of zenmapper service. (ZPS-2172)
- Add global.conf configuration file to zenmapper service. (ZPS-2216)
- Restrict zenmapper instances configuration to 1 only. (ZPS-2144)
- Fix "l2_gateways" AttributeError after ZenPack is removed. (ZPS-2581)
1.3.5
- Add client MAC addresses to SubInterfaces and ManagementInterfaces dropdown lists (ZPS-1663)
- Fix an invalid expanded device link. (ZPS-1683)
1.3.4
- Fix potential infinite loop during event suppression. (ZPS-1353)
1.3.3
- Fix compatibility with ZenPacks rely on deprecated CatalogAPI. (ZPS-1267)
1.3.2
- Optimize modeling and zenmapper for devices with many connections. (ZPS-736)
- Eliminate Layer2 modeling overhead for vSphere devices. (ZPS-736)
1.3.1
- Improve modeling performance for devices with many component types. (ZPS-736)
1.3.0
- Add "Show MAC addresses" and "Show dangling connectors" to the network map.
- VLAN and VXLAN layers are no longer selected by default on network map.
- Support for multiple gateways per device or device class. (ZEN-24767)
- Add zL2Gateways property. (ZEN-24767)
- Deprecate zZenossGateway property. (ZEN-24767)
- Add zL2PotentialRootCause to allow automatic gateways discovery.
- Add zL2SuppressIfPathsDown to toggle ping event suppression.
- Add zL2SuppressIfDeviceDown to toggle non-ping event suppression.
- Add rootCauses event field for suppressed events.
- Improve event suppression performance and reliability.
- Add zLocalMacAddresses to remove unwanted interfaces in maps. (ZEN-23182)
- Add client discovery support using Q-BRIDGE MIB. (ZEN-25336)
- Fix "NeighborSwitch" errors after removing the ZenPack. (ZEN-26189)
1.2.2
- Fix potential 2 minute modeling delay in Zenoss 4.
- Fix "Connection refused" when Redis is not available.
1.2.1
- Added "workers" option to zenmapper daemon.
- Refactored connection catalog to use Redis as storage. This prevents cases where ZODB grows over time
- Layer2 index now doesn't touch/modify ZoDB storage in any of the cases.
- Devices added to the index in time they changed. Zenmapper daemon adds to index only differences, e.g. indexing is incremental now.
- In time when zenpack is installed/upgraded zenmapper daemon will create an initial index. This occurs only on first run and it may take several minutes depending on the number of devices.
1.1.1
- Fix page help code in Layer2 ZP conflict with other ZenPacks (ZEN-21264)
1.1.0
- When filtering by VLAN show also layer2 links that are VLAN-unaware (ZEN-20946)
- Add a checkbox that allows to show the full map
- Fix Cisco community string indexing in the ClientMACs modeler plugin.
- Fix the issue of getting the client MAC address from labeled VLAN interfaces. (ZEN-19874)
- Fix Network Map - Missing link from Cisco device to subnet on depth 2,3,4 (ZEN-18603)
- Make Impact use new the connections catalog instead of the MACs catalog (ZEN-18636)
- Fix Broken link for Subnet node in Network map (ZEN-20749)
1.0.3
- Remove macs_catalog when removing the ZenPack. (ZEN-17967)
- Replace the Layer2Info template with the ClientMACs modeler plugin.
1.0.2
- Fix modeling of CDP neighbor switches with IPv6 addresses. (ZEN-17248)
- Avoid community@VLAN context querying for non-Cisco switches. (ZEN-17258)
- Change default cycletime for Layer2Info from 30 minutes to 12 hours. (ZEN-17031)
1.0.1
- Fix device overview links error. (ZEN-14063)
- Remove add/remove from catalog logging. (ZEN-15465)
- Fix usage of incorrect community VLAN suffixes on BRIDGE-MIB queries. (ZEN-16951)
- Fix looping of impact relationships between switches. (ZEN-17020)
- Fix incorrect modeling of neighbor switches and improve modeling time. (ZEN-17023)
- Stop binding the Layer2Info template to /Network by default. (ZEN-17035)
1.0.0
- Initial release