Database Monitor
ZenPacks.zenoss.DatabaseMonitor
This ZenPack is an enhanced version of the older ZenPacks.zenoss.DatabaseMonitor 2.5.0, and adds Instances as a component thereby allowing multiple components to be associated with a single server.
Applications Monitored: Oracle Database (10.X, 11.X, 12.X, 19.X)
Commercial
This ZenPack is developed and supported by Zenoss Inc. Commercial ZenPacks are available to Zenoss commercial customers only. Contact Zenoss to request more information regarding this or any other ZenPacks. Click here to view all available Zenoss Commercial ZenPacks.
Releases
Version 3.1.4 Download
- Released on 2024/02/21
- Requires PythonCollector ZenPack (>=1.10.1), ZenPackLib ZenPack (>=2.0.0)
- Compatible with Zenoss Resource Manager 6.8.0, and Zenoss Cloud
Version 3.1.3 Download
- Released on 2024/05/15
- Requires PythonCollector ZenPack (>=1.10.1), ZenPackLib ZenPack (>=2.0.0)
- Compatible with Zenoss Resource Manager 6.7.0 and Zenoss Cloud
Prerequisites
- OS must support Oracle JDBC 12.1+ drivers
- Oracle must be listening on a target device's TCP port with JDBC support.
Gallery
Features
General:
- Automatic migration from older versions
- Data Collection has done with Oracle JDBC (Java)
- Multiple instance support via components
- TableSpace Support
Events:
- Tablespace or tablespace file's ONLINE_STATUS is not ONLINE, SYSTEM, or AVAILABLE.
- Warning events, if there's a < 90% cache, hit ratio
- Warning events if there's a > 95% PGA memory usage
ConnectionString Format
The Connection String is the data format that is used to specify a database. The connection string format must have one of the following JDBC Thin driver formats:
<Username><Password>@<fqdn.domain.com><port>:<SID>
                      - or -
<Username><Password>@<fqdn.domain.com><port>;/<SERVICE_NAME>
Example:
Example: joe/secretpassword@area51.zenoss.com:1521:XE
Example: joe/secretpassword@area51.zenoss.com:1521/service.zenoss.int
Note
Usernames and passwords should conform to standard Oracle formats.
Discovery and Migration
Instances will be automatically discovered via a connection string that contains the username, password, port, and instance name you provide. If starting from a new server without any OracleDB monitoring, simply bind the Oracle template from the gear menu on the bottom left of the server's infrastructure page.
Migration is done by binding the new Oracle template to the existing server and executing "Model Device" from the gear menu on the inventory page. Do not remove the older template until the new template is in place or the migration will lack the required information. Once you have verified that the new data model is correct you should delete the older template in the Advanced area of the GUI.
Metrics
Host monitoring is separately done by the server monitoring template. This zenpack applies a component level addition to the host system. The following Oracle-related metrics will be collected every 5 minutes by default.
Instance Metrics
- sysstat.cache_hit_ratio: Cache Hit Ratio
- sysstat.logonscumulative: Cumulative Logons
- sysstat.logonscurrent: Total number of current logons
- sysstat.messagesreceived: Messages received in last interval
- sysstat.messagessent: Total number of messages sent
- sysstat.openedcursorscumulative: Total number of opened cursors since instance has started
- sysstat.openedcursorscurrent: Total number of current cursors open
- sysstat.physicalreads: Physical reads per second
- sysstat.physicalwrites: Physical writes per second
- sysstat.redoentries: Redo entry number since instance has started
- sysstat.redosize: Total amount of redo generated in bytes
- sysstat.redowrites: Total number of writes by LGWR to the redo logs
- sysstat.sessionpgamemory: Session PGA Memory in use
- sysstat.sessionpgamemorymax: Maximum available PGA Memory
- sysstat.sga_free: SGA Free Memory
- sysstat.sga_total: SGA Total Memory
- sysstat.sga_used: SGA Used memory
- sysstat.sortsdisk: Number of sort operations that required at least one disk write
- sysstat.sortsmemory: Number of sort operations that were performed completely in memory
- sysstat.sortsrows: Number of sort operations that were performed completely in memory
- sysstat.usercalls: Number of user calls such as login, parse, fetch, or execute
- sysstat.usercommits: Number of user commits; the closest thing to a user transaction rate
- sysstat.userIOwaittime: Total wait time (microseconds) belonging to User I/O wait class
- sysstat.userrollbacks: Number of times users manually issue the ROLLBACK statement
Tablespace Metrics
- dbmTBSP.BYTES_FREE: Free disk space
- dbmTBSP.BYTES_USED: Used disk space
- dbmTBSP.TOTAL_SIZE: Total disk Space
Tablespace File Metrics
These metrics are based on statistics over tablespace files. If more than one tablespace file exists, metrics are file averages, and standard deviations are calculated over file metrics.
- dbmTBSPstats.READS: Total number of reads to db
- dbmTBSPstats.READTIME: Read time average over files
- dbmTBSPstats.WRITES: Total number of writes to db
- dbmTBSPstats.WRITETIME: Write time average over files
- dbmTBSPstats.READS_STDDEV: Standard Deviation on reads
- dbmTBSPstats.READTIME_STDDEV: Standard Deviation on read-time
- dbmTBSPstats.WRITES_STDDEV: Standard Deviation on writes
- dbmTBSPstats.WRITETIME_STDDEV: Standard Deviation on write-time
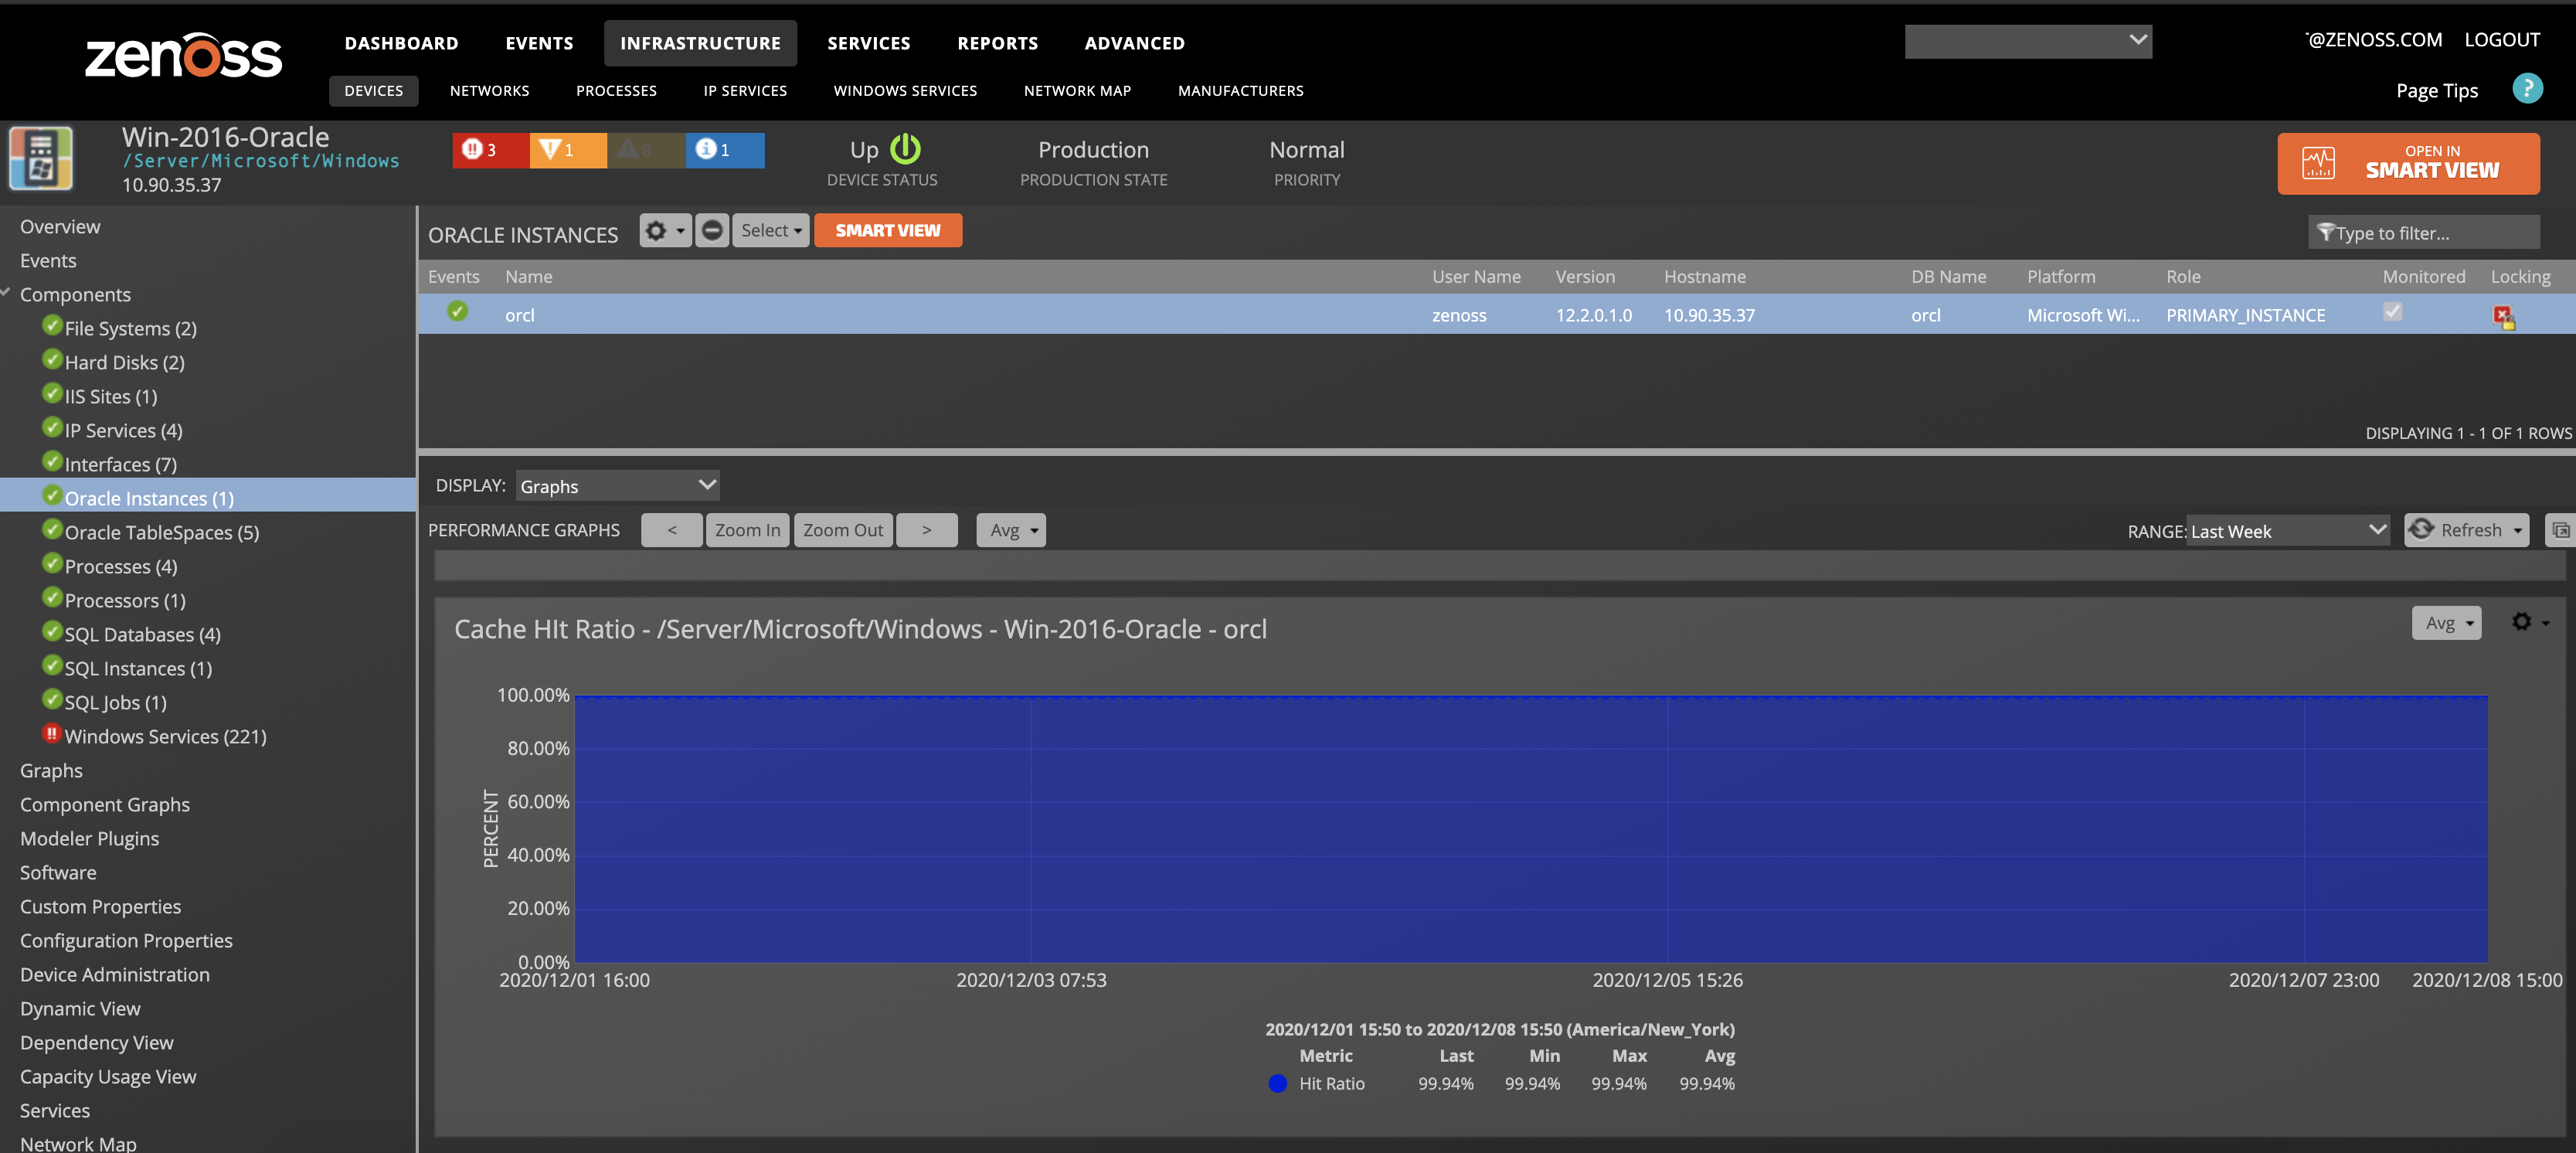
Instance Support
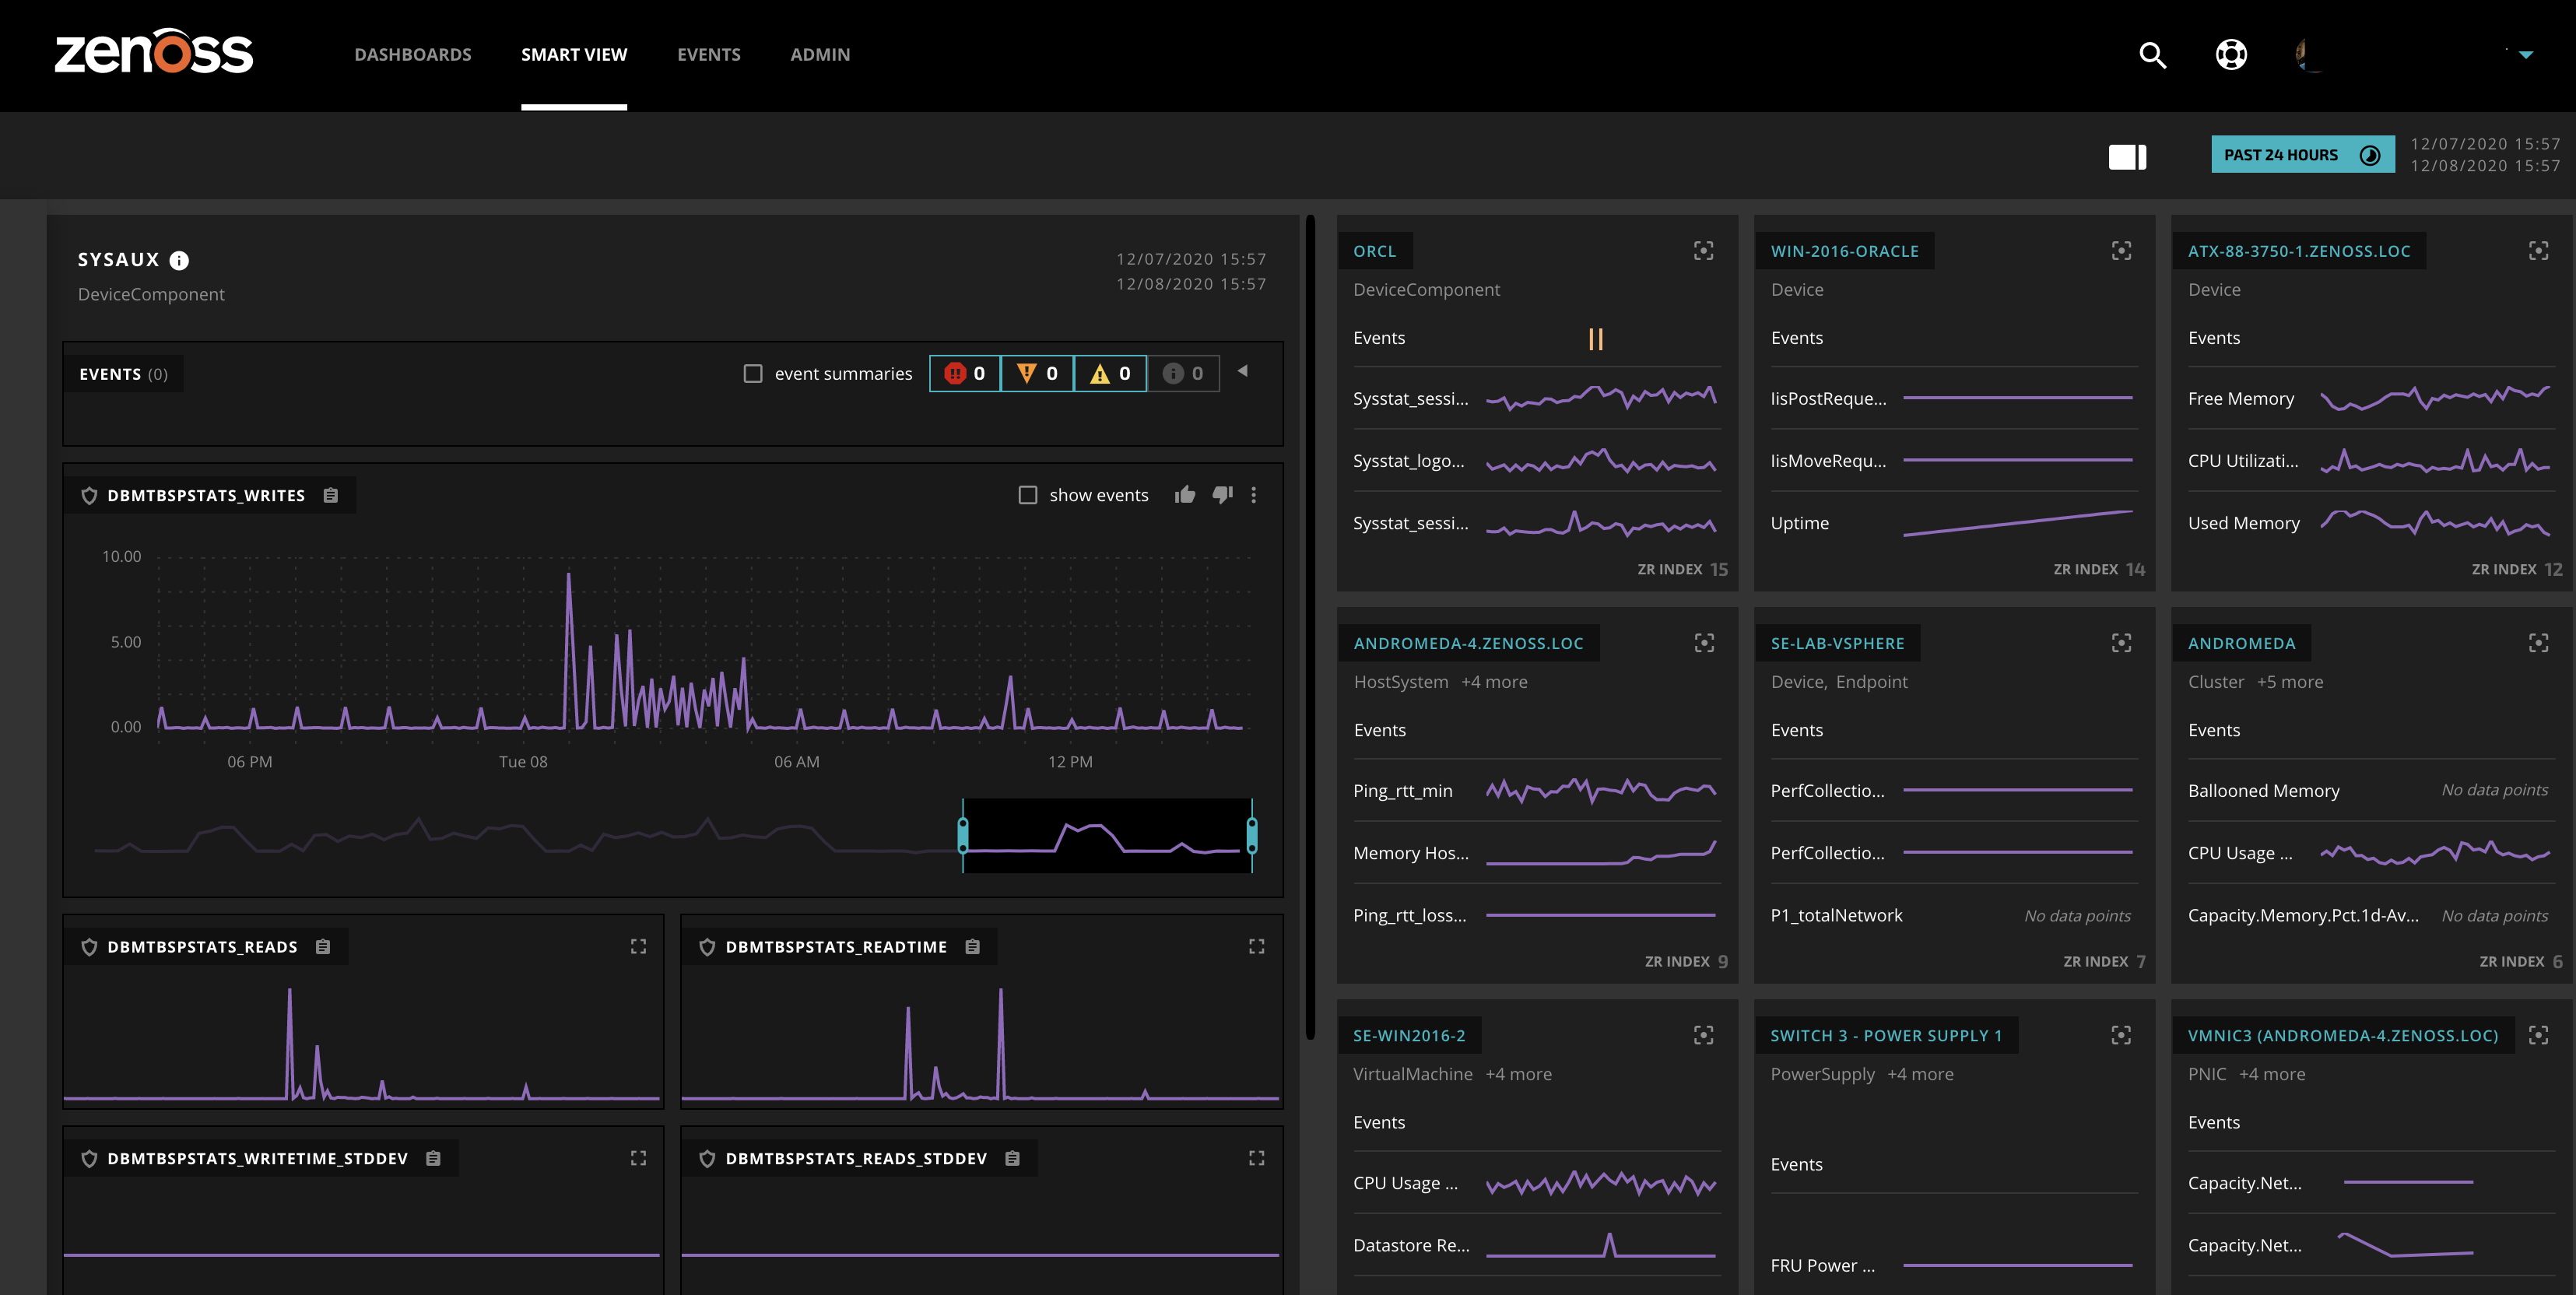
The new instance support allows multiple instances per server to be monitored. The Context Display area has the following:
- Graphs
- Events
- Details
- Templates
- TableSpaces
Instance Graphs
Instance support includes the following graphs:
- SGA: Total, Free, Used (bytes)
- PGA: Total, Free, Used (bytes)
- Cache Hit Ratio (%)
- User IO Wait Time (wait/sec)
- User Operations: Calls, Commits, Rollbacks (ops/sec)
- Sorts: Disk, Memory, Rows (sorts/sec)
- Redo Operations: Entries, Writes (ops/sec)
- Redo Size (bytes)
- Physical Operations: Reads, Writes (ops/sec)
- Messages: Sent, Received (messages/sec)
- Logins
- Opened Cursors: Current (#), Per Second (opens/sec)
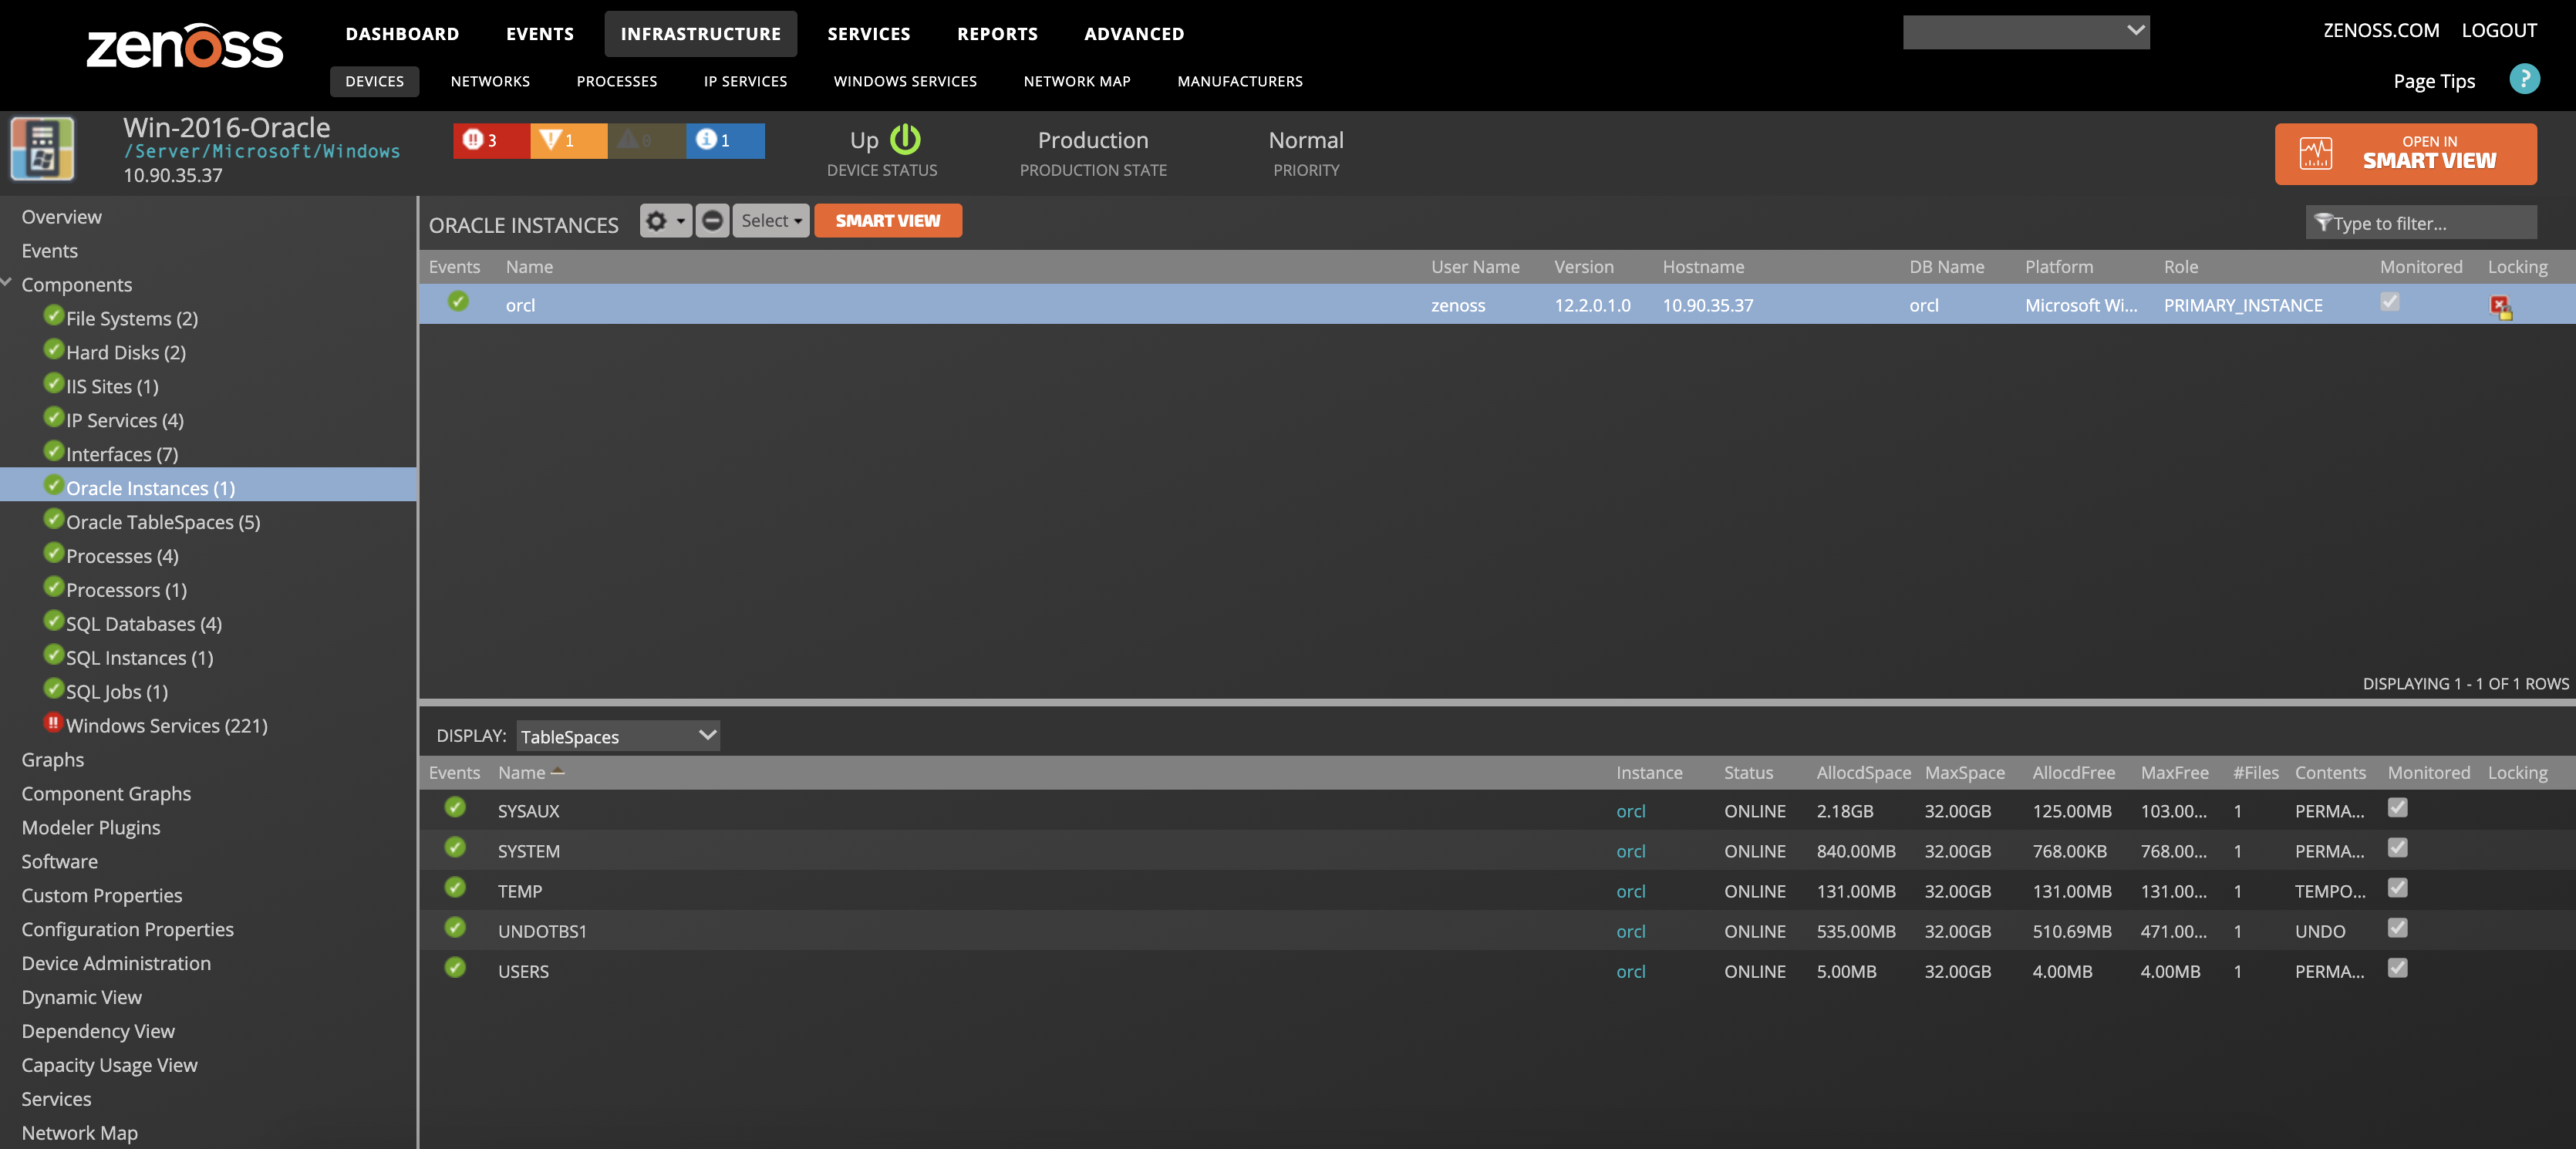
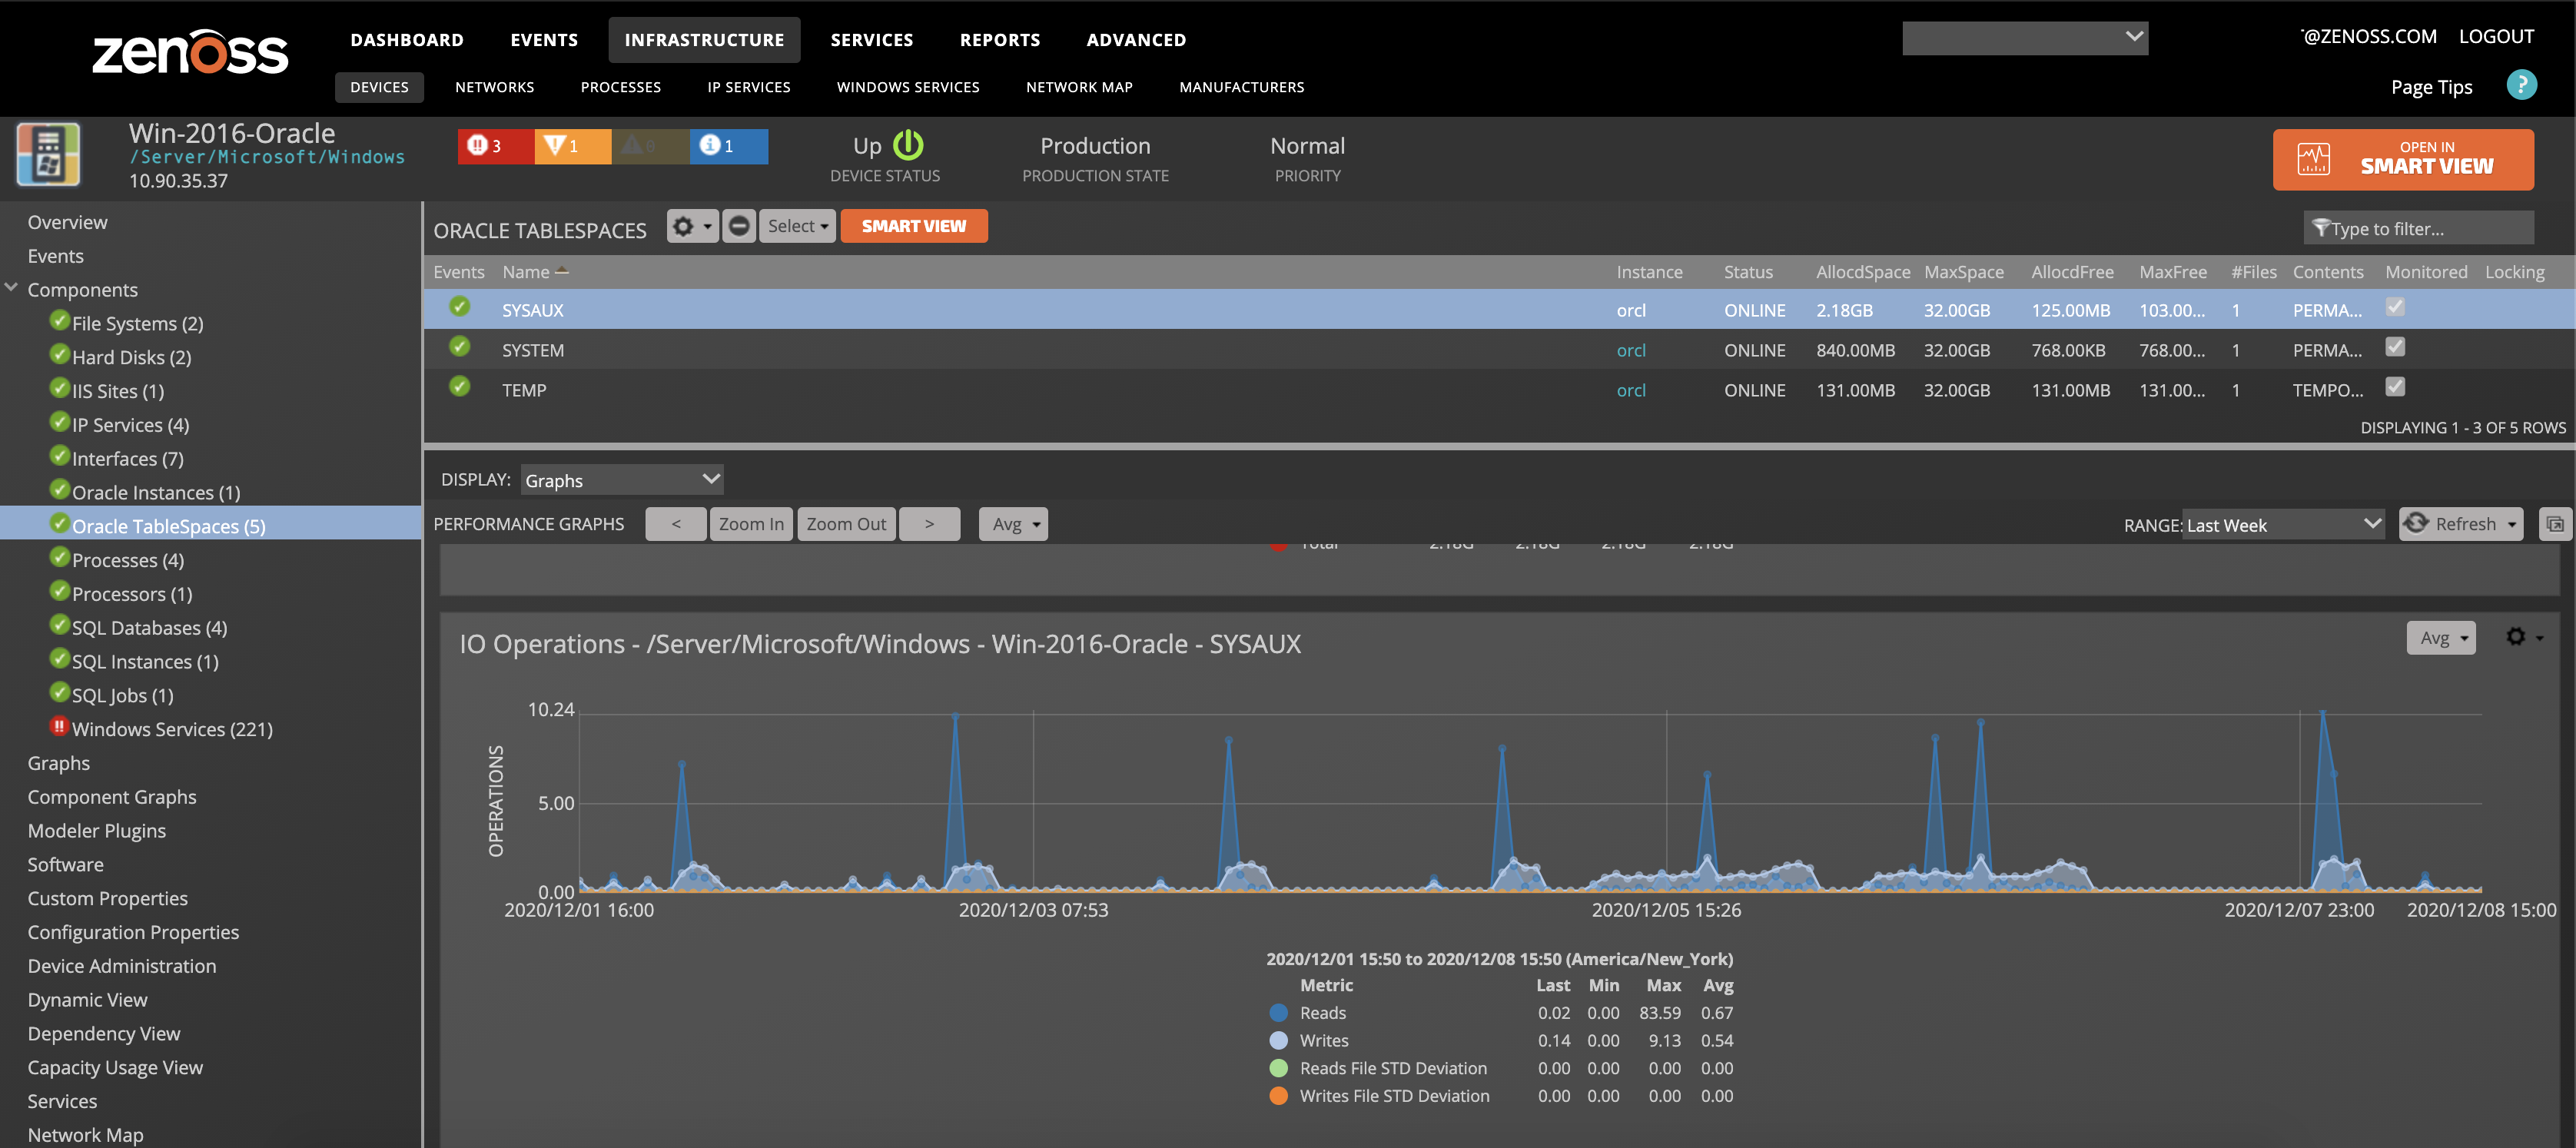
Table Space Support
Oracle TableSpace has been added. The TableSpace grid has links to the parent Instance. The Context Display area has the following:
- Graphs
- Events
- Details
- TableSpaces
For each instance, there will be a set of TableSpaces as defined on the target system. This usually includes at least:
- SYSAUX
- SYSTEM
- TEMP
- UNDO
- USERS
TableSpace Graphs
Oracle TableSpaces can have dynamically allocated disk space. This can cause some confusion when considering currently allocated space vs reserve allocated space.
TableSpace graphs include the following:
- Disk Space (bytes): Used, Free, and Total space allocated
- IO Operations (ops): Reads, Writes, and their standard deviation across files
- Time Per Request (sec): Read-time, write-time, and standard deviation across files
Installed Items
Installing this ZenPack will add the following items to your Zenoss system:
Configuration Properties
- zOracleConnectionString
- zOracleUser
- zOraclePassword
- zOracleConnectString (for legacy support)
- zOracleInstance
- zOraclePort
- zOracleLinuxUser
Note: zOracleLinuxUser is the user on the Linux server under which the Oracle process is run.
Modeler Plugin
- zenoss.ojdbc.Instances
Datasource Types
- Oracle
Monitoring Templates
- OracleInstance: sysstat
- OracleTableSpaces: dbmTBSP
Installation and Configuration
The installation consists of the following steps which will be covered in depth:
- Configure Oracle Server
- Network Configuration
- Install the plugin
- Install the base server device
- Bind the plugin modeler template to a server
- Set the zOracleConnectionStrings property
- Set the zOracleLinuxUser property
- Model the device
Configure Oracle Server
The Oracle server must be configured correctly and granted access in order to allow access to the tables needed for monitoring. THESE STEPS ARE REQUIRED:
-
Make sure the Oracle server is listening on the correct TCP port (usually 1521)
-
Configure the Oracle DB for ZP Access. You must configure the database to create and allow access to specific tables for the Zenoss user. The simplest way is to use the sqlplus command from the oracle account. Make sure you have ORACLE_HOME and ORACLE_SID set correctly in your oracle user account. The REQUIRED tables are:
- All V$ tables and views
- SYS.X$KCCFN (not directly available to normal user)
- SYS.X$KTFTHC (not directly available to normal user)
- SYS.TS$
- SYS.FILE$
- SYS.VW_X$KCCFN
- SYS.VW_X$KTFTHC
- dba_data_files
- dba_free_space
- dba_tablespaces
- dba_temp_files
We recommend using the following script to set this up:
/* -----------------------------------------------------------------------
 Steps to create a secure Zenoss user for monitoring:
 1: Log into oracle account. Make sure ORACLE_HOME and ORACLE_SID are set:
 2: oracle_env.sh (for Oracle 10.X)
 3: ./sqlplus /nolog
 4: connect /as sysdba
 ----------------------------------------------------------------------- */

 drop user zenoss cascade;
 create user zenoss identified by zenoss;
 grant connect to zenoss;
 grant SELECT ANY DICTIONARY to zenoss;

 create view VW_X$KCCFN as select * from SYS.X$KCCFN;
 create view VW_X$KTFTHC as select * from SYS.X$KTFTHC;

 grant select on SYS.TS$ to zenoss;
 grant select on SYS.FILE$ to zenoss;
 grant select on SYS.VW_X$KCCFN to zenoss;
 grant select on SYS.VW_X$KTFTHC to zenoss;
 grant select on dba_data_files to zenoss;
 grant select on dba_free_space to zenoss;
 grant select on dba_tablespaces to zenoss;
 grant select on dba_temp_files to zenoss;
 commit;
/* ---------------------------------------------------------------------- */
Network Configuration
If your network has strong firewalls you may need to open up ports from your Zenoss installation to the monitored Oracle servers. You only need to open the TCP port the Oracle's JDBC listener uses. This is typically TCP 1521 but will differ with multiple instances which must each have unique TCP ports.
Install the Base Server Device
Install the base server as you normally would. Just select the type of server that Oracle will run on (Linux, Solaris, Windows, etc..). The host server should have its base data collection services running as usual in order to monitor its vitals. Make sure to set zProperty zCommandCommandTimeout to 120.
Now you are ready to bind the modeler:
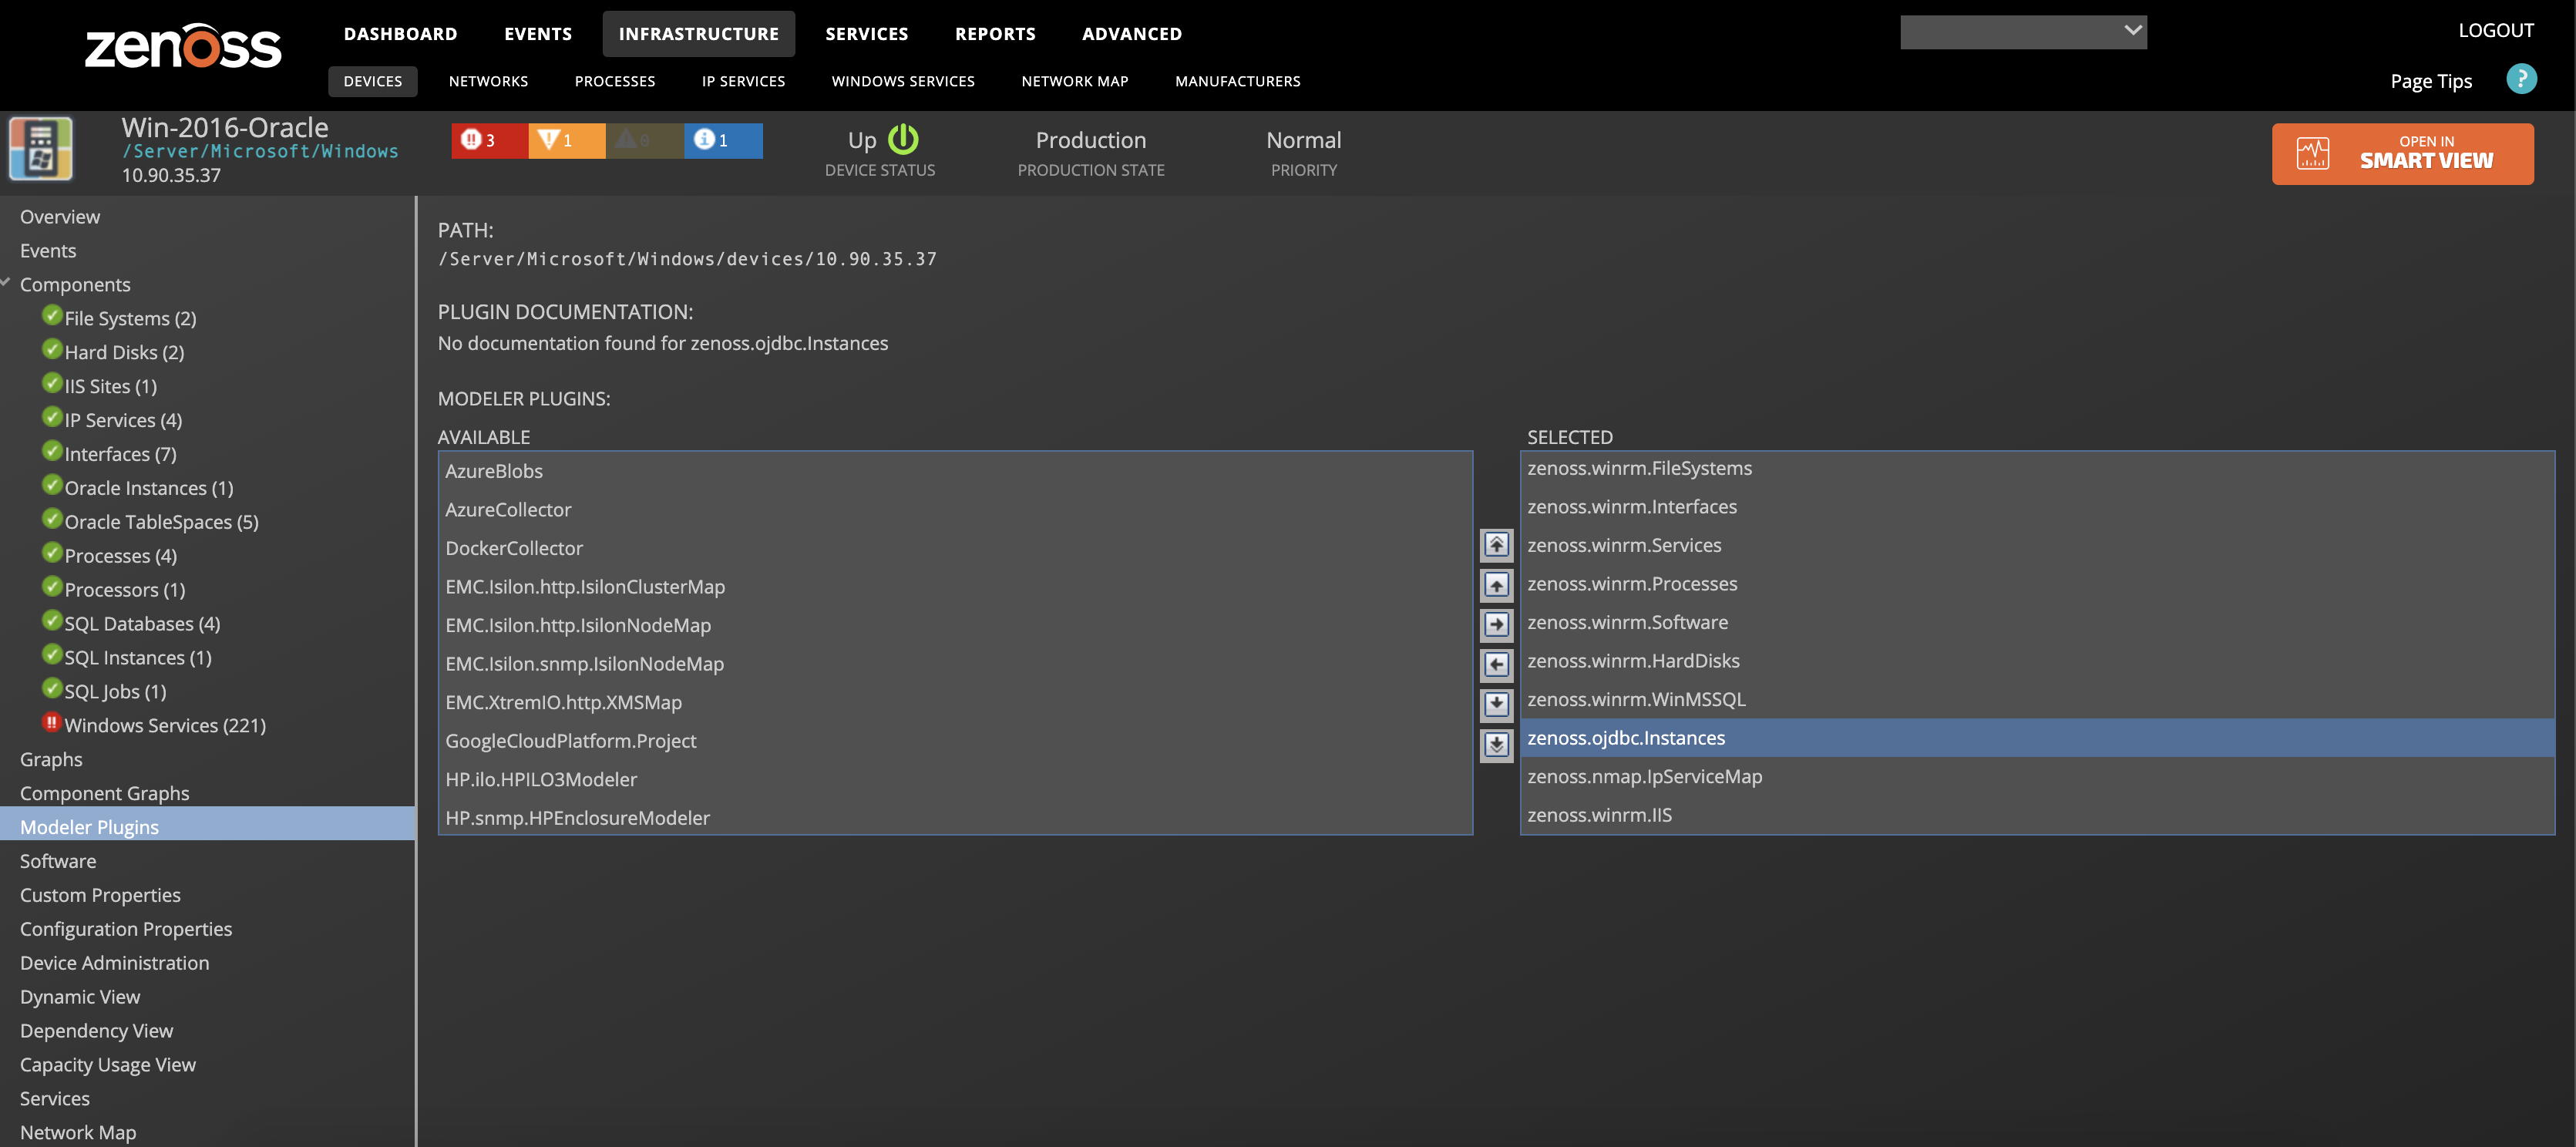
Bind the Plugin Modeler Template to Server
- From the Infrastructure page, select your server.
- From Modeler Plugins, move zenoss.ojdbc.Instances to the Selected group, Save.
- Now you are almost ready to model the device.
Enabled TableSpace Templates
Tablespace templates are enabled by default.
To disable these templates:
- Navigate to Advanced -> Monitoring Templates
- Select OracleTableSpace
- DoubleClick dbmTBSP and uncheck Enabled
- -Save-
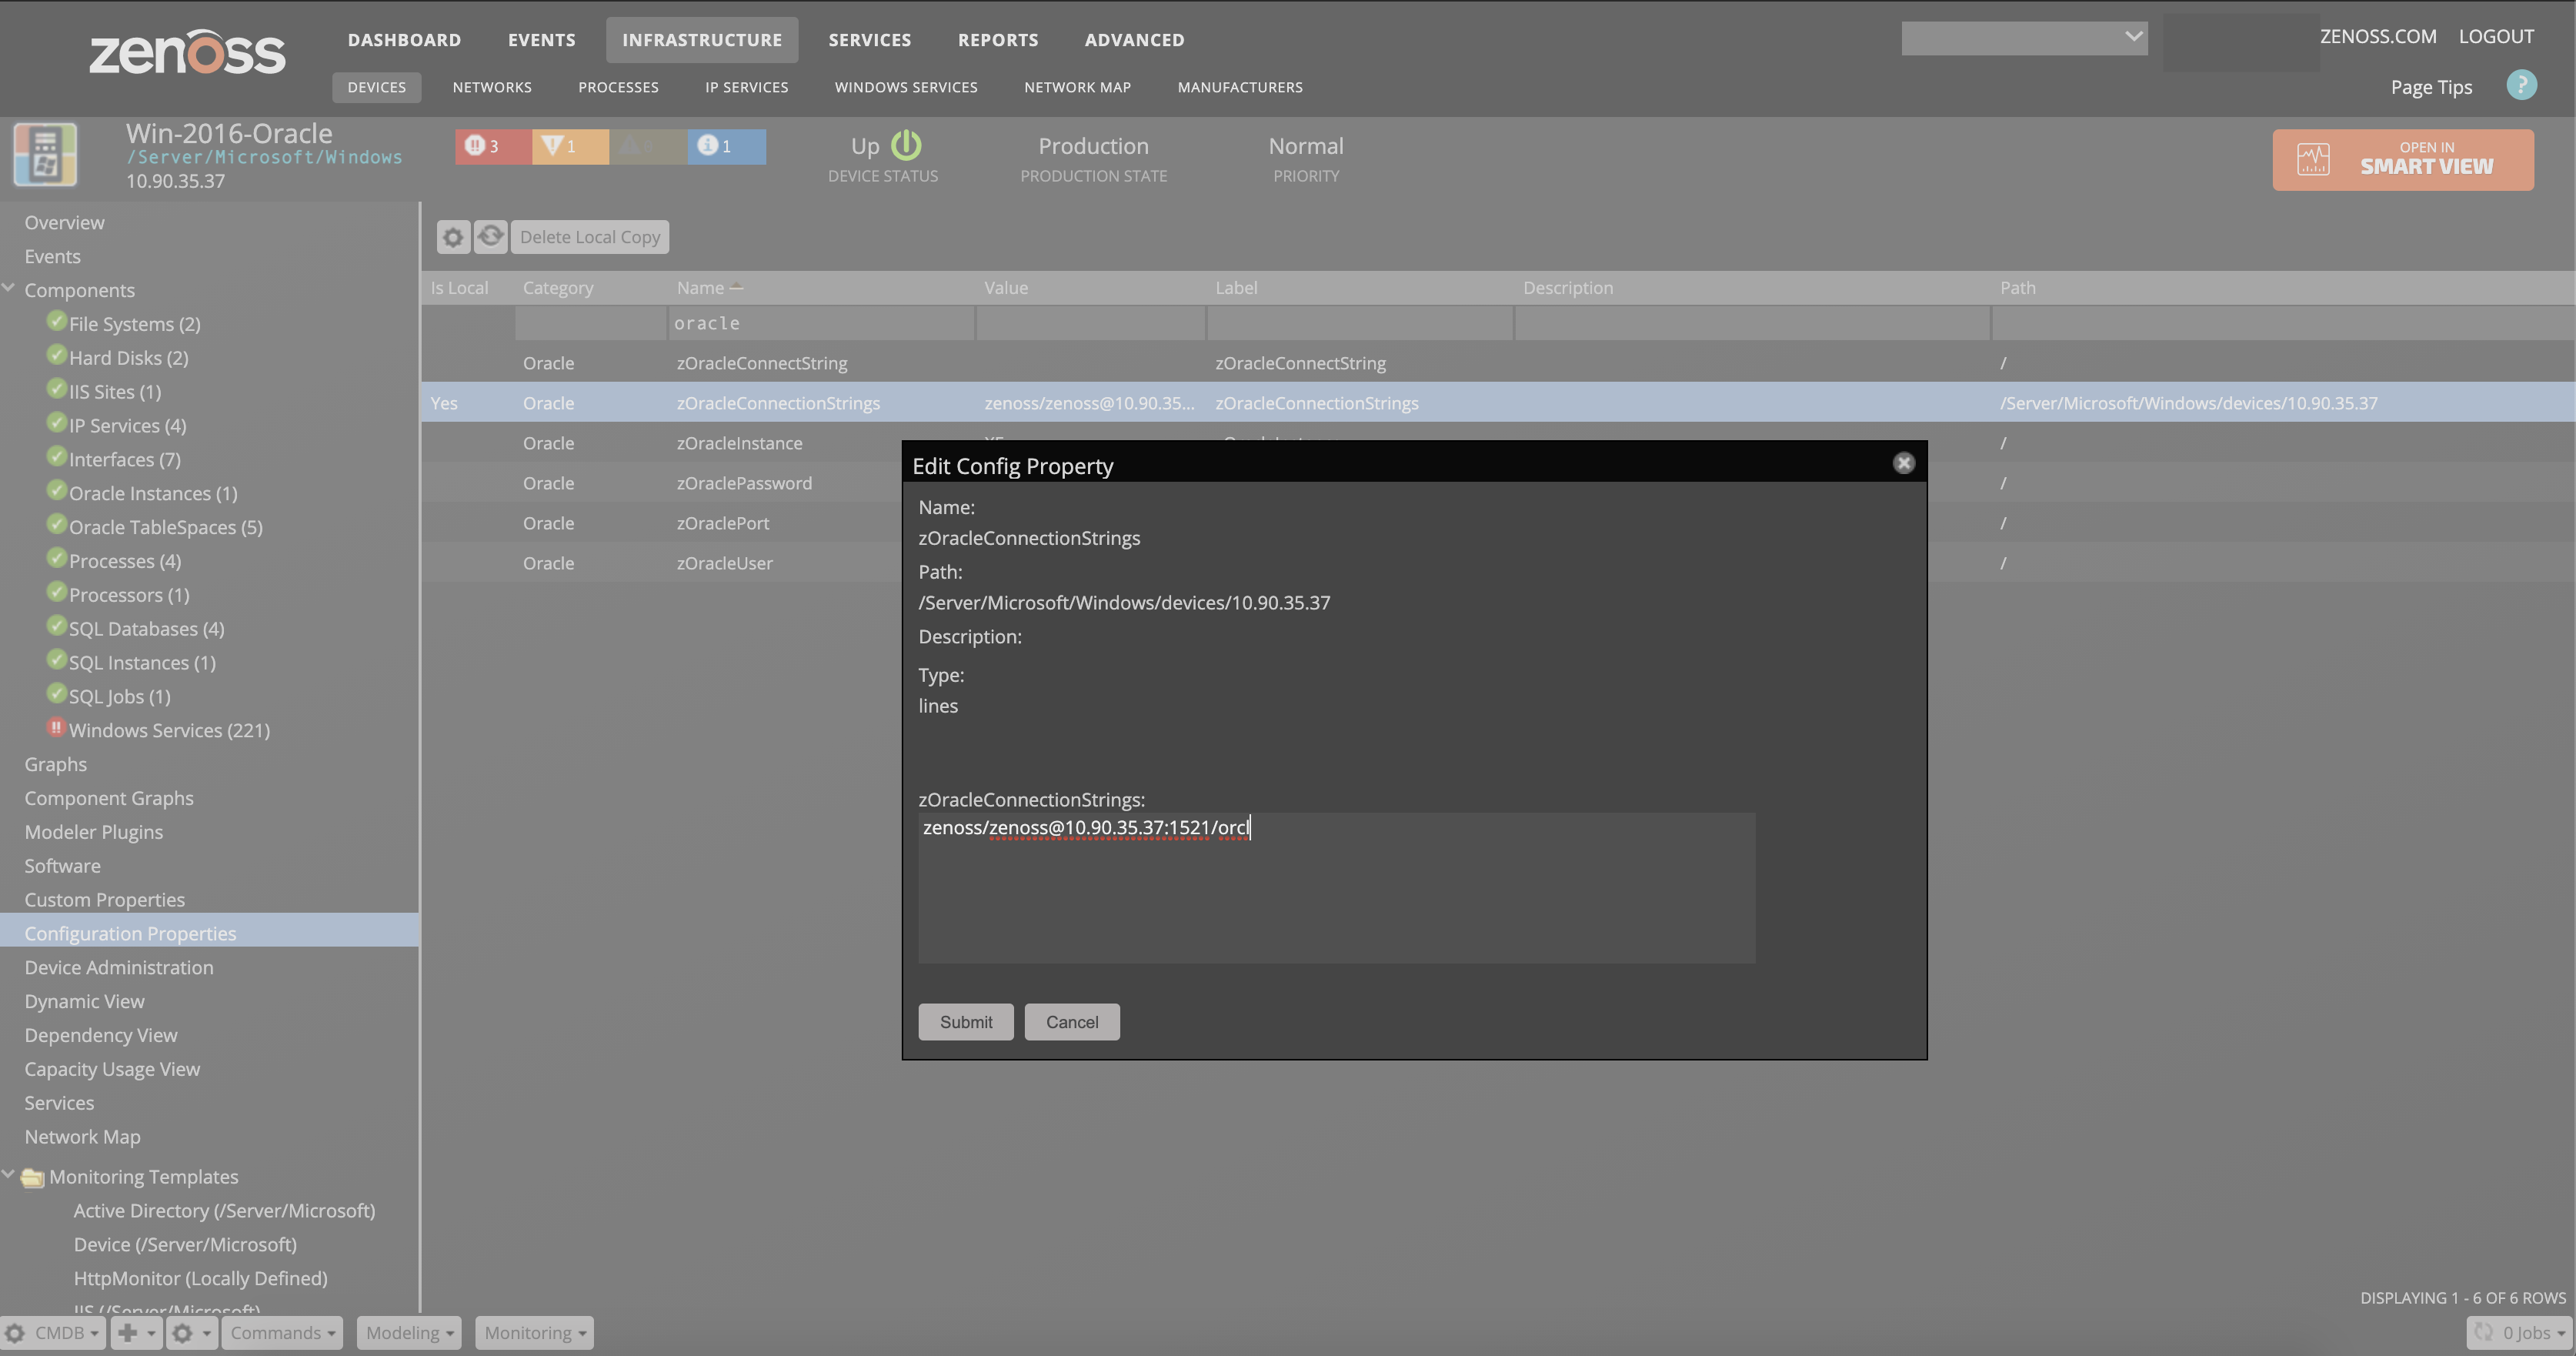
Set the zConnectionStrings Property
- Select your server from the Infrastructures Tab
- Click on Configuration Properties
- Search for zOracle and locate and select
zOracleConnectionStrings
- You may enter all the connection strings for Instances
- Don't fill in the singular zOracleConnectString
- Search for zOracleUser: Enter your username for the DB (zenoss by default)
- Search for zOraclePassword: Enter your password for the DB (zenoss by default)
These settings will allow you to protect your passwords if you set ${here/zOraclePassword} in the connection string as in the following examples:
JoeNameth/${here/zOraclePassword}@db1.example.com:1521:XE
${here/zOracleUser}/${here/zOraclePassword}@db1.example.com:1521:XE
${here/zOracleUser}/${here/zOraclePassword}@${here/manageIp}:${here/zOraclePort}:${here/zOracleInstance}
${here/zOracleUser}/${here/zOraclePassword}@db1.example.com:1521/db7.zenoss.int
We STRONGLY recommend that you install the same read-only user in your databases so that you don't have to chase down usernames and passwords for your instances. A read-only DB user will also enhance your security and be less prone to abuse.
Model the Component
- From the device view, select Model Device from the gear menu.
- If all goes well Zenoss should model the device.
- Since the Instances are just components of the server, you should see them hanging off of the device as components.
Unlocking Components from Deletion
This ZenPack automatically locks Instance components so that they are not removed when modeling fails to collect. This can happen for a variety of reasons including network failure, system downtime, and Oracle maintenance.
You can unlock your Instance components if you wish the modeler to remove deleted Instances as follows:
- Select your Instance
- Select the gear menu
- Select Locking...
- Un-check "Lock from deletion"
Migration from Older Versions
Migrating from 2.5.X
When migrating from the 2.5.X version of DatabaseMonitor, you must:
- Install the new version of the ZP
- Restart Zenoss Services like Zenhub
- Make sure to leave the old version in place during the installation process. This will allow the new version to construct the new zConnectionStrings entry.
- Bind the Plugin Modeler as above
- Model the Component as above
- Remove the old monitor Template from the device
- There are no Tablespace files for 2.5.X to deal with conversion
Moving Old RRD Data from 2.5.X
You will have to manually move the old RRD data. In order to do so, you must first install the new Zenpack and identify the new location of the Instance you are monitoring as well as the old. To do so:
-
Identify the old and new locations of the ZP RRD data:
<zenoss>: find $ZENHOME/perf/Devices -name "sysstat_usercalls.rrd"Copy down that folder location. The new location will have "oracle_instances" in the path.
-
Copy the RRD files from the old to the new locations:
<zenoss>: cp -a $ZENHOME/perf/Devices/old/path/ $ZENHOME/.../oracle_instances/new/path/
Moving Old RRD Data from 3.0.0
We changed the Tablespaces datasource name in newer versions. We recommend that you delete the old files and start fresh.
If you want to migrate tablespace files, you will need to change them accordingly. For example, in the containing folder:
mv TableSpaceDU_bytes_free.rrd dbmTBSP_BYTES_FREE.rrd
mv TableSpaceDU_bytes_max.rrd dbmTBSP_MAXBYTES.rrd
mv TableSpaceDU_bytes_used.rrd dbmTBSP_BYTES_USED.rrd
mv TableSpaceIO_reads.rrd dbmTBSP_READS.rrd
mv TableSpaceIO_readtime.rrd dbmTBSP_READTIME.rrd
mv TableSpaceIO_writes.rrd dbmTBSP_WRITES.rrd
mv TableSpaceIO_writetime.rrd dbmTBSP_WRITETIME.rrd
DataPoints and DataSources
Adding a New DataSource
Adding a new datasource is a simple process, however, you have an SQL query that conforms to the correct format. In this ZenPack, we require that the SQL query return data in the following two-column format, with the "|" character in between:
NAME | Value name1 | value1 name2 | value2 ..etc.. | ..etc..
where NAME is the datapoint identifier and VALUE is its numerical value. For example, a valid query to find the number of threads for a particular instance would be:
"select 'thread_count' as name, thread# value from v$instance"
There is one caveat: you need to double up on the dollar sign because the Zenoss TALES interpreter will try to interpret a single-dollar variable as an internal variable. The double-dollar expression protects this literal dollar sign. The actual query must thus look like this:
"select 'thread_count' as name, thread# value from v$$instance"
Note: If your datapoint NAME has any special characters or spaces, they will be stripped out of the name key.
In order to add this query to the OracleInstance datasource, perform the following steps:
-
Go to the Advanced page and select Monitoring Templates
-
Select OracleInstance
-
Hit the + key in the DataSources panel
- Enter "threads" as Name
- Select "Oracle" as the Type
- -Submit-
-
Now open the threads datasource by double-clicking it. Add the following to the form:
-
Name: threads
-
Enabled: on
-
Component: ${here/id}
-
Timeout: 120
-
Cycle Time: 300
-
Severity: [Info|Warning|Critical]
-
ConnectionString: ${here/connectionString}
-
SQL Query:
select 'thread_count' as name, thread# value from v$$instance -
-SAVE-
-
Now you have the datasource defined you must add a Datapoint to it. This example query only has a single value associated with it.
Next, we will add this datapoint.
Adding a New DataPoint
We now add the thread_count datapoint to our new threads datasource. You could also add a datapoint from an existing DataSource like sysstat if it collects extra data that is not already setup.
We do the following:
- Highlight the threads' datasource in the DataSources panel.
- From the Gear Menu, select Add Data Point:
- Name: thread_count
- Description: Number of threads
- RRD Type: GAUGE
- Read Only: on
- -SAVE-
Now you can use the datapoint in a graph by referencing the name as threads.thread_count from the pull-downs in the Graph section. Alternatively, from the DataSources panel, you can select the datapoint and assign it directly to a graph.
Note: Once you assign this point to a graph, it will be referenced with the dot as threads_thread_count.
Adding New DataPoints to SYSSTAT DataSource
As mentioned before you can add a new datapoint to the existing sysstat datasource by simply adding the correct key identifier to the sysstat datasource as outlined above. To get a current list of these identifiers, you can consult the Oracle documentation for Statistics Descriptions in the Oracle Database Reference documentation:
References:
- http://docs.oracle.com/cd/E16655_01/server.121/e17615/stats002.htm
- http://docs.oracle.com/cd/B28359_01/server.111/b28320/stats002.htm
- http://docs.oracle.com/cd/B14117_01/server.101/b10755/stats002.htm
Miscellaneous and Troubleshooting
Oracle Database Checks
Ensure that:
- Oracle Database is running
- User/Permissions are set according to documentation on Oracle
- All tables/views exist according to documentation on Oracle
- Telnet to 1521 works
Zenoss DatabaseMonitor ZP Checks
Ensure that zOracleConnectionString Matches the Device IP.
Check whether manual connecting and querying works:
-
Set the following in bash(double-check $constr and $ZP_BASE):
export constr="jdbc:oracle:thin:USERNAME/PASSWORD@ipname.zenoss.loc:1521:XE" export ZP_BASE=$ZENHOME/ZenPacks/ZenPacks.zenoss.DatabaseMonitor*/ZenPacks/zenoss/DatabaseMonitor export JARFILE=$ZP_BASE/lib/zenpack-ojdbc-client-1.0-SNAPSHOT.jar function ora() { /usr/bin/java -Djava.security.egd=file:///dev/urandom \ -Duser.timezone=UTC -jar "$JARFILE" -c "$constr" -q "$1" } # Test function to use CONNECTION_STRING via environment export CONNECTION_STRING="jdbc:oracle:thin:zenoss/zenoss@ipname.zenoss.loc:1521:XE" function eora() { /usr/bin/java -Djava.security.egd=file:///dev/urandom \ -Duser.timezone=UTC \ -jar "$JARFILE" \ -q "$1" } -
Test the following query:
ora 'select * from v$instance'If this fails, you have a connectivity problem that must be fixed.
-
Test the existence of special tablespace views:
ora 'select * from sys.vw_x$kccfn'
ora 'select * from sys.vw_x$ktfthc'
If any of these tests fail, your Zenoss system is not properly configured. Please consult the documentation.
JDBC Collection Speed and Security Note (/dev/random)
The data collector uses the Oracle JDBC connector to OracleDB. The JDBC connector normally uses the Linux device file /dev/random for its random number generation, primarily for encryption. The lack of system entropy causes this device significant delay and therefore causes data collection to time out and eventually fail.
We have bypassed this problem in java by passing -Djava.security.egd=file:///dev/urandom to the Java runtime command. If your number generator is fast enough you can reinstate the original /dev/random by modifying $ZPHOME/lib/txojdbc.py in the _get_query_command().
Insufficient Processes on Oracle
If you get an ORA-12519 in your data collection, and your DB is setup with fewer than 100 processes you may need to bump up that amount to 150 in sqlplus:
alter system set processes = 150 scope = spfile;
Zenoss Analytics
This ZenPack provides additional support for Zenoss Analytics. Perform the following steps to install extra reporting resources into Zenoss Analytics after installing the ZenPack.
-
Copy analytics-bundle.zip from:
$ZENHOME/ZenPacks/ZenPacks.zenoss.DatabaseMonitor*/ZenPacks/zenoss/DatabaseMonitor/analytics/on your Zenoss server.
-
Navigate to Zenoss Analytics in your browser.
-
Log in as a superuser.
-
Remove any existing Oracle Database ZenPack folder.
- Choose Repository from the View menu at the top of the page.
- Expand Public in the list of folders.
- Right-click on Oracle Database ZenPack folder and choose Delete.
- Confirm the deletion by clicking OK.
-
Add the new Oracle Database ZenPack folder.
- Choose Server Settings from the Manage menu at the top of the page.
- Choose Import on the left page.
- Remove checks from all checkboxes.
- Click Choose File to import a data file.
- Choose the analytics-bundle.zip file copied from your Zenoss server.
- Click Import.
You can now navigate back to the Oracle Database ZenPack folder in the repository to see the following resources added by the bundle.
Domains
- DatabaseMonitor Domain
Ad Hoc Views
Domains can be used to create Ad Hoc views using the following steps.
- Choose Ad Hoc View from the Create menu.
- Click Domains at the top of the data chooser dialog.
- Expand Public then Oracle Database ZenPack.
- Choose the OracleDB Domain domain.
Changes
3.1.4
- Fixed missing execute permissions during ZP upgrade process (ZPS-7820)
- Tested with Zenoss Resource Manager 6.8.0, Zenoss Cloud, and Service Impact 5.7.1.
3.1.3
- Make DatabaseMonitor ZenPack compatible with Ubuntu-based CZ 7.2.0 (ZPS-8865)
- Tested with Zenoss Resource Manager 6.7.0, Zenoss Cloud, Oracle 12c, 19c, and Service Impact 5.6.0.
3.1.2
- Fixed mixing results when modeling multiple devices in the same container (ZPS-8059)
- Tested with Zenoss Resource Manager 6.6.0, Zenoss Cloud, Oracle 12c, 19c, and Service Impact 5.5.5.
3.1.1
- Add Oracle Instance status event (ZPS-7560)
- Tested with Zenoss Resource Manager 6.5.0, 6.6.0, Zenoss Cloud, Oracle 12c, 19c, and Service Impact 5.5.3.
3.1.0
- Convert ZenPack to be based on ZenPackLib 2.0 (ZPS-7668)
- Fix performance issue with a large number of TableSpaces (ZPS-3488)
- Mask connection strings in debug output (ZPS-7720)
- Update database driver for analytics bundle (ZPS-7791)
- Tested with Zenoss Resource Manager 6.5.0, 6.6.0, Zenoss Cloud, Oracle 12c, 19c, Analytics, and Service Impact 5.5.3
3.0.12
- Remove platform distribution name from egg (ZPS-2668)
- Call python from env to bypass permissions issues (ZPS-2852)
- Redo Size (bytes) graph set to base 1024 scale (ZPS-2876)
- Tested with Zenoss Resource Manager 4.2.5 RPS 743, 5.3.3, 6.1.0, Service Impact 5.2.2, Analytics 5.0.8
3.0.11
- Security: Hide all Connection String info from the process list (ZPS-2185)
- Ensure txojdbc kills java process after timeout (ZPS-2479)
- Change tablespace storage graphs to base 1024 (ZPS-2254)
- Set SGA and PGA graphs to base 1024 (ZPS-2604)
- Fix missing properties and relations in Analytics (ZPS-2597)
- Tested with Zenoss Resource Manager 4.2.5 RPS 743, 5.3.3, 6.0.1, Service Impact 5.2.2, Analytics 5.0.8
3.0.10
- Add CallHome metric collection (ZPS-1241)
- Add READ ONLY status as a clear state (ZPS-1276)
3.0.9
- Provide accurate available TEMP tablespace size for Oracle 11+ (ZPS-729)
3.0.8
- Fix possible "Permission denied" error after upgrading Zenoss 5 (ZEN-25575)
3.0.7
- Fix bug in GNUMakefile
3.0.6
- Guard modeler against modeler errors (ZEN-24515)
- Correct Analytics Bundle: (ZEN-24317)
- Security fixes: Include full regex for mask_pass (ZEN-24634)
3.0.5
- Re-work Analytics for new metrics introduced in 3.0.4
- Improve TBSP event handling (ZEN-24339)
- Mask connectionString in errors (ZEN-21748)
- Ensure dbmTBSP omits damaged TableSpaces (ZEN-23916)
- Minor Graph Adjustments
3.0.4
- Added multi-file support and datasource for tablespaces
- Added standard deviation for multi-file tablespaces
- Reads and Writes units changed from count/sec to count
- As a result: Tablespace IO Operations Read/Write data are lost on upgrade
3.0.3
- Added Analytics Support
- Added $ and # to valid ConnectionString passwords
- Updated Thresholds
3.0.2
- Enhanced tablespace scalability to 100's of tablespaces (ZEN-11569)
- Allow for c##name style usernames for RAC (ZEN-12387)
- Enhanced security for the JDBC user
3.0.1
- Added Support for RAC-style service names in connectionStrings
3.0.0
- JDBC connectivity added
- Added support for multiple instances
- Added support for tablespaces