Ceph
ZenPacks.zenoss.Ceph
Ceph is a distributed object storage and file system.
This ZenPack monitors the Ceph storage clustering system.
We support two APIs for connecting to Ceph: Calamari and SSH.
- Calamari is beneficial when you already have Calamari monitoring setup and don't want to talk directly to your cluster. Calamari caches data and will put less load on your server while maintaining existing security.
- The SSH API is appropriate when Calamari monitoring is not desired. This choice is easier to setup if no existing Calamari system exists. For Ceph Octopus and Pacific versions the SSH API make direct contact only to Ceph Admin node (initial monitor node) and pulls data from it. For the older versions the SSH API make direct contact to each host and pulls data from each server and so this API is more direct and reactive. This API choice requires you setup SSH keys or provide SSH password authentication.
Releases
Version 2.2.1: Download:
- Released on 2024/06/03
- Requires PythonCollector ZenPack
- Compatible with Zenoss 6.7 and Zenoss Cloud
Version 2.2.0: Download:
- Released on 2022/06/17
- Requires PythonCollector ZenPack
- Compatible with Zenoss 6.7 and Zenoss Cloud
Prerequisites
- Ceph (Octopus and Pacific)
- Ceph (Older versions)
- Calamari (Version 1.3.1 or newer)
- Calamari credentials
- Administrative credentials for your Ceph cluster
Gallery
Features
Ceph features include:
- Overall Cluster Health Monitoring
- Health Monitoring for Monitors, OSDs, MDSs, RBDs, Pools, Snapshots, Ceph FSs and Hosts
- Graphs for key Ceph settings and performance metrics
- Service Impact and root cause analysis. (Requires Zenoss Service Dynamics)
- Event Management
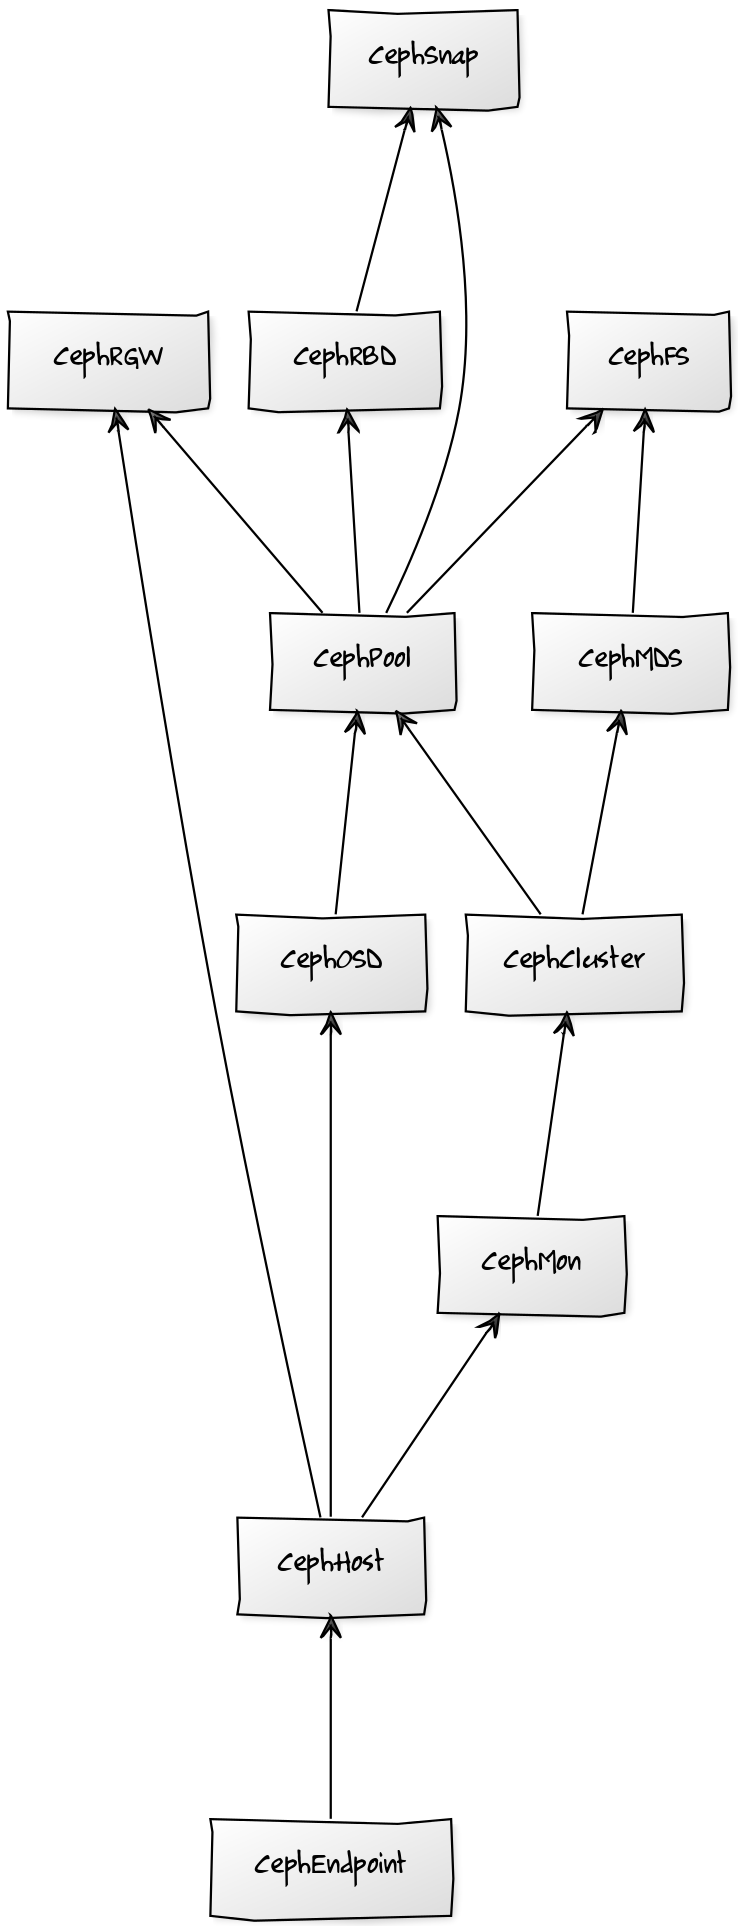
Ceph Structure and Discovery
Objects are automatically discovered via Calamari API or SSH API. The ZenPack class structure can be visualized in the following Diagram:
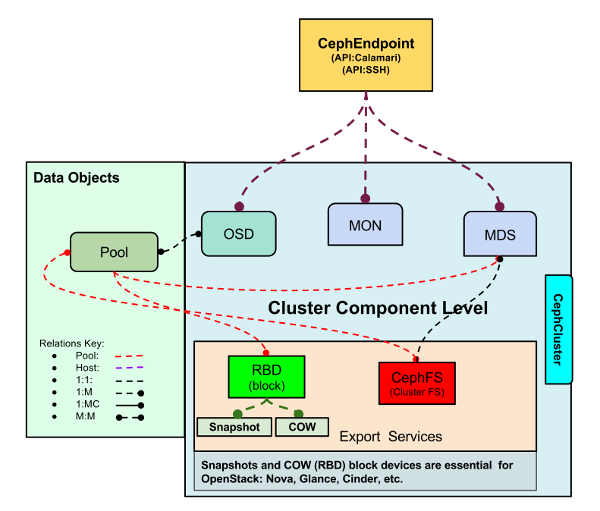
Ceph ZP Class Structure
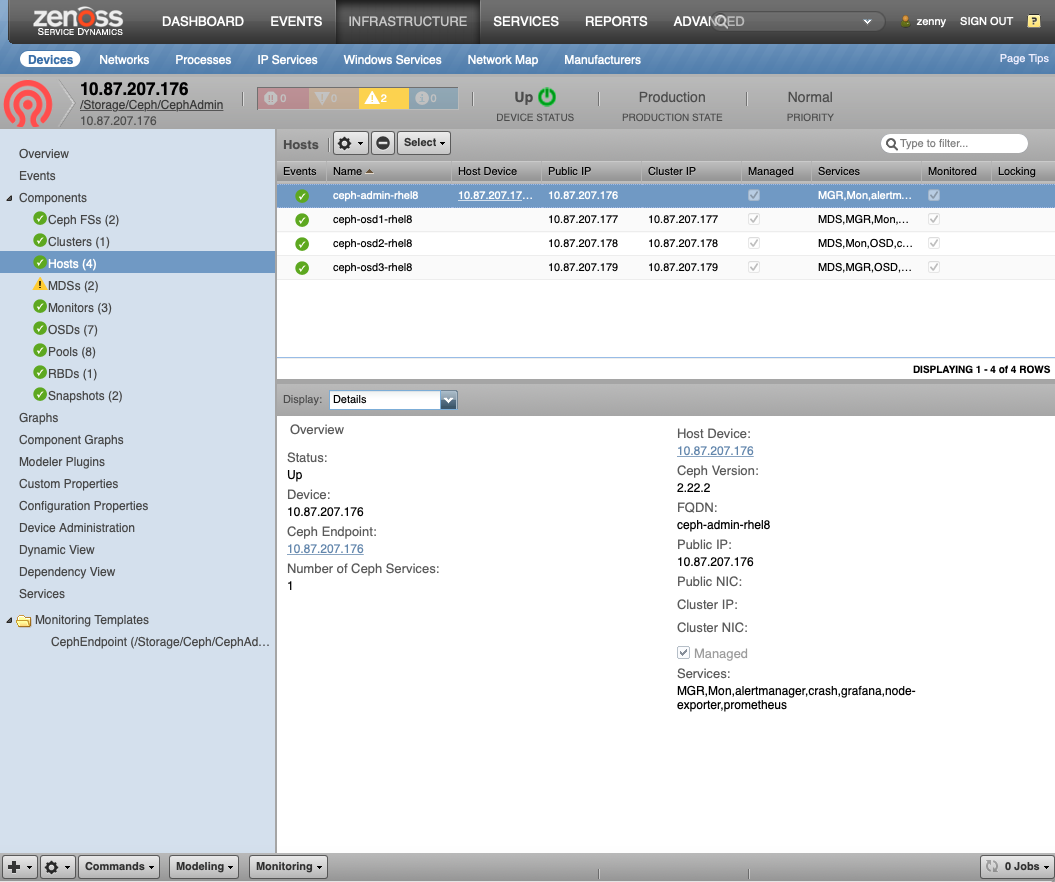
Hosts (CephHost)
- Description: Hosts that various Ceph services run on
- Attributes: fqdn, ceph_hostname, ceph_version, managed, frontend_addr, frontend_iface, backend_addr, backend_iface: Cluster facing interface, services: Services managed on host
- Relationships: cephEndpoint, cephServices
- Datasources:
- Events
(Only in
Calamari):
- Late Reporting
- Rebooted
- Regained Contact
- Datapoints:
- cpu.total.idle
- cpu.total.system
- cpu.total.iowait
- diskspace.root.byte_used
- diskspace.root.byte_free
- diskspace.root.byte_avail
- memory.Active
- memory.MemFree
- memory.MemTotal
- Events
(Only in
Calamari):
- Graphs:
- Idle Cpu
- CPU IO Wait
- Disk Space
- Memory Utilization
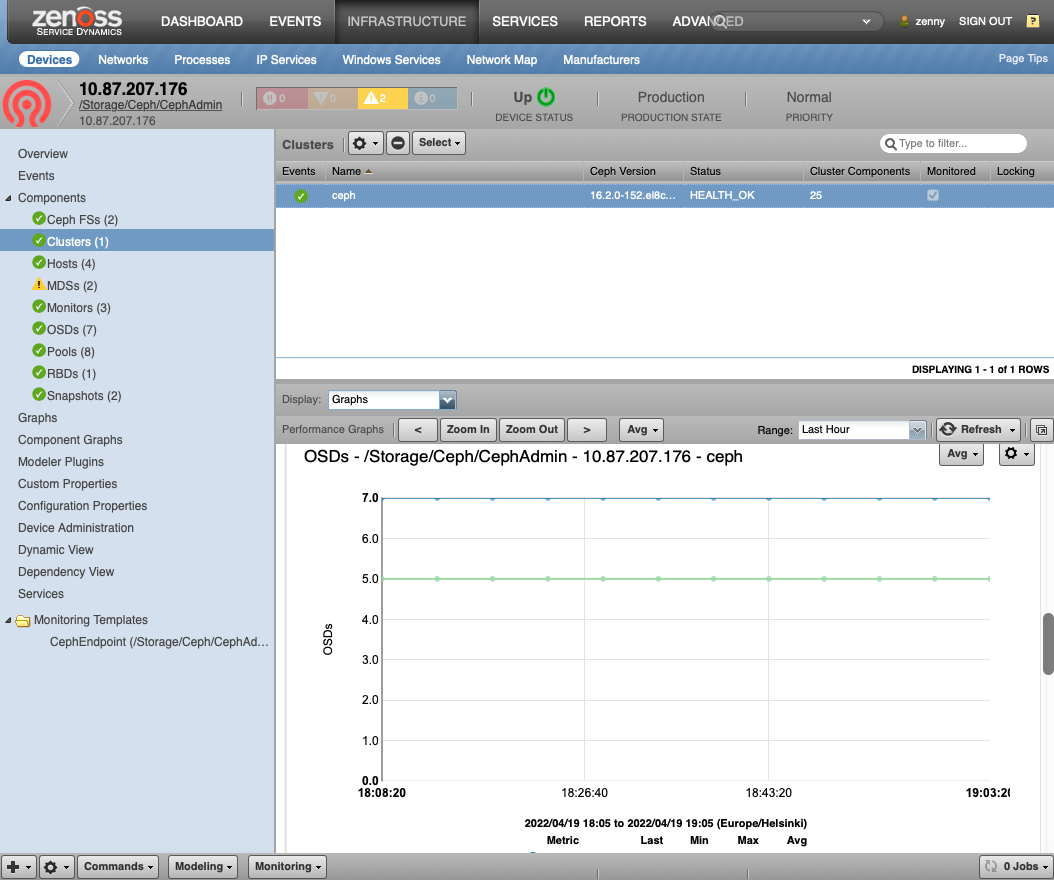
Ceph Clusters (CephCluster)
- Description: The cluster component. Ceph can host multiple clusters.
- Attributes: Status: Health Status, FSID: The cluster ID, Cluster Name
- Relationships: cephEndpoint, cephClusterComponents
- Datasources:
- Events:
- Health Warn
- Health OK
- Storage Space Capacity
- API Communication Error
- Regained Contact (Only in Calamari)
- Late Reporting (Only in Calamari)
- Datapoints:
- Cluster:
- total_bytes
- total_avail_bytes
- total_used_bytes
- OSD data:
- num_osds
- num_in_osds
- num_up_osds
- PG Data:
- active, backfill_toofull, backfilling, forced_backfill, backfill_wait, backfill_unfound, clean, creating, degraded, down, inactive, incomplete, inconsistent, peering, peered, recovering, recovery_wait, remapped, repair, replay, scrubbing, snaptrim_wait, snaptrim_error, snaptrim, splitting, stale, undersized, wait_backfill, unknown
- Cluster:
- Events:
- Graphs:
- Disk Usage
- OSDs Total, In and Up
- PG States (In SSH Octopus/Pacific and Calamari)
- Utilization (Only in SSH)
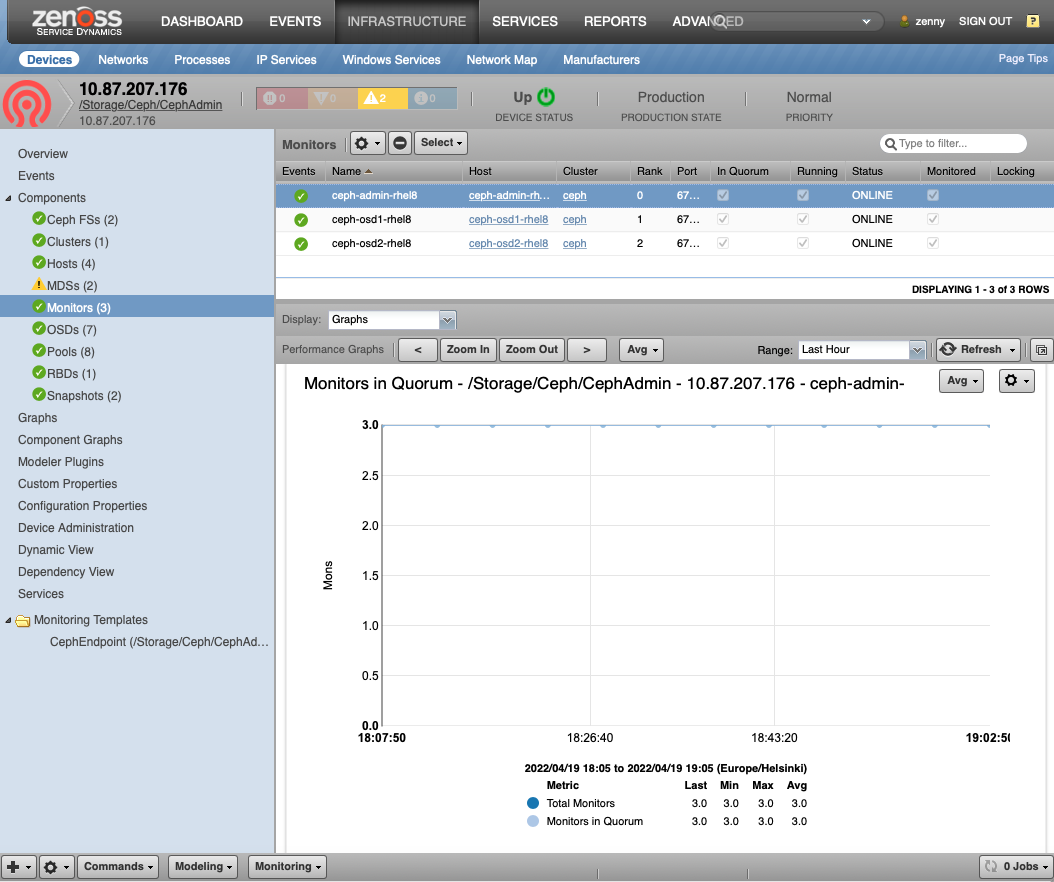
Ceph Monitors (CephMon)
- Description: Creates and monitors all Ceph services and health
- Attributes: rank in_quorum, public_ipaddr, public_port, running, status
- Relationships: cephCluster, cephHost
- Datasources:
- Events:
- Joined Quorum
- Left Quorum
- Rank Changed
- Running
- Status Changed
- Datapoints:
- cluster.num_mon
- cluster.num_mon_quorum
- mon.election_call
- mon.election_win
- mon.election_lose
- mon.num_elections
- Events:
- Graphs:
- Monitors in Quorum
- Elections (Not Supported for Octopus/Pacific)
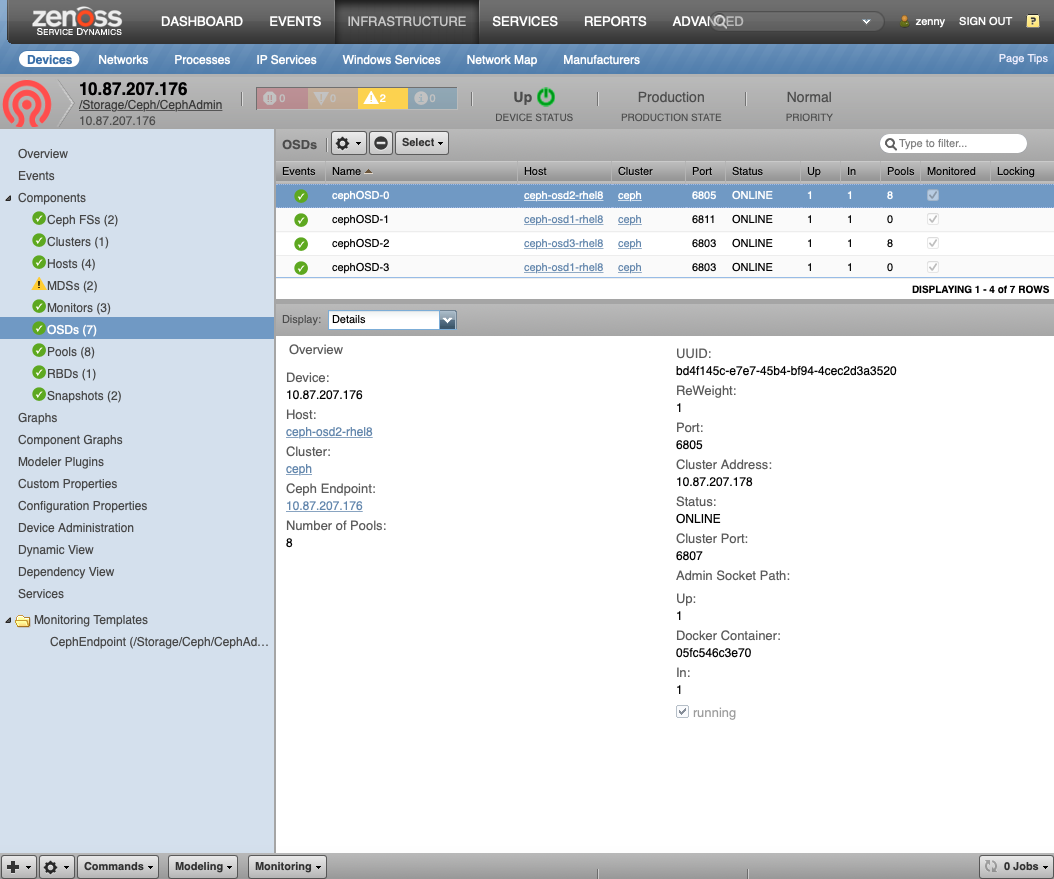
Ceph Object Storage Daemon (CephOSD)
- Description: Service that provides raw storage to Ceph
- Attributes: status, ceph_uuid, up, in, reweight, public_ipaddr, public_port, cluster_ipaddr, cluster_port
- Relationships: cephCluster, cephHost, cephPools
- Datasources:
- Events:
- OSD Down
- OSD Up
- OSD Reweight
- Running
- Status Changed
- Pools updated for OSD
- OSD Disk Space Capacity (Only in SSH Octopus/Pacific)
- Datapoints
(Only in SSH Octopus/Pacific):
- total_kb
- total_kb_avail
- t otal_kb_used
- average_utilization
- Graphs
(Only in SSH Octopus/Pacific):
- OSD Disk Space
- OSD Disk Utilization
- Events:
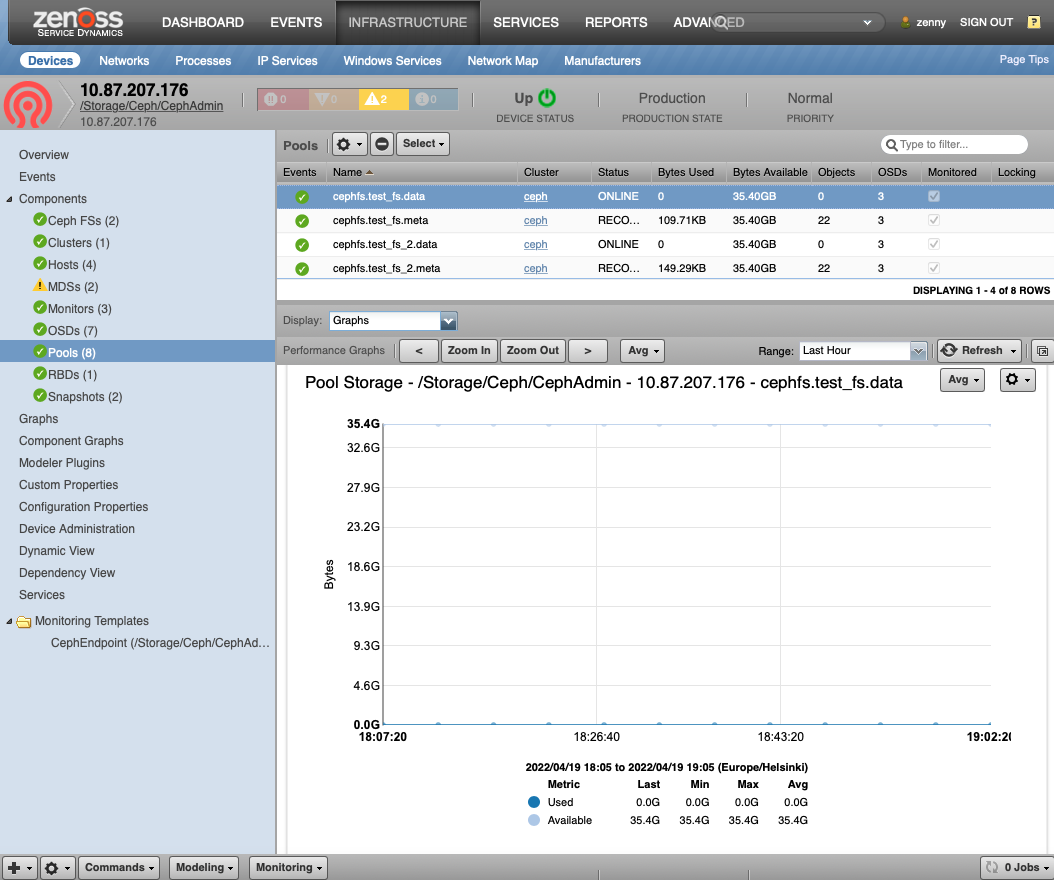
Pools (CephPool)
- Description: The basic Ceph logical areas that data is organized into
- Attributes: status
- Relationships: cephCluster, cephOSDs, cephMDSs, cephRBDs, cephSnaps, cephFS
- Datasources:
- Datapoints: num_objects, num_objects_degraded, num_objects_dirty, num_objects_misplaced, num_objects_missing_on_primary, num_objects_recovered, num_objects_clones, num_read_kb, num_write_kb, num_scrub_errors
- Graphs:
- Pool Storage
- Pool IO
- Dirty Objects
- Misplaced Objects
- Objects Recovered
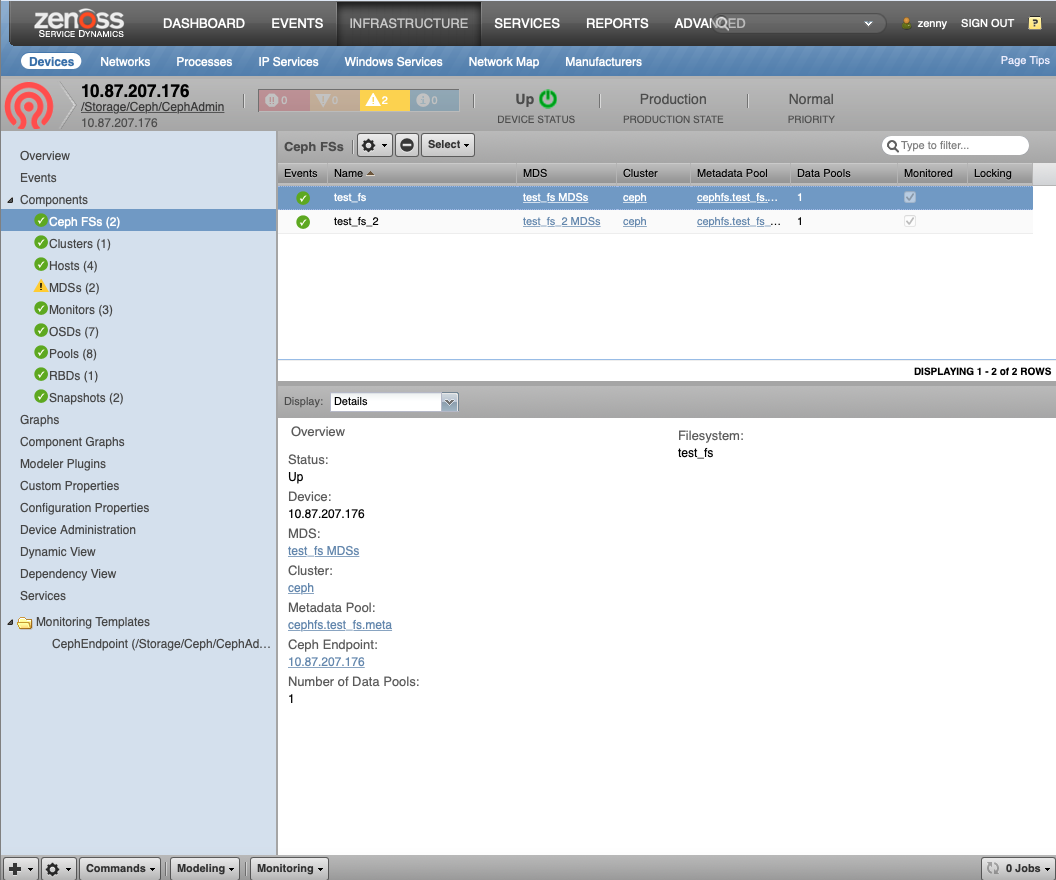
Ceph Filesystem (Ceph FS)
- Description: Global filesystem
- Attributes: mds_pool, data_pools
- Relationships:
- cephCluster
- cephMDSs
- cephPools
- Datasources: None
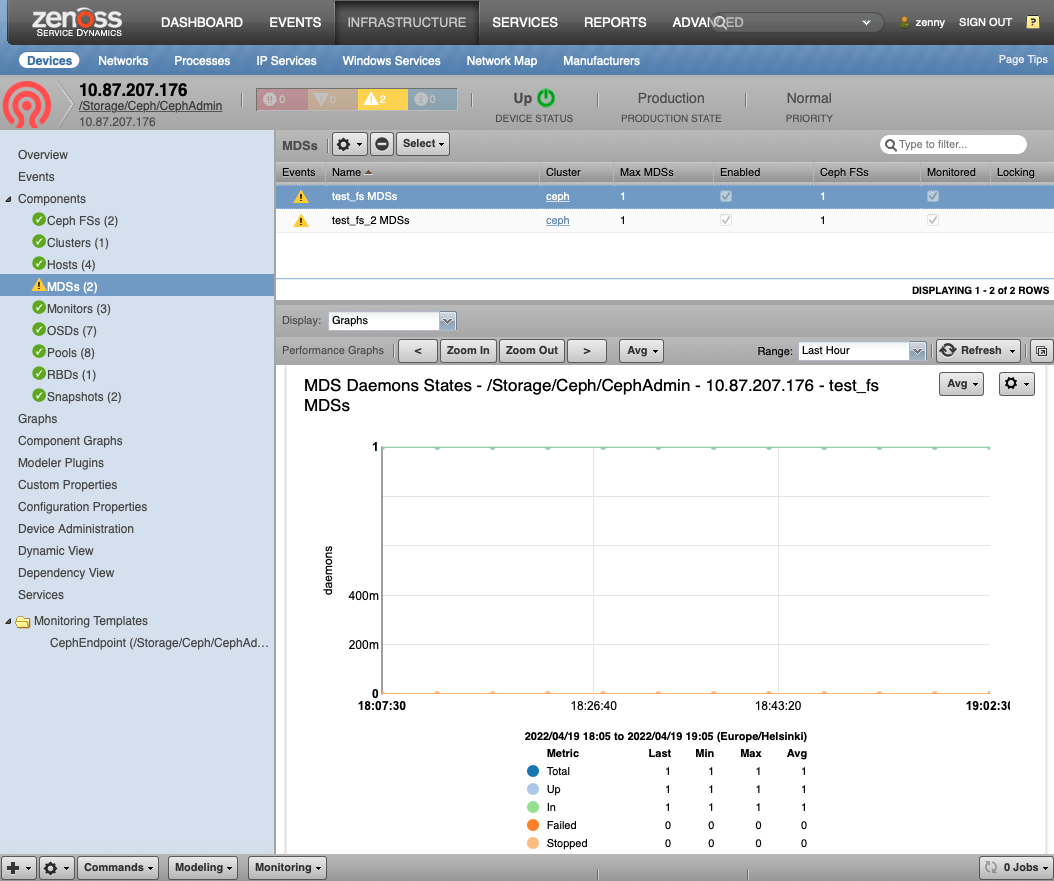
Ceph Metadata Servers (CephMDS)
- Description: Service provides all meta-data to Ceph FS files and objects. For Ceph Octopus and Pacific versions it is modeled as a single service for each Ceph FS. For older version it is currently modeled as a single service. This service which requires at least max_mds active servers and one standby server.
- Attributes: created, enabled, epoch, flags, last_failure, last_failure_osd_epoch, max_file_size, max_mds, modified, root, session_autoclose, session_timeout, tableserver
- Relationships: cephCluster, cephPools, cephFS
- Datasources:
- Events:
- Active Daemons
- Standby Daemons
- Datapoints:
- total_count, up_count, in_count, failed_count, stopped_count, max_mds, active_count, standby_count, other_count, datapool_count, epoch, first_committed, last_committed
- Events:
- Graphs:
- MDS Daemons States: Note: Totals don't sum to the subgroups
- MDS Daemon Secondary States
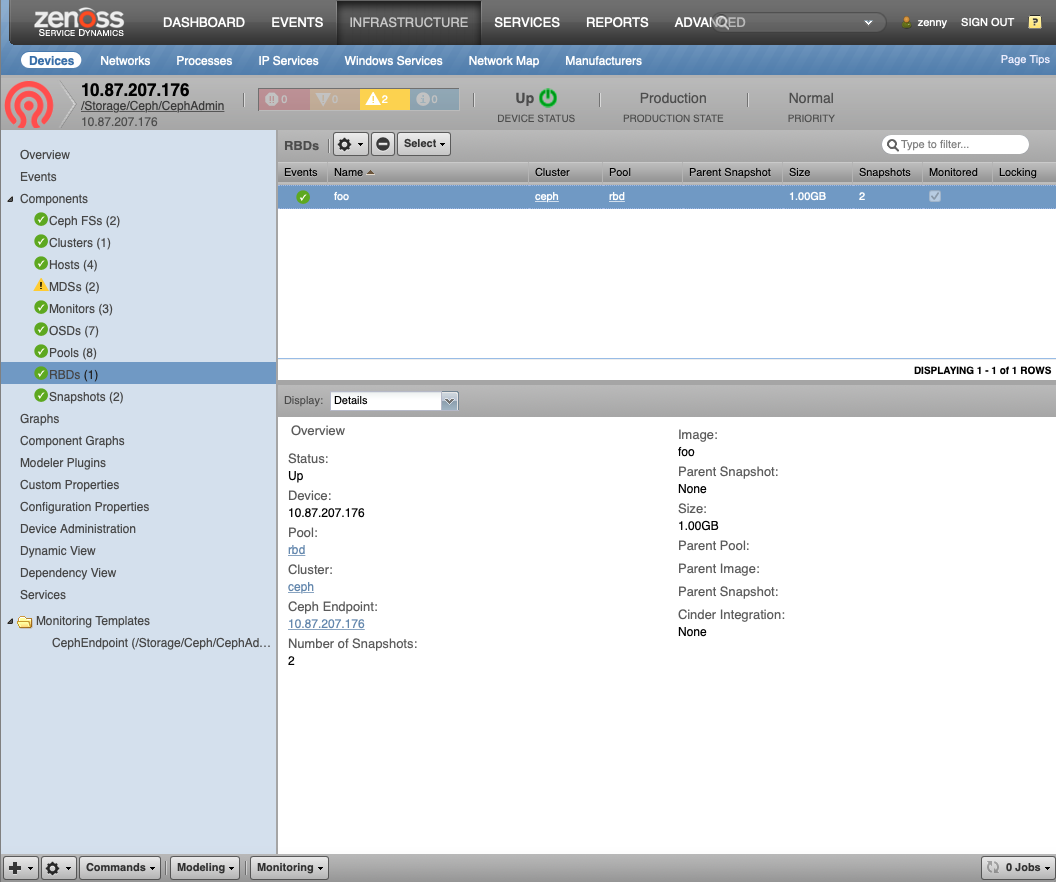
Ceph RADOS Block Device (CephRBD)
- Description: Block devices exported to systems as disk images
- Attributes: parent: (If COW image), size
- Relationships: cephCluster, cephPool, cephSnaps
- Datasources: None
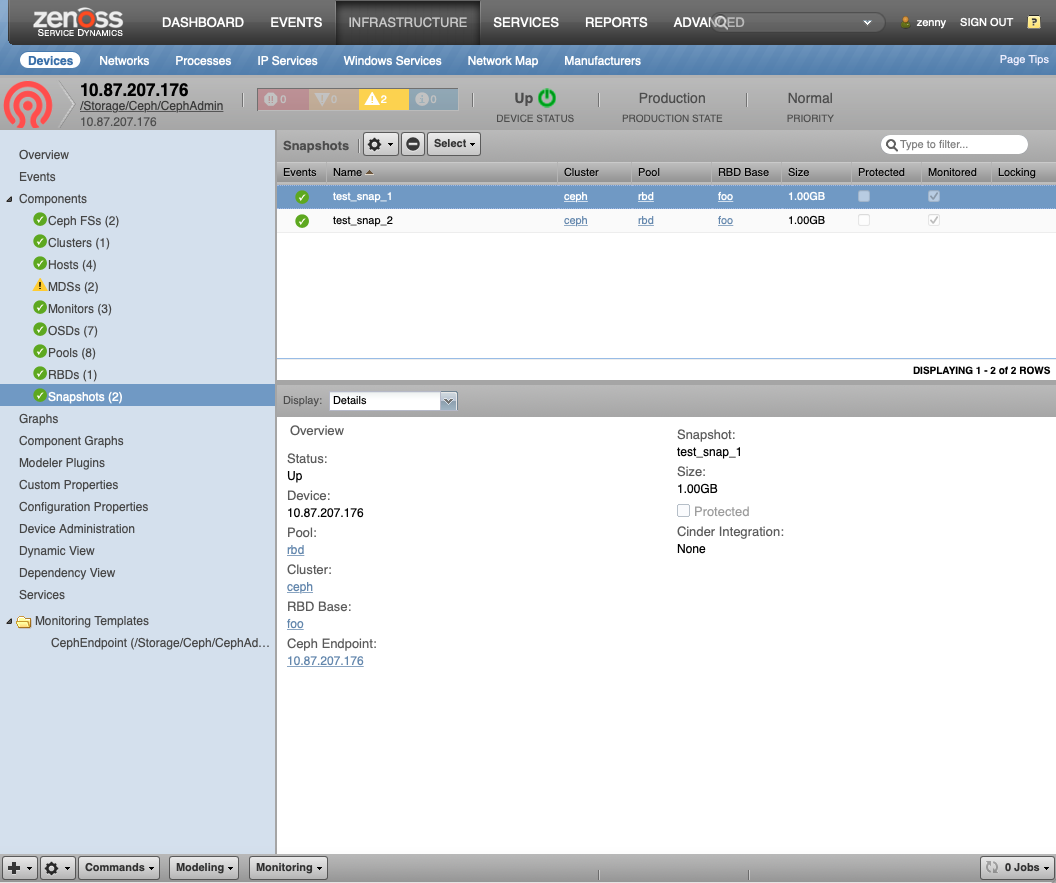
Ceph Snapshots (CephSnap)
- Description: Snapshot block devices for backups and copy-on-write (COW) images
- Attributes: size, protected
- Relationships: cephCluster, cephPool, cephRBD
- Datasources: None
Usage
Recall that we have two types of API connectivity to Ceph: Calamari and SSH.
ZenPack setup with Calamari/Graphite
The Calamari API is outlined here.
Calamari/Graphite setup is covered here. You must have access to both the Calamari and Graphite APIs which are bundled into the Calamari packages. Calamari has other dependencies that must be installed on the Ceph cluster.
Installation consists of the following steps:
- If possible, ensure Linux hosts are not configure: See Host Discovery below
- Ensure all prerequisite ZenPacks are installed
- Install the Ceph ZenPack on Zenoss
- Restart all Zenoss Services
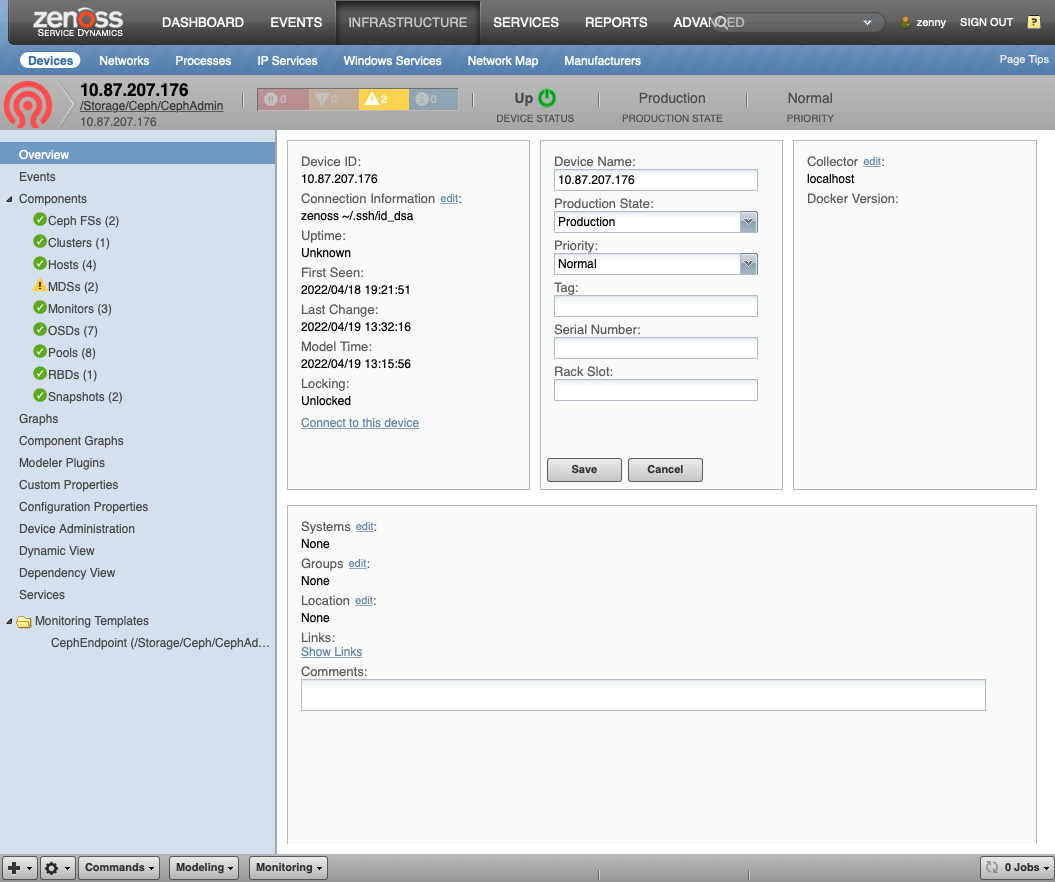
- Install the target device in Zenoss:
- Go to Infrastructure tab
- Add Ceph Endpoint, set properties as follows:
- Device Name: Use a unique name for the endpoint
- Calamari Host IP
- Calamari User Name: See zCephCalamariUsername
- Calamari Password: See zCephCalamariPassword
- Collector: Choose the appropriate Collector
Calamari/Graphite Batch Configuration
You can also add your devices in batch for convenience and automation.
-
Attach to the Zope container:
serviced service attach zope -
Create a text file (filename: /tmp/ceph.txt) as follows:
/Devices/Storage/Ceph ceph zCephCalamariUrl='http://calamari.fqdn/api/v2', \ zCephCalamariUsername='username', \ zCephCalamariPassword='password', \ zCephGraphiteUrl='http://calamari.fqdn/render' -
Now run the zenbatchload command:
zenbatchload /tmp/ceph.txt -
The Ceph device should be modeled automatically
SSH Configuration for Ceph Octopus/Pacific cluster versions
For SSH access you must enable an SSH account on each Ceph cluster server. Make sure all your Ceph cluster servers have the Zenoss ssh key install as per the SSH section of Prepare Remote Device Document. We recommend setting up a dedicated user with restricted access.
Ssh authentication can take two forms:
- An SSH user/password combination (via zCommandUsername, zCommandPassword)
- An SSH public/private key pair (via zKeyPath)
SSH Public Key Authentication
- Select Configuration Properties from the left-hand pane to access zProperties.
- Ensure that a zCommandUsername is set to the username to use for remote access to the server. If blank, the remote access username defaults to zenoss .
- Ensure that a zKeyPath is set properly -- the default is ~/.ssh/id_rsa. The tilde is short-hand for the Zenoss user home directory (/home/zenoss)
- Generate an SSH key as the zenoss user, using ssh-keygen. A public and private key will be generated and placed in ~/.ssh/id_rsa and ~/.ssh/id_rsa.pub, respectively.
- Append the contents of the ~/.ssh/id_rsa.pub file to the remote Ceph node's ~/.ssh/authorized_keys file to allow access.
Note: All Zenoss 6.X+, operations on Zenoss need to be carried out in a Zope container. Since ~/.ssh/* is part of the Zenoss 5.X Distributed Filesystem (DFS) there is no need to commit the container. Also note that the SSH credentials will persist beyond any upgrades.
Complex SSH setup on your Ceph servers is beyond the scope of this document. Please reference SSH documentation for more information.
Sudo Configuration
We recommend that you setup sudo on your Ceph servers so that the following commands can be used by your ssh user:
-
zCephRBDCommand: sudo /usr/bin/rbd --format json
-
zCephCommand: sudo /usr/bin/ceph -f json-pretty
-
Ceph admin sockets dir: sudo sh -c "ls\ -1\ /var/run/ceph*"
-
To setup sudoers file, as root, add a file called /etc/sudoers.d/zenoss on each host as follows:
Defaults:zenoss !requiretty Cmnd_Alias ZENOSS_CMDS = \ /usr/bin/rbd --format json *, \ /usr/bin/ceph -f json-pretty *, \ /bin/sh -c ls\ -1\ /var/run/ceph/* zenoss ALL=(ALL) NOPASSWD: ZENOSS_CMDS -
Manual Check: Ensure for Ceph Admin host that the following commands result in a valid response
sudo /usr/bin/ceph -f json-pretty health
sudo /usr/bin/rbd --format json showmapped
sudo /bin/sh -c  'ls -1 /var/run/ceph/*/*.asok'
Note: The sudo command for sockets is only required if your Zenoss user in not the ceph user used to setup your Ceph servers. You can verify this by executing the command as your Zenoss user on one of the Ceph nodes, both with and without sudo. Also note that /var/run/ceph is sometimes a soft link to /run/ceph. See zCephSocketDir in Configuration and zProperties.
Ceph Octopus/Pacific versions cluster modelling
-
If possible, ensure Ceph Linux nodes are not configure: See Host Discovery below.
-
Install the Ceph ZenPack on Zenoss
-
Restart all Zenoss Services
-
Add the device:
- Go to Infrastructure tab
- Add Single Device: set properties as follows:
- Hostname or IP address: Use Ceph Admin node real IP or DNS name
- Title: Use common Ceph Admin node name or set same as Hostname
- Device Class: /Storage/Ceph/CephAdmin
- Collector: Choose the appropriate Collector
- Uncheck Model Device
- Click on More
- Set zCommandUsername and zCommandPassword if doing SSH password
- Set zKeyPath if doing public-key authentication
- Click on Add
-
After refreshing Infrastructure, go into the device's Configuration Properties and:
-
Ensure all other zProperties are correct.
-
Click on Model Device
-
Note
There is a separate device class for the latest Ceph Octopus/Pacific versions - '/Storage/Ceph/CephAdmin'. So in the latest ZenPack version devices with Ceph Octopus/Pacific versions can not be modelled under other device classes.
SSH Batch Configuration (Octopus/Pacific)
Installation is easiest and simplest with zenbatchload as follows:
-
Attach to the Zope container:
serviced service attach zope -
Create a text file (filename: /tmp/ceph.txt) as follows:
/Devices/Storage/Ceph/SSH ceph.ssh zCommandUsername='username', \ zCommandPassword='password', \ zCephDiscoverHosts=True, \ setPerformanceMonitor='collector7' -
If you are using SSH public key authentication, you must verify that the public portion of the key referenced in zKeyPath is installed in the ~/.ssh/authorized_keys file for the appropriate user on the Ceph nodes. In addition, set the zKeyPath (if different from the default) in your batch file as:
/Devices/Storage/Ceph/SSH
ceph.ssh zCommandUsername='username', \
          zCommandPassword='', \
          zCephDiscoverHosts=True, \
          setPerformanceMonitor='collector7', \
          zKeyPath='~/.ssh/id_rsa'
Note: If you are using SSH key-pair authentication, you may not need zCommandUsername and zCommandPassword as above.
-
Run the zenbatchload command:
zenbatchload /tmp/ceph.txt -
The Ceph device should be modelled automatically.
SSH Configuration for Ceph older versions
For SSH access you must enable an SSH account on each Ceph cluster server. Make sure all your Ceph cluster servers have the Zenoss ssh key install as per the SSH section of Prepare Remote Device Document. We recommend setting up a dedicated user with restricted access.
Ssh authentication can take two forms:
- An SSH user/password combination (via zCommandUsername, zCommandPassword)
- An SSH public/private key pair (via zKeyPath)
SSH Public Key Authentication
- Select Configuration Properties from the left-hand pane to access zProperties.
- Ensure that a zCommandUsername is set to the username to use for remote access to the server. If blank, the remote access username defaults to zenoss .
- Ensure that a zKeyPath is set properly -- the default is ~/.ssh/id_rsa. The tilde is short-hand for the Zenoss user home directory (/home/zenoss)
- Generate an SSH key as the zenoss user, using ssh-keygen. A public and private key will be generated and placed in ~/.ssh/id_rsa and ~/.ssh/id_rsa.pub, respectively.
- Append the contents of the ~/.ssh/id_rsa.pub file to the remote Ceph node's ~/.ssh/authorized_keys file to allow access.
Note: All Zenoss 6.X+, operations on Zenoss need to be carried out in a Zope container.
Since ~/.ssh/* is part of the Zenoss 5.X Distributed Filesystem (DFS) there is no need to commit the container.
Also note that the SSH credentials will persist beyond any upgrades.
Complex SSH setup on your Ceph servers is beyond the scope of this document. Please reference SSH documentation for more information.
Sudo Configuration
We recommend that you setup sudo on your Ceph servers so that the following commands can be used by your ssh user:
-
zCephRBDCommand: sudo /usr/bin/rbd --format json
-
zCephCommand: sudo /usr/bin/ceph -f json-pretty
-
Ceph admin sockets: sudo sh -c "ls -1 /var/run/ceph/*.asok"
-
To setup sudoers file, as root, add a file called /etc/sudoers.d/zenoss on each host as follows:
Defaults:zenoss !requiretty Cmnd_Alias ZENOSS_CMDS = \ /usr/bin/rbd --format json *, \ /usr/bin/ceph -f json-pretty *, \ /bin/sh -c ls\ -1\ /var/run/ceph/*.asok zenoss ALL=(ALL) NOPASSWD: ZENOSS_CMDSNote: If you use sudo in zCephDockerCommand for Docker commands, adjust your batchfile as follows:
Cmnd_Alias ZENOSS_CMDS = \ /usr/bin/rbd --format json *, \ /usr/bin/ceph -f json-pretty *, \ /bin/sh -c ls\ -1\ /var/run/ceph/*.asok, \ /usr/bin/docker * -
Manual Check: Ensure for each host that the following commands result in a valid response:
sudo /usr/bin/ceph -f json-pretty health
sudo /usr/bin/rbd --format json showmapped
sudo /bin/sh -c  'ls -1 /var/run/ceph/*.asok'
Note
The sudo command for sockets is only required if your Zenoss user in not the ceph user used to setup your Ceph servers.
You can verify this by executing the command as your Zenoss user on one of the Ceph nodes, both with and without sudo.
Also note that /var/run/ceph is sometimes a soft link to /run/ceph. See zCephSocketDir in Configuration and zProperties.
Installation consists of the following steps:
-
If possible, ensure Ceph Linux nodes are not configured: See Host Discovery below.
-
Install the Ceph ZenPack on Zenoss
-
Restart all Zenoss Services
-
Add the device:
- Go to Infrastructure tab
- Add Single Device: set properties as follows:
- Hostname or IP address: Use a unique name for the endpoint: Don't use any real IP or DNS name!
- Title: Use same as Hostname
- Device Class: /Storage/Ceph/SSH
- Collector: Choose the appropriate Collector
- Uncheck Model Device
- Click on More
- Set zCommandUsername and zCommandPassword if doing SSH password
- Set zKeyPath if doing public-key authentication
- Click on Add
-
After refreshing Infrastructure, go into the device's Configuration Properties and:
-
Set zCephHosts as the list of your Ceph Hosts, one FQDN or IP per line. If you use containers the format should be:
<fqdn>:<container_name>For example:
192.168.10.1:cephmon 192.168.10.2:cephmon 192.168.10.3:cephmon -
Ensure all other zProperties are correct.
- Click on Model Device
-
SSH Batch Configuration (older versions)
Installation is easiest and simplest with zenbatchload as follows:
-
Attach to the Zope container:
serviced service attach zope -
Create a text file (filename:
/tmp/ceph.txt) as follows:/Devices/Storage/Ceph/SSH ceph.ssh zCommandUsername='username', \ zCommandPassword='password', \ zCephDiscoverHosts=True, \ setPerformanceMonitor='collector7', \ zCephHosts=['ceph1.url','ceph2.url','ceph3.url', ...] -
If you use containerized environment where some Ceph nodes run in Docker containers your batch file will look like this:
/Devices/Storage/Ceph/SSH ceph.ssh zCommandUsername='username', \ zCommandPassword='password', \ zCephDiscoverHosts=True, \ setPerformanceMonitor='collector7', \ zCephHosts=['ceph1.url:ContainerOne','ceph2.url:ContainerTwo','ceph3.url', ...] -
If you require sudo access for Docker, add the zCephDockerCommand:
/Devices/Storage/Ceph/SSH ceph.ssh zCommandUsername='username', \ zCommandPassword='password', \ zCephDiscoverHosts=True, \ setPerformanceMonitor='collector7', \ zCephHosts=['ceph1.url:ContainerOne','ceph2.url:ContainerTwo','ceph3.url', ...], \ zCephDockerCommand='sudo docker' -
If you are using SSH public key authentication, you must verify that the public portion of the key referenced in zKeyPath is installed in the ~/.ssh/authorized_keys file for the appropriate user on the Ceph nodes. In addition, set the zKeyPath (if different from the default) in your batch file as:
/Devices/Storage/Ceph/SSH ceph.ssh zCommandUsername='username', \ zCommandPassword='', \ zCephDiscoverHosts=True, \ setPerformanceMonitor='collector7', \ zKeyPath='~/.ssh/id_rsa', \ zCephHosts=['ceph1.url:ContainerOne','ceph2.url:ContainerTwo', ...], \ zCephDockerCommand='sudo docker' -
Note: if you are using SSH key-pair authentication, you may not need zCommandUsername and zCommandPassword as above.
-
Ensure to include ALL your Ceph servers in the zCephHosts including:
- Ceph Monitors
- Ceph OSDs
- Ceph MDSs
- Ceph RDWs
-
Run the zenbatchload command:
zenbatchload /tmp/ceph.txt -
The Ceph device should be modeled automatically
Event Transformation
All events in Ceph ZenPack are mapped to a target modeled device - Ceph Endpoint. In order to map events which were raised by Ceph services which are running on separate devices in a cluster we can use event transformation.
Here is an example on how we can map OSD, MON and other events to devices where this services are running:
-
In the Resource Manager click on the "Events" tab.
-
Then choose "Event Classes" and select "Transforms" from a dropdown.
-
From the left pane select "Status" event class.
-
Add following code to "Transform for: /Event/Status" block:
# Check if event DeviceClass is "/Storage/Ceph/CephAdmin" and component has "cephHost" attribute filled.

if getattr(evt, 'DeviceClass', None) == "/Storage/Ceph/CephAdmin" and getattr(component, 'cephHost', None):

    # Retrieve Ceph Host hostname and truncate it to needed FQDN form.
    ceph_host = component.get_cephHost().replace('cephHost-', '', 1)

    # Check if component hostname differs from device name.
    if ceph_host != device.id:

        # Change event default event "Resource" field to component hostname.
        evt.device = ceph_host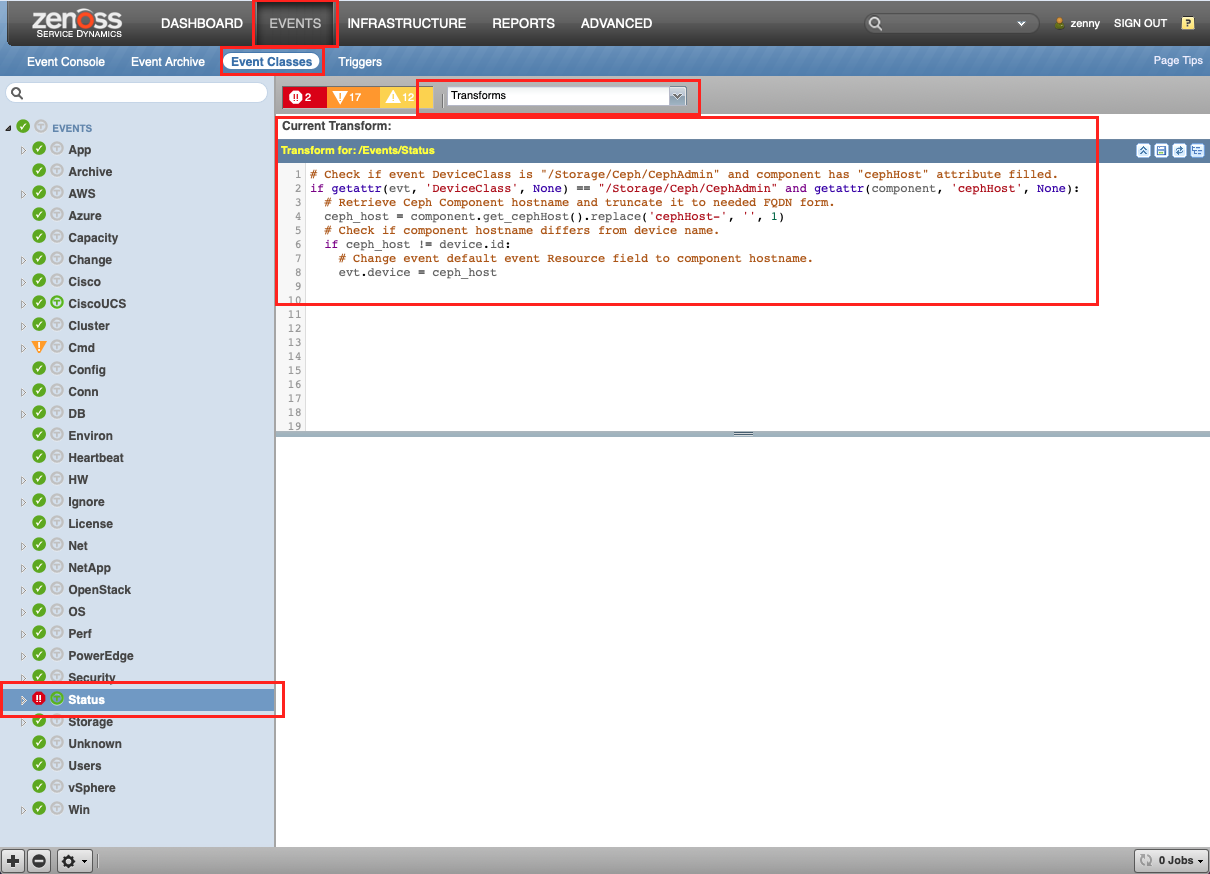
After you perform these steps you will be able to see OSD, MON and other "Status" events related to these services devices.
Note
You can specify your own event transformation rules for any needed use case.
TroubleShooting
If you see events that look like:
ceph health' JSON format has changed in luminous. If you see this your
monitoring system is scraping the wrong fields. Disable this with 'mon health
preluminous compat warning = false'
You can disable those notices by updating /etc/ceph/ceph.conf and
restarting your monitor services:
mon_health_preluminous_compat = true
mon health preluminous compat warning = false
Host Discovery
If you have set zCephDiscoverHosts to true, then the first time you visit the Hosts components, each host listed there will be created as a device of type zCephHostDeviceClass.
These hosts will not be modeled until you provide the appropriate zProperties in each host so that the modeler can have proper access.
If your hosts already exist, they should have the same hostname that Ceph believes them to be, either from Ceph's DNS servers for from /etc/hosts files. To avoid having multiple versions of the hosts, you should first remove the hosts from Zenoss prior to installing your first Ceph cluster.
Linux Host Setup Tips
Warning: We recommend against manually configuring Linux Ceph nodes!
Host device names should use the same FQDN hostname that Ceph ZenPack is expecting whenever possible. Choosing different device names will complicate this process. Therefore it is highly recommended that you do not manually pre-configure those Linux devices, but rather allow the Ceph ZenPack to automatically discover and configure those devices at model time.
If this is not possible, you may have to re-name and re-configure those hosts and place them into the desired device classes manually.
Installed Items
Installing this ZenPack will add the following items to your Zenoss system:
Configuration and zProperties
The zProperties and example format settings for the Ceph are as follows:
Under the Calamari/Graphite API:
- zCephCalamariUrl: URL for Calamari, format:
<http://calamari.fqdn/api/v2> - zCephGraphiteUrl: URL for Graphite, format:
<http://calamari.fqdn/render> - zCephCalamariUsername: Calamari Username
- zCephCalamariPassword: Calamari Password
Under the SSH API for Ceph Octopus/Pacific versions:
- zCommandUsername: The SSH username for your servers
- zCommandPassword: The SSH password for your servers
- zCephSocketDir: Ceph admin socket folder. Default:
/var/run/ceph/ - zCephCommand: Ceph command for data acquisition. Default:
sudo /usr/bin/ceph -f json-pretty - zCephRBDCommand: Command to access RBD data. Default:
sudo
    /usr/bin/rbd --format json
Under the SSH API for older Ceph versions:
- zCommandUsername: The SSH username for your Ceph Admin node
- zCommandPassword: The SSH password for your Ceph Admin node
- zCephHosts: All Ceph Monitors and OSD server IP or FQDN, one host per line
- zCephSocketDir: Ceph admin socket folder. Default:
/var/run/ceph/ - zCephCommand: Ceph command for data acquisition. Default:
sudo /usr/bin/ceph -f json-pretty - zCephRBDCommand: Command to access RBD data. Default:
sudo /usr/bin/rbd --format json - zCephDockerCommand: Command to execute Docker commands in
containers. Default:
docker
For all API:
- zCephDiscoverHosts: Boolean to create Linux devices. Default: false
- zCephHostDeviceClass: Hosts with zCephDiscoverHosts set true will belong to this device class. Default: /Server/Linux
Modeler Plugins
- zenoss.Ceph for Calamari API
- zenoss.CephAdmin for Ceph Octopus/Pacific versions SSH API
- zenoss.CephSSH for Ceph older versions SSH API
Zenoss Analytics
This ZenPack provides additional support for Zenoss Analytics. Perform the following steps to install extra reporting resources into Zenoss Analytics after installing the ZenPack.
Note: Zenoss Analytics may not work with the latest Ceph Octopus/Pacific versions.
- Copy analytics-bundle.zip from $ZENHOME/ZenPacks/ZenPacks.zenoss.Ceph*/ZenPacks/zenoss/Ceph/analytics/ on your Zenoss server.
- Navigate to Zenoss Analytics in your browser.
- Login as superuser.
- Remove any existing Ceph_ZenPack folder.
- Choose Repository from the View menu at the top of the page.
- Expand Public in the list of folders.
- Right-click on Ceph_ZenPack folder and choose Delete.
- Confirm deletion by clicking OK.
- Add the new Ceph_ZenPack folder.
- Choose Server Settings from the ''Manage' menu at the top of the page.
- Choose Import in the left page.
- Remove checks from all check boxes.
- Click Choose File to import a data file.
- Choose the analytics-bundle.zip file copied from your Zenoss server.
- Click Import.
You can now navigate back to the Ceph_ZenPack folder in the repository to see the following resources added by the bundle.
Domains
- Ceph Domain
Domains can be used to create ad-hoc views using the following steps.
- Choose Ad Hoc View from the Create menu.
- Click Domains at the top of the data chooser dialog.
- Expand Public then Ceph ZenPack.
- Choose the Ceph Domain domain
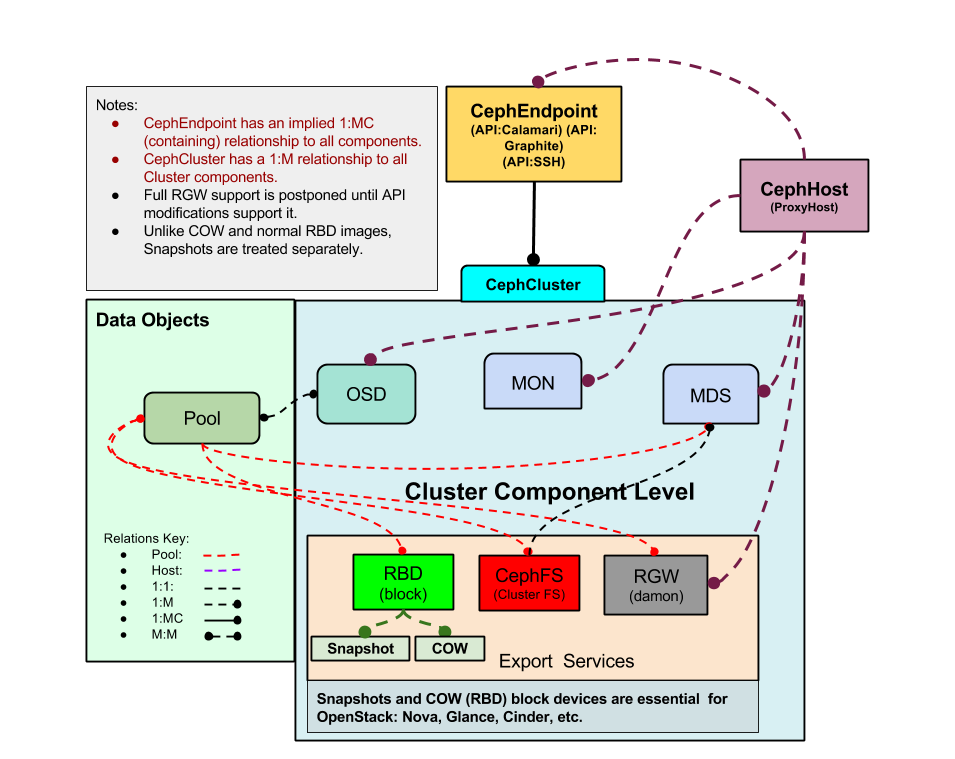
Service Impact and Root Cause Analysis
When combined with the Zenoss Service Dynamics product, this ZenPack adds built-in service impact and root cause analysis capabilities for Ceph. The service impact relationships shown in the diagram (right) and described below are automatically added and maintained. These will be included in any services that contain one or more of the explicitly mentioned components.
The following Ceph objects types would typically be added to Impact services.
- Cluster
- Hosts
- Monitors
- OSDs
- MDSs
- Ceph FSs
- RBDs
- Pools
- Pool
- Snapshots
- Ceph Endpoint (Ceph Admin node)
Impact Relationships between Ceph Components
- Ceph Endpoints impact all managed Ceph Hosts.
- Ceph Hosts impact the Mon, and OSD processes they're running.
- Ceph Mons impact their associated cluster.
- Ceph Clusters impact all associated Ceph Pools, and MDS if Ceph FS is used.
- Ceph OSDs impact their associated pools.
- Ceph Pools impact all RBDs, Snapshots, and Ceph FSs that use them.
- Ceph RBDs impact any associated snapshots.
- Ceph MDS impacts all associated Ceph FSs.
OpenStack Integration
The Ceph ZenPack has support for OpenStack integration of RBD images to OpenStack volumes and snapshots.
OpenStack Integration requires:
- Your OpenStack cluster is fully integrated with your Ceph cluster
- The Ceph ZenPack version 2.0.0+ is installed and modeled
- The OpenStackInfrastructure ZenPack version 2.2.0+ is installed and modeled
- The OpenStack (/Server/SSH/Linux/NovaHost) block devices are fully modeled
Once integration is achieved, you should expect to see corresponding volume links in the respective component details relating Ceph RBDs to OpenStack volumes and snapshots.
Known Issues
-
On adding an SSH device via UI, if you see:
ERROR zen.ZenDisc: Error: No IP found for name <device_id>just open the device and remodel it. The instructions indicate that you should uncheck Model Device, which may have been overlooked.
-
On upgrade, you can safely ignore the following alias type errors:
   2019-05-08 00:25:16,726 warning zpl.zenpacklib: alias character length limit exceeded 31: cluster_monitor_election_lose__count, truncating
   2019-05-08 00:25:16,731 warning zpl.zenpacklib: alias character length limit exceeded 31: cluster_monitor_election_win__count, truncating
   2019-05-08 00:25:20,274 warning zpl.zenpacklib: alias character length limit exceeded 31: cluster_osd_size_available__byte, truncating
   2019-05-08 00:25:26,381 warning zpl.zenpacklib: alias character length limit exceeded 31: cluster_monitor_election_lose__count, truncating
   2019-05-08 00:25:26,384 warning zpl.zenpacklib: alias character length limit exceeded 31: cluster_monitor_election_win__count, truncating

Those errors are related to the older ZenPack and not the updated one.
Changes
2.2.1
- Added support of Collection Zone 7.2.0
- Impove Ceph Cluster components event generation (ZPS-8250)
- Fix Ceph Cluster modeling if "rbd" default pool is not specified (ZPS-8314)
- Tested with Zenoss 6.7.0, Zenoss Cloud and Service Impact 5.7.0
2.2.0
- Add support for Ceph Octopus/Pacific versions via SSH API (ZPS-7959)
- Add new modeler plugin CephAdmin for Ceph Octopus/Pacific versions (ZPS-8061)
- Update metrics monitoring for Ceph Octopus/Pacific versions (ZPS-8101)
- Update events creation for Ceph Octopus/Pacific versions (ZPS-8118)
- Add PG States and OSD Disk Space metrics for Ceph Octopus/Pacific versions via SSH API (ZPS-8150)
- Tested with Zenoss 6.6.0, Zenoss Cloud and Service Impact 5.5.5.0.0
2.1.0
- Add backend_addr to host components (ZPS-281)
- Clarify and enhance docs for sudoers (ZPS-270)
- Change Pool IO to rate instead of gauge (ZPS-3039)
- Guard against missing d.cephProxyComponentUUID in DeviceProxy (ZPS-4945)
- Fix pre-Luminous health-check errors (ZPS-5738)
- Use sudo fallback for .asok sockets in modeler (ZPS-5246)
- Add sudo support for Docker containers (ZPS-5736)
- Clarify docs on installing SSH device (ZPS-5742)
- Tested with Zenoss Cloud, Zenoss 6.3.2 and Service Impact 5.3.4
2.0.1
- Upgrade txsshclient to fix critical change in twisted.conch (ZEN-25737)
- Reduce INFO logs in modeler to reduce noise (ZEN-25738)
2.0.0
- OpenStack integration for volumes and snapshots
- Added SSH type API connectivity to clusters
- Updated DynamicView and Impact relationships
- Add eventsClassKey mappings
- Improved error handling of API communications
- Improved Data Collection
- New Graphs: The following new graphs were added:
- Clusters: Utilization (SSH only)
- Pools: Pool Storage
- Pools: Pool IO
- Most Calamari Datapoints Renamed: All prior data besides Cluster PG States will be lost
- Moved Graphs: OSD Graphs were moved to Cluster:
- OSDs: OSD's In and Up
- OSDs: Disk Space
1.0.0
- Initial Release